
Nissan Juke Service and Repair Manual : Power supply and ground circuit
A/C auto AMP. : Diagnosis Procedure
1.CHECK SYMPTOM
Check symptom (A or B).
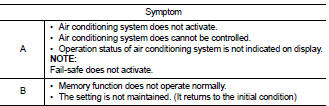
Which symptom is detected? A >> GO TO 2.
B >> GO TO 5.
2.CHECK FUSE
1. Turn ignition switch OFF.
2. Check 10A fuse (No. 3).
NOTE
:
Refer to PG-23, "Fuse and Fusible Link Arrangement".
Is the inspection result normal? YES >> GO TO 3.
NO >> Replace the blown fuse after repairing the affected circuit if a fuse is blown.
3.CHECK A/C AUTO AMP. IGNITION POWER SUPPLY
1. Disconnect A/C auto amp. connector.
2. Turn ignition switch ON.
3. Check voltage between A/C auto amp. harness connector and ground.

Is the inspection result normal? YES >> GO TO 4.
NO >> Repair harness or connector between A/C auto amp. and fuse.
4.CHECK A/C AUTO AMP. GROUND CIRCUIT FOR OPEN
1. Turn ignition switch OFF.
2. Check continuity between A/C auto amp. harness connector and ground.

Is the inspection result normal? YES >> Replace A/C auto amp. Refer to HAC-91, "Removal and Installation".
NO >> Repair harness or connector.
5.CHECK FUSE
1. Turn ignition switch OFF.
2. Check 10A fuse (No.7, located in fuse block (J/B)].
NOTE
:
Refer to PG-22, "Fuse, Connector and Terminal Arrangement".
Is the inspection result normal? YES >> GO TO 6.
NO >> Replace the blown fuse after repairing the affected circuit if a fuse is blown.
6.CHECK A/C AUTO AMP. BATTERY POWER SUPPLY
1. Disconnect A/C auto amp. connector.
2. Check voltage between A/C auto amp. harness connector and ground.

Is the inspection result normal? YES >> Replace A/C auto amp. Refer to HAC-91, "Removal and Installation".
NO >> Repair harness or connector between A/C auto amp. and fuse.
 B27A6, B27A7, B27A8, B27A9 mode door motor
DTC Logic
DTC DETECTION LOGIC
NOTE:
• If DTC is displayed along with DTC U1000, first perform the trouble diagnosis
for DTC U1000. Refer to HAC-
51, "DTC Logic".
• If DTC is displ ...
 A/C on signal
Component Function Check
1.CHECK A/C ON SIGNAL
With CONSULT-III
1. Turn ignition switch ON.
2. Operate blower motor.
3. Select “AIR CONDITIONER� of “BCM� using CONSULT-III.
4. Select “ ...
Other materials:
Passenger side door mirror defogger
Description
Heats the heating wire with the power supply from the rear window defogger
relay to prevent the door mirror
from fogging up.
Component Function Check
1.CHECK PASSENGER SIDE DOOR MIRROR DEFOGGER
1. Perform IPDM E/R Active Test (“REAR DEFOGGER�) using CONSULT-III.
2. Touch “O ...
Super lock actuator
Driver side : Component Function Check
1.CHECK FUNCTION
1. Select “DOOR LOCK� of “BCM� using CONSULT-III.
2. Select “SUPER LOCK� in “ACTIVE TEST� mode.
3. Check that the function operates normally according to the following
conditions.
Is the inspection result normal?
YES & ...
Front washer nozzle and tube
Exploded View
LHD models
1. Front washer nozzle LH
2. Front washer nozzle RH
3. Cowl top cover
4. Front washer tube (tank side)
5. Front washer tube RH
6. Front washer tube LH
: Vehicle front
Hydraulic Layout
1. Front washer nozzle
2. Check valve
3. Front washer
4. Washer tank ...
