Nissan Juke Service and Repair Manual : Side curtain air bag module
Exploded View
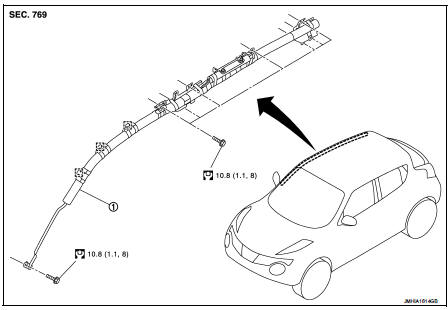
1. Side curtain air bag module
 : Metal clip
 : N·m (kg-m, ft-lb)
Removal and Installation
WARNING:
• Before servicing, turn ignition switch OFF, disconnect battery negative
terminal and wait 3 minutes
or more.
• Always work from the side of curtain air bag module. Never work in front of it.
• Never use the air tools or electric tools for servicing.
REMOVAL
1. Remove headlining assembly. Refer to INT-26, "Removal and Installation".
2. Remove the curtain air bag module mounting bolt that is located on the front pillar.
3. Disengage metal clips on the front roof.
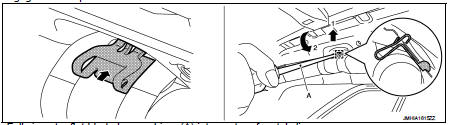
1. Fully insert a flat-bladed screwdriver (A) into center of metal clip.
2. Lift the flat-bladed screwdriver upward as shown in the figure and disengage upper side of metal clip.
3. Rotate the flat-bladed screwdriver as shown in the figure and disengage lower side of metal clip.
: Metal clip
CAUTION:
Never deform metal clip.
4. Disconnect side curtain air bag harness connector.
CAUTION:
• For installing/removing the side curtain air bag harness
connector, insert thin screwdriver wrapped in tape into
notch, lift lock and remove the connector.
• Install the connector with lock raised, and push lock into the connector.
• After installing the connector, check that the lock is pushed securely into it.
5. Remove the curtain air bag module mounting bolts that are located on the rear pillar.
6. Remove the curtain air bag module mounting bolts that are located on the center pillar.
7. Remove the curtain air bag module mounting bolts that are located on the inflator, and then remove curtain air bag module.
CAUTION:
• Never impact the side curtain air bag module.
• Replace the side curtain air bag module if it has been dropped or sustained an impact.
• Never insert any foreign objects (screwdriver, etc.) into the side curtain air bag module.
• Never disassemble the side curtain air bag module.
• Never expose the side curtain air bag module to temperatures exceeding 90 °C (194 °F).
• Never allow oil, grease, detergent, or water to come in contact with the side curtain air bag module
.
INSTALLATION
Note the following items, and then install in the reverse order of removal.
CAUTION:
• Insert metal clips of front roof until a locking sound is heard. Pull metal
clips and check that it is fully
locked to the vehicle body.
• Check perforation of curtain air bag module to check that curtain air bag module is not twisted.
• Never damage the harness while installing.
• If malfunction is detected by the air bag warning lamp, after repair or replacement of the malfunctioning parts, reset the memory using self-diagnosis or CONSULT-III. Refer to SRC-12, "On Board Diagnosis Function" or SRC-16, "CONSULT-III Function".
• After the work is completed, check that no system malfunction is detected by air bag warning lamp.
 Side air bag module
Exploded View
1. Side air bag module
2. Front seat assembly
: Do not reuse
: N·m (kg-m, in-lb)
Removal and Installation
WARNING:
• Before servicing, turn ignition switch OFF, disconnect b ...
 Crash zone sensor
Exploded View
1. Crash zone sensor
2. Bracket
: Vehicle front
: Do not reuse
N·m (kg-m, ft-lb)
Removal and Installation
WARNING:
• Before servicing, turn ignition switch OFF, disconnect ...
Other materials:
NISSAN Intelligent Key
NISSAN Intelligent Key fob (supplied as two complete sets)
Emergency mechanical key (integrated inside the fob)
Key number plate (one unique metal stamp plate)
Your vehicle is protected by advanced security pairing, meaning it can only be ...
Shift lock system
Component Function Check
1.CHECK SHIFT LOCK OPERATION (PART 1)
1. Turn ignition switch ON.
2. Shift the selector lever to “P” position.
3. Attempt to shift the selector lever to any other than position with the brake
pedal released.
Can the selector lever be shifted to any other positio ...
Wiring diagram
IPDM E/R
Wiring Diagram
For connector terminal arrangements, harness layouts, and alphabets in a
(option abbreviation; if not
described in wiring diagram), refer to GI-12, "Connector Information/Explanation
of Option Abbreviation".
...
