
Nissan Juke Service and Repair Manual : P182F coupling temperature sensor left
DTC Logic
DTC DETECTION LOGIC
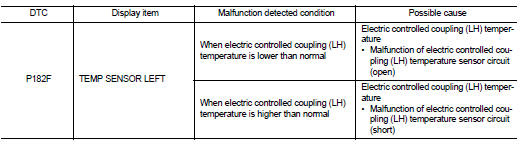
DTC CONFIRMATION PROCEDURE
1.PRECONDITIONING
If “DTC CONFIRMATION PROCEDURE� has been previously conducted, always turn ignition switch OFF and wait at least 10 seconds before conducting the next test.
>> GO TO 2.
2.DTC REPRODUCTION PROCEDURE
 With CONSULT-III
1. Turn the ignition switch OFF to ON.
2. Perform self-diagnosis for “ALL MODE AWD/4WD�.
Is DTC “P182F� detected? YES >> Proceed to diagnosis procedure. Refer to DLN-60, "Diagnosis Procedure".
NO >> INSPECTION END
Diagnosis Procedure
1.CHECK ELECTRIC CONTROLLED COUPLING (LH) TEMPERATURE SENSOR POWER SUPPLY
1. Turn the ignition switch OFF.
2. Disconnect transfer fluid temperature sensor harness connector.
3. Turn the ignition switch ON.
CAUTION:
Never start the engine.
4. Check the voltage between rear final drive assembly harness connector terminals.
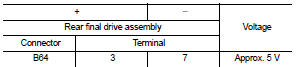
Is the inspection result normal? YES >> GO TO 3.
NO >> GO TO 2.
2.CHECK ELECTRIC CONTROLLED COUPLING (LH) TEMPERATURE SENSOR CIRCUIT
1. Turn the ignition switch OFF.
2. Disconnect 4WD control module harness connector.
3. Check the continuity between 4WD control module harness connector and rear final drive assembly harness connector.

4. Check the continuity between transfer fluid temperature sensor harness connector and ground.

Is the inspection result normal? YES >> GO TO 4.
NO >> Repair or replace error-detected parts.
3.CHECK ELECTRIC CONTROLLED COUPLING (LH) TEMPERATURE SENSOR
Check the electric controlled coupling (LH) temperature sensor. Refer to DLN-61, "Component Inspection".
Is the inspection result normal? YES >> GO TO 4.
NO >> Electric controlled coupling (LH) temperature sensor is malfunctioning. Replace electric controlled coupling (LH). Refer to DLN-139, "Removal and Installation".
4.CHECK TERMINALS AND HARNESS CONNECTORS
Check the pin terminals for damage or loose connection with each harness connector.
Is the inspection result normal? YES >> Replace 4WD control module. Refer to DLN-91, "Removal and Installation".
NO >> Repair or replace error-detected parts.
Component Inspect
1.CHECK ELECTRIC CONTROLLED COUPLING (LH) TEMPERATURE SENSOR
1. Turn the ignition switch OFF.
2. Disconnect rear final drive assembly harness connector.
3. Check the resistance between transfer control fluid temperature sensor connector terminals.
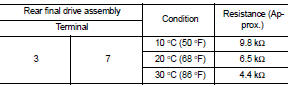
Is the inspection result normal? YES >> INSPECTION END
NO >> Electric controlled coupling (LH) temperature sensor is malfunctioning. Replace electric controlled coupling (LH). Refer to DLN-139, "Removal and Installation".
 P182E 4WD solenoid right
DTC Logic
DTC DETECTION LOGIC
1.PRECONDITIONING
If “DTC CONFIRMATION PROCEDURE� has been previously conducted, always turn
ignition switch OFF and
wait at least 10 seconds before conductin ...
 P1830 ABS operation signal
DTC Logic
DTC DETECTION LOGIC
DTC CONFIRMATION PROCEDURE
1.DTC REPRODUCTION PROCEDURE
With CONSULT-III
1. Start the engine and drive at 30 km/h (19 MPH) or more.
2. Perform self-diagnosis for ...
Other materials:
Speed limiter
Speed limiter : System Diagram
Speed limiter : System Description
INPUT/OUTPUT SIGNAL CHART
*: This signal is sent to the ECM through CAN communication line
BASIC SPEED LIMITER SYSTEM
• Speed limiter is a system that enables to restrict the vehicle speed within
the set speed that is se ...
Diagnosis and repair work flow
Work Flow
OVERALL SEQUENCE
DETAILED FLOW
1.INTERVIEW FOR MALFUNCTION
Interview the symptom to the customer.
>> GO TO 2.
2.SYMPTOM CHECK
Check the symptom from the customer's information.
>> GO TO 3.
3.BASIC INSPECTION
Check the operation of each part. Check that any sym ...
Trouble diagnosis
System Diagram
Condition of Error Detection
DTC (e.g. U1000 and U1001) of CAN communication is indicated on SELF-DIAG
RESULTS on CONSULT-III
if a CAN communication signal is not transmitted or received between units for 2
seconds or more.
CAN COMMUNICATION SYSTEM ERROR
• CAN communica ...
