Nissan Juke Service and Repair Manual : Light & rain sensor
Exploded View
CAUTION:
When the light & rain sensor is removed from windshield, the light & rain sensor
cannot be re-used.
REMOVAL
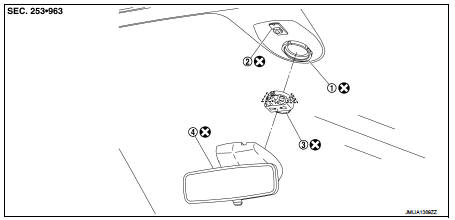
1. Light & rain sensor bracket
2. Mirror base
3. Light & rain sensor
4. Inside mirror assembly
 : Pawl
 : Do not reuse
Removal and Installation
REMOVAL
1. Remove inside mirror assembly. Refer to MIR-41, "Removal and Installation".
2. Disconnect light & rain sensor connector.
3. Disengage both sides of metal spring clips, and remove the light & rain sensor from the windshield.
INSTALLATION
Note the following items, and the install in the reverse order of removal.
CAUTION:
• Surface of windshield should be cleaned.
• Never touch gel/adhesive of new part.
• Lock the metal spring clips and install the light & rain sensor securely.
 Front fog lamp
Exploded View
1. Front fog lamp assembly
2. Metal clip
3. Front fog lamp bulb
4. Front fog lamp bracket
5. U nut
6. Front bumper fascia lower
: Pawl
: N·m (kg-m, in-lb)
Removal and Ins ...
 Lighting & turn signal switch
Removal and Installation
REMOVAL
Remove light & turn signal switch. Refer to BCS-94, "Removal and
Installation".
INSTALLATION
Install in the reverse order of removal. ...
Other materials:
Basic inspection
DIAGNOSIS AND REPAIR WORK FLOW
Work Flow
DETAILED FLOW
1.OBTAIN INFORMATION ABOUT SYMPTOM
Interview the customer to obtain as much malfunction information (conditions
and environment when the malfunction
occurred) as possible when the customer brings the vehicle in.
>> GO TO 2.
2. ...
Security indicator lamp does not turn on or blink
Description
Security indicator lamp does not blink when ignition switch is in a position
other than ON.
NOTE:
• Before performing the diagnosis, check “Work Flow”. Refer to SEC-187, "Work
Flow".
• Check that vehicle is under the condition shown in “CONDITIONS OF VEHICLE ...
Door mirror remote control switch
Exploded View
1. Instrument lower panel
2. Switch bracket
3. Door mirror remote control switch
Removal and Installation
REMOVAL
1. Remove the instrument lower panel. Refer to IP-13, "Removal and
Installation".
2. Remove mounting screws and remove switch bracket from instrument ...
