
Nissan Leaf 2018-2025 (ZE1) Owner's Manual : How to park with predicted course lines
WARNING
- If the factory tires are replaced with different sized tires or alternative aftermarket rims, the calculated trajectory metrics will be altered, and the predicted course lines may be displayed incorrectly on your console.
- On a snow-covered, icy, or otherwise slippery road surface, the vehicle's traction limits change, meaning there may be a noticeable difference between the predicted course line trajectory and the actual course line path traveled by the car.
- If the auxiliary 12-volt battery is disconnected or becomes completely discharged, the backup camera calibration data will reset temporarily, causing the predicted course lines to be displayed incorrectly on the multimedia screen.
If this calibration loss occurs, please perform the following physical driving realignment procedures to restore system accuracy:
- Turn the steering wheel fully from lock to lock in both directions while the EV (electric vehicle) powertrain system is running and in READY-to-drive mode.
- Drive the vehicle on a straight, flat road with stable lane markings for a continuous period of more than 5 minutes.
- When the steering wheel column is manually turned or adjusted while the power switch is in the auxiliary ACC position rather than the fully operational ON state, the sensor mapping can lag, and the predicted course lines may be displayed incorrectly.
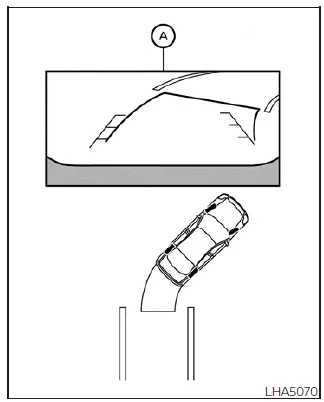
1. Always physically and visually check your surroundings to ensure that the designated parking space and adjacent perimeter are completely safe before beginning to back your vehicle into the slot.
2. A real-time wide-angle rear view of the vehicle is automatically displayed on the main infotainment screen A the exact moment the electronic shift selector lever is moved to the R (Reverse) position.
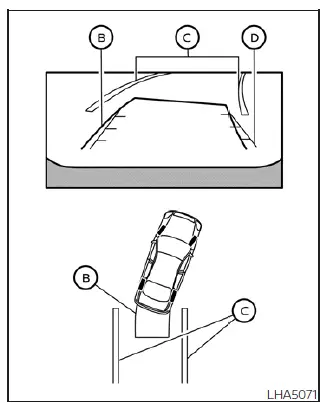
3. Slowly back up the vehicle into the zone, smoothly adjusting the steering wheel angle so that the curved, dynamic predicted course lines B safely enter the boundaries of the target parking space C.
4. Counter-steer and maneuver the steering wheel to align the vehicle width guide lines D perfectly parallel to the parallel markers of the parking space C while continuously referring to the trajectory path shown by the predicted course lines.
5. Once your vehicle is parked in the space completely and aligned straight, firmly push the electronic P (Park) position switch on the center selector module and apply the manual or electronic parking brake.
Adjusting the screen
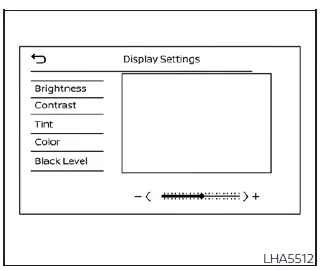
1. Press the physical hardware MENU button located on the display bezel assembly.
2. Touch the contextual "Settings" key option on the digital interface screen.
3. Touch the designated "Camera" key to open up the specialized driver assistance configurations.
4. Touch the specific "Display Settings" key to change the screen attributes.
5. Touch the corresponding "Brightness", "Contrast", "Tint", "Color", or "Black Level" key depending on your current ambient cabin lighting conditions.
6. Adjust the selected calibration item by repeatedly touching the "+" or "-" key indicators on the interactive touch-screen display panel.
NOTE:
To avoid driver distraction, do not attempt to adjust any of the digital display settings of the RearView Monitor while the vehicle is actively moving. Make sure the vehicle is fully stationary and the parking brake is firmly applied before modifying parameters.
How to turn on and off predicted course lines
To toggle the graphic overlay of the predicted course lines ON and OFF while the vehicle transmission is safely held in the P (Park) position:
1. Touch the global "Settings" key on the central multimedia interface home menu.
2. Touch the specific "Camera" key option from the sub-menu.
3. Touch the interactive "Predicted Course Lines" key icon to switch the feature ON or OFF according to your visual preference.
Alternatively, pressing the physical CAMERA button on the console bezel while the shift selector lever is actively resting in the R (Reverse) position can also instantly turn on and off the predicted course lines overlay.
 RearView Monitor system operation
The automated RearView Monitor system is programmed to automatically display a live wide-angle view of the area directly behind the vehicle on the central console screen as soon ...
 RearView Monitor system limitations
WARNING
Listed below are the inherent technical system limitations of the RearView Monitor equipment. Failure to operate your vehicle in accordance with these specific system limitations could ca ...
Other materials:
Diagnosis and repair workflow
Work Flow
OVERALL SEQUENCE
DETAILED FLOW
1.GET INFORMATION FOR SYMPTOM
Get the detailed information from the customer about the symptom (the
condition and the environment when
the incident/malfunction occurred) using the “Diagnostic Work Sheet�. (Refer to
EC-539, "Diagnostic Work ...
Hazard switch
Component Function Check
1.CHECK HAZARD SWITCH SIGNAL BY CONSULT-III
CONSULT-III DATA MONITOR
1. Turn the ignition switch ON.
2. Select “HAZARD SW� of BCM (FLASHER) data monitor item.
3. With operating the hazard switch, check the monitor status.
Is the inspection result normal?
YES > ...
Steering does not lock
Description
Steering does not lock when door is open while ignition switch is OFF.
NOTE:
Before performing the diagnosis, check “Work Flow�. Refer to SEC-47, "Work
Flow".
Diagnosis Procedure
1.CHECK DOOR SWITCH
Check door switch.
Refer to DLK-87, "Component Function C ...
