Nissan Juke Service and Repair Manual : High-mounted stop lamp
Exploded View
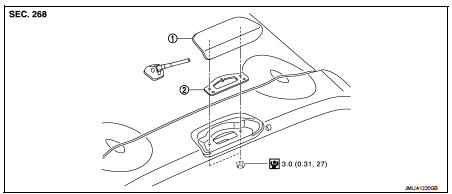
1. High-mounted stop lamp 2. Seal packing
 : N┬Ěm (kg-m, in-lb)
Removal and Installation
CAUTION:
Disconnect battery negative terminal or remove the fuse.
REMOVAL
1. Remove blind seal from back door inside.
CAUTION:
Be careful not to damage the blind seal, so that it can be reused.
2. Remove high-mounted stop lamp mounting nuts and connector.
3. Pull high-mounted stop lamp toward vehicle upside, and then remove high-mounted stop lamp.
INSTALLATION
Note the following item and then, install in the reverse order of removal.
CAUTION:
Seal packing cannot be reused.
 Rear combination lamp
Exploded View
REMOVAL
1. Grommet
2. Grommet
3. Rear combination lamp
: Clip
: N┬Ěm (kg-m, in-lb)
DISASSEMBLY
1. Rear combination lamp housing assembly
2. Back-up lamp bulb
3. Harness ...
 License plate lamp
Exploded View
1. License plate lamp housing assembly
2. Blub
3. License plate lamp blub socket
: Pawl
Removal and Installation
CAUTION:
Disconnect battery negative terminal or remove the fu ...
Other materials:
Auto door lock operation does not operate
Diagnosis Procedure
1.CHECK ÔÇťAUTO LOCK SETÔÇŁ SETTING IN ÔÇťWORK SUPPORTÔÇŁ
1. Select ÔÇťINTELLIGENT KEYÔÇŁ of ÔÇťBCMÔÇŁ using CONSULT-III.
2. Select ÔÇťAUTO LOCK SETÔÇŁ in ÔÇťWORK SUPPORTÔÇŁ mode.
3. Check ÔÇťAUTO LOCK SETÔÇŁ in ÔÇťWORK SUPPORTÔÇŁ.
Refer to DLK-43, "INTELLIGENT KEY : ...
Spark plugs
WARNING
Be sure the engine and ignition switch are off and that the parking brake
is engaged securely.
CAUTION
Be sure to use the correct socket to remove the spark plugs. An incorrect
socket can damage the spark plugs.
REPLACING SPARK PLUGS
If replacement is required, see a NISSAN dealer ...
Symptom diagnosis
COMBINATION SWITCH SYSTEM SYMPTOMS
Symptom Table
1. Perform ÔÇťData MonitorÔÇŁ of CONSULT-III to check for any malfunctioning
item.
2. Check the malfunction combinations.
3. Identify the malfunctioning part from the agreed combination and repair or
replace the part.
...
