Nissan Juke Service and Repair Manual : Rear combination lamp
Exploded View
REMOVAL
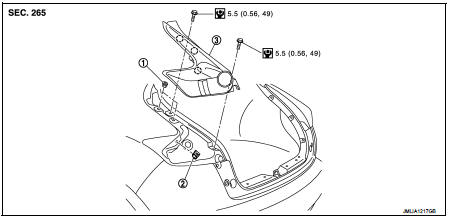
1. Grommet
2. Grommet
3. Rear combination lamp
 : Clip
 : N·m (kg-m, in-lb)
DISASSEMBLY
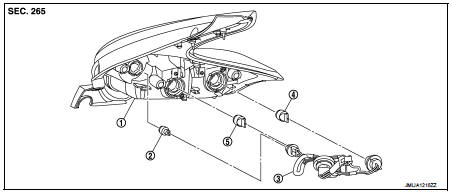
1. Rear combination lamp housing assembly
2. Back-up lamp bulb
3. Harness connector
4. Rear turn signall lamp bulb
5. Stop/tail lamp bulb
Removal and Installation
CAUTION:
• Disconnect the battery negative terminal or the fuse.
• When removing, always use a remover tool that is made of plastic.
REMOVAL
1. Full open back door 2. Remove luggage side lower finisher. Refer to INT-31, "LUGGAGE SIDE LOWER FINISHER : Removal and Installation".
3. Remove rear combination lamp mounting bolts.
4. Insert a remover tool into the rear combination lamp rear fender to disengage the clips.
5. Pull up rear combination lamp, and then remove rear combination lamp.
6. Disconnect rear combination lamp connector.
INSTALLATION
Install in the reverse order of removal.
Replacement
CAUTION:
• Disconnect the battery negative terminal or the fuse.
• Never touch the glass of bulb directly by hand. Keep grease and other oily matters away from it.
• Never touch bulb by hand while it is lit or right after being turned off.
• Never leave bulb out of lamp reflector for a long time because dust, moisture smoke, etc. may affect the performance of lamp. When replacing bulb, be sure to replace it with new one.
STOP/TAIL LAMP BULB
1. Remove rear combination lamp assembly. Refer to EXL-100, "Removal and Installation".
2. Rotate stop/tail lamp bulb socket counterclockwise, and then remove stop/tail lamp bulb socket.
3. Remove stop/tail lamp bulb from stop/tail lamp bulb socket.
REAR TURN SIGNAL LAMP BULB
1. Remove rear combination lamp assembly. Refer to EXL-100, "Removal and Installation".
2. Rotate rear turn signal lamp bulb socket counterclockwise, and then remove rear turn signal lamp bulb socket.
3. Remove rear turn signal lamp bulb from rear turn signal lamp bulb socket.
BACK-UP LAMP BULB
1. Remove rear combination lamp assembly. Refer to EXL-100, "Removal and Installation".
2. Rotate back-up lamp bulb socket counterclockwise, and then remove back-up lamp bulb socket.
3. Remove back-up lamp bulb from back-up lamp bulb socket.
 Headlamp aiming switch
Exploded View
1. Headlamp aiming switch
2. Instrument lower panel assembly LH
: Pawl
Removal and Installation
REMOVAL
1. Remove instrment lower panel (LH/RH). Refer to IP-13, "Removal an ...
 High-mounted stop lamp
Exploded View
1. High-mounted stop lamp
2. Seal packing
: N·m (kg-m, in-lb)
Removal and Installation
CAUTION:
Disconnect battery negative terminal or remove the fuse.
REMOVAL
1. Remove bli ...
Other materials:
Symptom diagnosis
Squeak and rattle trouble diagnoses
Work Flow
CUSTOMER INTERVIEW
Interview the customer if possible, to determine the conditions that exist
when the noise occurs. Use the Diagnostic
Worksheet during the interview to document the facts and conditions when the
noise occurs and any of
the cu ...
The seat belt reminder warning continues sounding, or
does not sound
Description
• Seat belt reminder warning does not sound.
• Seat belt reminder warning sounds continuously.
Diagnosis Procedure
1.CHECK SEAT BELT WARNING LAMP
1. Turn ignition switch ON.
2. Check the operation of the seat belt warning lamp in the combination meter.
Seat belt (driver side) ...
P0403 EGR volume control valve
DTC Logic
DTC DETECTION LOGIC
Diagnosis Procedure
1.CHECK EGR VOLUME CONTROL VALVE CONTROL CIRCUIT
1. Turn ignition switch OFF.
2. Disconnect EGR volume control valve harness connector and ECM harness
connector.
3. Check the continuity between EGR volume control valve terminal harness
co ...
