
Nissan Juke Service and Repair Manual : License plate lamp
Exploded View
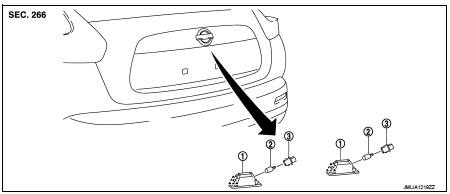
1. License plate lamp housing assembly
2. Blub
3. License plate lamp blub socket
 : Pawl
Removal and Installation
CAUTION:
Disconnect battery negative terminal or remove the fuse.
REMOVAL
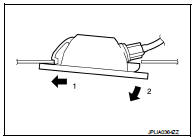
1. While pressing the license plate lamp to direction right side, pull it to direction outside and then remove it.
2. Disconnect license plate lamp connector.
INSTALLATION
Install in the reverse order of removal.
Replacement
CAUTION:
• Disconnect the battery negative terminal or the fuse.
• Never touch the glass of bulb directly by hand. Keep grease and other oily matters away from it.
• Never touch bulb by hand while it is lit or right after being turned off.
• Never leave bulb out of lamp reflector for a long time because dust, moisture smoke, etc. may affect the performance of lamp. When replacing bulb, be sure to replace it with new one.
LICENSE PLATE LAMP BULB
1. Remove license plate lamp.
2. Rotate the bulb socket counterclockwise and unlock it.
3. Remove the bulb from the socket.
 High-mounted stop lamp
Exploded View
1. High-mounted stop lamp
2. Seal packing
: N·m (kg-m, in-lb)
Removal and Installation
CAUTION:
Disconnect battery negative terminal or remove the fuse.
REMOVAL
1. Remove bli ...
 Rear fog lamp
Exploded View
REMOVAL
1. Rear fog lamp
DISASSEMBLY
1. Rear fog lamp housing
2. Rear fog lamp bulb
3. Rear fog lamp bulb sock
Removal and Installation
CAUTION:
Disconnect battery negativ ...
Other materials:
Rear window defogger system
Wiring Diagram - DEFOGGER CONTROL SYSTEM -
For connector terminal arrangements, harness layouts, and alphabets in a
(option abbreviation; if not
described in wiring diagram), refer to GI-12, "Connector Information/Explanation
of Option Abbreviation".
...
Wiring diagram
SRS AIR BAG SYSTEM
Wiring Diagram
For connector terminal arrangements, harness layouts, and alphabets in a
(option abbreviation; if not
described in wiring diagram), refer to GI-12, "Connector Information/Explanation
of Option Abbreviation".
...
Diagnosis system (A/C auto AMP.)
Description
Air conditioning system performs self-diagnosis, operation check, function
diagnosis, and various settings
using diagnosis function of each control unit.
CONSULT-III Function
CONSULT-III performs the following functions via CAN communication with A/C
auto amp.
NOTE:
Diagnos ...
