Nissan Juke Owners Manual : Fuel gauge
The gauge1 indicates the approximate fuel level in the tank.
The gauge may move slightly during braking, turning, acceleration, or going up or down hills.
Refill the fuel tank before the gauge registers 0 (empty).
The low fuel
warning light  illuminates when the
amount of fuel in the tank is getting low.
Refuel as soon as it is convenient, preferably before the gauge reaches 0. There will be a small reserve of fuel in the tank when the fuel gauge reaches 0.
The  indicates that the fuel-filler
door is located on the front passenger’s side of the vehicle.
CAUTION
• If the vehicle runs out of fuel, the
 malfunction indicator light (MIL)
may come on. Refuel as soon as possible. After a few driving trips, the
 light should turn off. If the light
remains on after a few driving trips, have the vehicle inspected by a NISSAN dealer.
• For additional information, see “Malfunction Indicator Light (MIL)” .
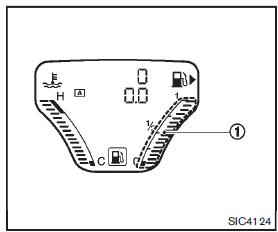
 Engine coolant temperature gauge
The gauge 1 indicates the engine coolant temperature.
The engine coolant temperature is within the normal range when the gauge is within
the zone 2 shown in the illustration.
The engine coolant te ...
 Vehicle information display
When the ignition switch is placed in the ON position, the vehicle information
display shows the following information:
1. Outside air temperature
2. Continuously Variable Transmission (CVT) pos ...
Other materials:
Brakes
If you notice that the braking system does not feel responsive or operate as expected, have the vehicle inspected immediately. We recommend visiting a NISSAN certified LEAF dealer for professional brake servicing.
WARNING
Never attempt to adjust the height of the brake pedal yourself. Tamp ...
Insufficient cooling
Description
Symptom
• Insufficient cooling
• No cool air comes out. (Air flow volume is normal.)
Diagnosis Procedure
NOTE:
Perform self-diagnoses with CONSULT-III before performing symptom diagnosis. If
any DTC is detected, perform
the corresponding diagnosis.
1.CHECK MAGNET CLUTCH O ...
Instrument panel
1. Meters and gauges
2. Center ventilator
3. Audio system or Navigation system
— Clock
4. Hazard warning flasher switch
5. Integrated Control System
— Drive mode
— Heater and air conditioner control
— Defroster switch
5. Heater and air conditioner control (models without Integrate ...
