Nissan Juke Owners Manual : Control panel buttons — color screen with navigation system (if so equipped)
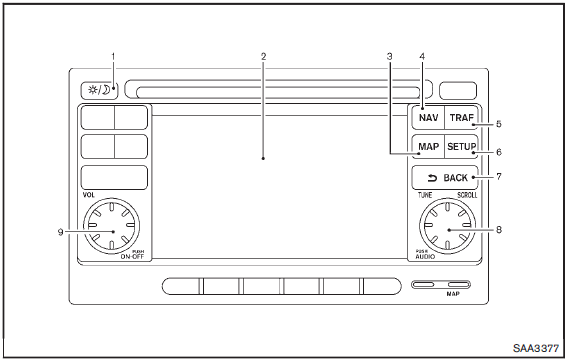
1.  (brightness control) button
2. Display screen
3. MAP button
4. NAV button
5. TRAF button
6. SETUP button
7.  BACK button
8. TUNE/SCROLL knob
9. Power button/Volume control knob
For navigation system control buttons, refer to the separate Navigation System Owner’s Manual.
When you use this system, make sure the engine is running.
If you use the system with the engine not running (ignition ON or ACC) for a long time, it will discharge the battery, and the engine will not start.
Reference symbols:
“Example” — Words marked in quotes refer to a key shown only on the display. These keys can be selected by touching the screen.
- How to use touch screen
- How to use the BACK button
- How to use brightness control and display ON/OFF button
- How to use the setup button
 Safety note
WARNING
• Do not disassemble or modify this system. If you do, it may result in accidents,
fire, or electric shock.
• Do not use this system if you notice any abnormality, such as a frozen screen ...
 How to use touch screen
CAUTION
• The glass screen on the liquid crystal display may break if it is hit with
a hard or sharp object. If the glass screen breaks, do not touch it.
Doing so could result in an injury.
• To ...
Other materials:
Door mirror (open/close motor)
Component Function Check
1.CHECK DOOR MIRROR RETRACT FUNCTION
1. Turn ignition switch ON.
2. Operate open/close switch. Check that door mirror operates normally.
Is the inspection result normal?
YES >> INSPECTION END
NO >> Refer to MIR-25, "Diagnosis Procedure".
Diagno ...
Symptom diagnosis
Noise, vibration and harshness
(NVH) Troubleshooting
NVH troubleshooting Chart
1. Locate the area where noise occurs.
2. Confirm the type of noise.
3. Specify the operating condition of engine.
4. Check specified noise source.
If necessary, repair or replace these parts.
A: Closely rel ...
Power supply and ground circuit
Diagnosis Procedure
1.CHECK GROUND CONNECTION
1. Turn ignition switch OFF.
2. Check ground connection E21 and E38. Refer to Ground Inspection in GI-44,
"Circuit Inspection".
Is the inspection result normal?
YES >> GO TO 2.
NO >> Repair or replace ground connection.
...
