
Nissan Leaf 2018-2025 (ZE1) Owner's Manual : Automatic climate control (models with Navigation System)
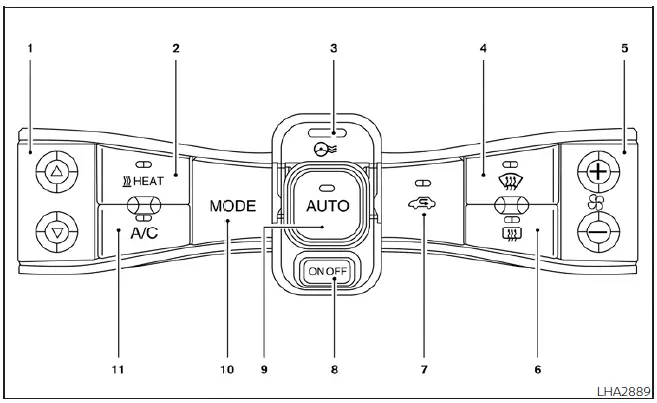
- Temperature control button (used to adjust the target cabin temperature up or down)
-
 HEAT button
- Climate Ctrl. Timer indicator (lights up when a pre-scheduled cabin warming or cooling session is armed)
-
 front defroster button
-
 fan speed control button
-
 Rear window and outside
mirror
(if so equipped) defroster switch
Rear window and outside
mirror
(if so equipped) defroster switch
-
 intake air control button
- Climate control system ON-OFF button (global toggle for checking or cutting total power to the blower unit)
- AUTO climate control ON button (engages the intelligent automated system computer mapping)
- MODE (manual air flow control) button (cycles through the available air distribution pathways)
- A/C (air conditioner) ON-OFF button (directly engages or disengages the mechanical cooling compressor loop)
Automatic operation (AUTO)
The highly efficient AUTO mode can be reliably used year-round, as the internal vehicle processor dynamically maintains a completely constant temperature, balanced air flow distribution patterns, and an optimized variable fan speed setting.
1. Press the dedicated AUTO switch button. The matching AUTO status indicator light will immediately illuminate on the console display screen.
2. Press the temperature control button to input your exact desired temperature parameters.
Please note that when any of the following specific override functions are manually operated by the driver, the automated mode will suspend and the AUTO indicator light will turn off.
- The
 HEAT or A/C button is physically pressed.
- The fan speed control button or the main ventilator air flow distribution mapping is manually operated.
However, any accompanying environmental functions that were not manually operated will continue running seamlessly in their background AUTO mode profiles.
NOTE:
- If the manual
 fan speed
control button, the MODE direction button, or the
fan speed
control button, the MODE direction button, or the
 intake air
control button is manually adjusted while the global AUTO program is in active use, all of the remaining unadjusted systems will continue operating normally in full AUTO mode.
intake air
control button is manually adjusted while the global AUTO program is in active use, all of the remaining unadjusted systems will continue operating normally in full AUTO mode. - While the central AUTO indicator light remains actively illuminated on the navigation screen, the auxiliary electrical power consumption of the vehicle air conditioner cooling unit is highly economized compared to the total baseline energy consumed while driving your Nissan Leaf with the AUTO indicator completely unlit.
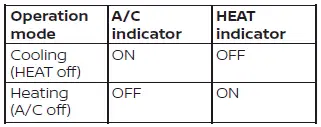
The integrated hardware HEAT indicator light and the separate A/C compressor indicator light will illuminate independently or in tandem according to the current real-time operation modes designated by the main climate control computer.
Manual operation
The manual configuration mode can be engaged at any point to gain direct user control over the internal heater core and air conditioner compressor loops to stabilize the cabin environment at your custom desired temperature.
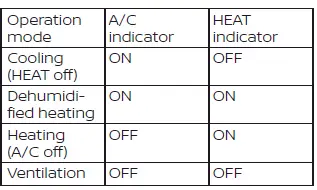
The dedicated hardware HEAT indicator light and the independent A/C compressor indicator light will light up or extinguish according to the selected user operation modes.
Cooling
1. Press the primary A/C button to engage active refrigeration and illuminate the accompanying A/C status indicator light.
2. Press the separate
 HEAT button to turn off the high-voltage heating matrix and ensure the HEAT indicator light goes fully dark.
- Do not adjust your target internal cabin temperature to a value higher than the actual ambient outside air temperature. Doing so can disrupt the tracking logic and prevent the target temperature from being controlled and balanced properly by the vehicle.
- A completely normal, visible vapor mist may sometimes be seen coming directly out of the ventilation vents under exceptionally hot and highly humid weather conditions due to the rapid cooling of incoming air. This physical moisture phenomenon is standard and does not indicate an equipment malfunction.
Dehumidified heating
1. Press the central A/C function button to engage the moisture removal process and illuminate the A/C dashboard indicator light.
2. Press the separate
 HEAT button to illuminate the matching HEAT indicator light and activate simultaneous thermal air processing.
NOTE:
The auxiliary electric power consumption of your Nissan Leaf climate control module increases drastically while the primary A/C button indicator and the separate
 HEAT button indicator are allowed to simultaneously illuminate. Because both systems pull energy at the same time, your total available driving range may be decreased.
Heating (A/C off)
1. Press the dedicated HEAT button to engage the pure thermal cycle and illuminate the corresponding
 HEAT status indicator light.
2. Press the independent A/C button to deactivate the air conditioning cooling cycle and ensure the A/C function indicator light is fully turned off.
- Do not adjust your target interior temperature setting to a value lower than the current ambient outside air temperature. Doing so can cause control loop bugs that prevent the internal temperature from being regulated or controlled properly.
- If your interior window glass surfaces begin to fog up due to humidity accumulation, switch over to the dehumidified heating configuration instead of running the pure A/C off heating mode.
Ventilation
Press the manual
 HEAT button and the independent A/C button if their respective panel indicators are currently active so that both individual indicator lights turn off completely.
NOTE:
- Operating strictly in the pure ventilation mode requires a significantly lower auxiliary power consumption, meaning that the overall cruising distance and total driving range of your Nissan Leaf will actively increase.
- While running in this low-energy ventilation mode, the targeted temperature value is completely hidden and is not indicated on the primary navigation monitor or on the dedicated air conditioner status display panel.
Dehumidified defrosting/defogging
Press the specialized
 front defroster button to clear the glass parameters (the integrated status indicator light will immediately illuminate).
- To remove heavy moisture, ice, or dense fog from the front window surface quickly:
- When the ambient outside air temperature drops below 23ºF (-5ºC), adjust your target temperature to its maximum high setting and set the multi-speed blower fan to its lowest velocity tier (1/7) for approximately 2 minutes to warm the core elements, then immediately ramp the fan speed up to its maximum level.
- When the ambient outside air temperature is above 23ºF (-5ºC), immediately adjust the target temperature directly to its maximum high setting and increase the fan speed straight to its highest operational level.
- Once the visual area of the windshield glass is completely cleared of condensation, press the
 front defroster button a second time to return to your previous settings (the status indicator light will turn off).
- The moment the
 front defroster button is pressed, the air conditioning compressor loop will automatically turn on to process, dry, and defog the air stream aimed at the windshield.
Simultaneously, the outside fresh air mode will be automatically selected by the internal damper doors to optimize and accelerate the overall defogging performance inside the Nissan Leaf.
Fan speed control
Press the dedicated manual
 fan speed control button to step through and manually control the fan speed volume.
Simply press the primary AUTO button to clear your manual overrides and return the fan speed profiles back to the fully automatic mode mapping.
Air flow control
Press the tactile MODE button to toggle through and change the active air flow distribution pathways inside the cabin.
 Air flows out directly from the adjustable center and side instrument panel ventilators.
 Air flows in a split path from the center and side ventilators as well as the lower footwell outlets.
 Air is routed to flow mainly out of the lower footwell floor outlets.
 Air flows simultaneously out of the base windshield defroster outlets and the lower footwell floor outlets.
 Air flows directly out of the base windshield defroster vents to clear driver visibility.
Temperature control
Press the dedicated temperature control buttons to select and set your exact desired interior temperature target.
Air recirculation
Press the physical
 intake air control button to manually adjust the sourcing of your ventilation. When the control panel status indicator light illuminates, the intake door closes, and the flowing air is continuously recirculated inside the vehicle cabin.
When the ambient outside temperature exceeds 70ºF (21ºC), the intelligent climate management system may default to internal air recirculation mode automatically. This automated behavior limits thermal exchange and reduces the overall auxiliary power consumption of the vehicle components.
To exit this state manually, simply deselect the air recirculation button (the indicator light will turn off), opening up the air door to re-enter fresh air intake mode.
Outside air circulation
Press the manual
 intake air control button to change the source path of your ventilation. When the indicator light does not illuminate, the intake door opens wide, and the flowing air is drawn directly from outside the vehicle parameters.
Automatic air intake control
While operating within the primary AUTO mode parameters, the selection of your intake air source will be controlled automatically by the vehicle processor modules. When the outside temperature exceeds 70ºF (21ºC), the air conditioning system logic may default to internal air recirculation mode automatically to limit thermal load and reduce overall auxiliary power consumption.
To configure the intake damper doors to full automated regulation mode, press and hold down the physical
 intake air control button for several seconds.
The physical dashboard status indicator light will blink twice to confirm successful configuration, and the inside/outside air circulation path will then be managed automatically by the internal sensor matrix. When operating in this automatic mode, the control panel indicator light will come on only during periods when internal air recirculation is actively engaged by the system.
To turn the system off
To completely shut down all cabin ventilation processing, simply press the main Climate control system ON·OFF button.
The exact operational state (Heater matrix or A/C loop) that was active at the moment the system was turned off is saved in memory and will be restored immediately when the climate system is turned back on.
 Automatic climate control
(models without Navigation System)
Automatic climate control
(models without Navigation System)
fan speed control dial
intake air control
button
front defroster button
...
 Climate ctrl. timer
This advanced pre-conditioning function is engineered to pre-heat or pre-cool the passenger compartment of the vehicle to a comfortable, tailored temperature before driving. By managing the cabin envi ...
Other materials:
P0112, P0113 IAT sensor
DTC Logic
DTC DETECTION LOGIC
DTC CONFIRMATION PROCEDURE
1.PRECONDITIONING
If DTC Confirmation Procedure has been previously conducted, always perform
the following procedure
before conducting the next test.
1. Turn ignition switch OFF and wait at least 10 seconds.
2. Turn ignition swit ...
B1024 pass A/B deact SW
DTC Logic
DTC DETECTION LOGIC
DTC CONFIRMATION PROCEDURE
1.CHECK SELF-DIAGNOSTIC RESULT
With CONSULT-III
1. Turn ignition switch ON.
2. Perform “Self Diagnostic Result� mode of “AIR BAG� using CONSULT-III.
Without CONSULT-III
1. Turn ignition switch ON.
2. Check the air bag warn ...
System temporarily unavailable
In certain operational scenarios, the Intelligent Blind Spot Intervention (I-BSI) system in your Nissan Leaf may automatically deactivate to ensure safety. In these instances, you will hear an audible chime, and a specific warning message will appear on the vehicle information display, signaling tha ...
