
Nissan Leaf 2018-2025 (ZE1) Owner's Manual : Automatic climate control (models without Navigation System)
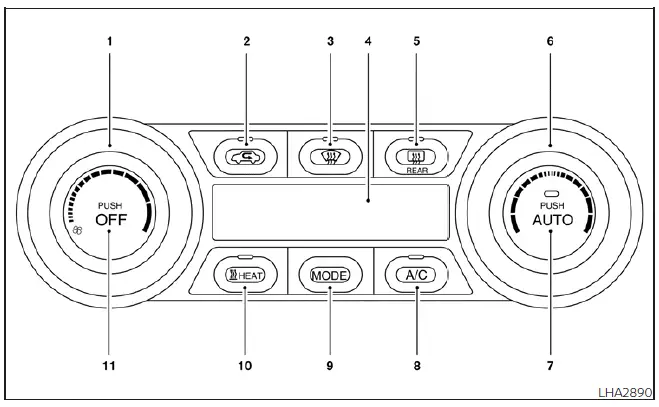
-
 fan speed control dial
-
 intake air control
button
intake air control
button
-
 front defroster button
- Climate Ctrl. display (dedicated monochromatic status screen for reading target temperatures and fan levels)
-
 Rear window and
outside
mirror (if
so equipped) defroster switch
Rear window and
outside
mirror (if
so equipped) defroster switch
- Temperature control dial (rotary adjustment knob for dialing in target interior cabin temperature values)
- AUTO climate control ON button (fully automated smart environment program mode key)
- A/C (air conditioner) button (manually engages or disengages the mechanical air conditioning cooling compressor loop)
- MODE (manual air flow control) button (sequences through various cabin ventilation distribution profiles)
-
 HEAT button
- Climate control system OFF button (instantly deactivates the blower fan, heating loop, and cooling systems entirely)
Automatic operation (AUTO)
The highly optimized AUTO mode may be utilized comfortably year-round as the central processing unit dynamically regulates a constant, uniform cabin temperature, balanced air flow distribution patterns, and variable multi-speed fan operation.
1. Press the dedicated AUTO switch button. The green or orange built-in AUTO status indicator light will be illuminated on the control panel console.
2. Rotate the physical temperature control dial to the left or right to set your exact desired target temperature choice.
Please note that the moment any of the following specific manual configuration functions are operated by the driver, the automated program will suspend and the AUTO indicator light will turn off.
- The
 HEAT or A/C button is physically pressed to manually override thermal cycles.
- The rotary fan speed control dial is rotated or the ventilator air flow directional control button is actively operated.
However, any remaining system sub-functions that were not manually operated or changed will continue running seamlessly in their background AUTO mode profiles.
NOTE:
- If the manual
 fan speed
control dial, the MODE distribution button, or the
fan speed
control dial, the MODE distribution button, or the
 intake air control
button
is manually adjusted while the global AUTO system is in active use, all of the remaining unadjusted buttons and dampers will continue to operate normally in full AUTO mode parameters.
intake air control
button
is manually adjusted while the global AUTO system is in active use, all of the remaining unadjusted buttons and dampers will continue to operate normally in full AUTO mode parameters. - While the primary AUTO mode indicator remains illuminated on the dash, the auxiliary electric power consumption of the vehicle air conditioner cooling system is managed to maximize efficiency and can be heavily economized compared to the continuous electrical load consumed while operating your Nissan Leaf with the AUTO indicator unlit.
The integrated HEAT indicator light and the standard A/C compressor indicator light will illuminate independently or in tandem according to the precise automated operation modes designated by the main climate control computer.
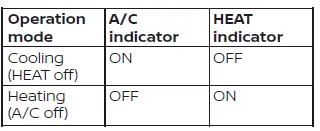
Manual operation
The versatile manual mode can be selected anytime to gain direct user control over the internal cabin heater loop and cooling air conditioner compressor to fine-tune your surroundings to a custom specific temperature.
The dedicated hardware HEAT indicator light and the independent A/C compressor indicator light will automatically illuminate or turn off according to your selected configuration modes.
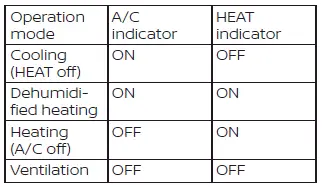
Cooling
1. Press the primary A/C toggle button to illuminate the built-in A/C function indicator light and engage active refrigeration.
2. Press the separate
 HEAT button to turn off the heating loop and ensure the HEAT indicator light goes completely dark.
- Do not adjust your target internal temperature setting to a value higher than the current ambient outside air temperature. Doing so may confuse the system and prevent the actual temperature from being controlled and stabilized properly by the vehicle.
- A completely safe, visible vapor mist may occasionally be seen flowing directly from the ventilation grilles under exceptionally hot and highly humid weather conditions due to the rapid chilling of incoming air. This physical moisture phenomenon is entirely standard and does not indicate an equipment malfunction.
Dehumidified heating
1. Press the central A/C function button to illuminate the A/C dashboard indicator light and activate moisture removal.
2. Press the separate
 HEAT button to illuminate the matching HEAT indicator light and engage concurrent thermal air processing.
NOTE:
The total auxiliary electric power consumption of your Nissan Leaf climate control module increases drastically while the primary A/C button indicator and the separate
 HEAT button indicator are allowed to simultaneously illuminate. Operating both systems together extracts more energy from the traction battery, and as a direct result, your total driving range may be significantly decreased.
Heating (A/C off)
1. Press the dedicated HEAT switch button to illuminate the corresponding
 HEAT status indicator light.
2. Press the independent A/C button to turn off the air conditioning cooling cycle and ensure the A/C indicator light is fully extinguished.
- Do not adjust your target internal cabin temperature to a value lower than the current ambient outside air temperature. Doing so can cause tracking bugs that prevent the internal temperature from being regulated or controlled properly.
- If your interior window glass surfaces begin to fog up due to moisture accumulation, switch over to the dehumidified heating configuration instead of running the pure A/C off heating mode.
Ventilation
To engage pure ventilation mode, press the
 HEAT button and the A/C compressor button if their respective indicator lights are illuminated, ensuring that both status lights turn off completely.
NOTE:
- Operating in pure ventilation mode significantly minimizes high-voltage auxiliary power consumption, directly extending the estimated driving range and maximizing the cruising distance of your Nissan Leaf.
- While running strictly in ventilation mode, the targeted temperature value is completely hidden and not indicated on the central air conditioner status display screen.
Dehumidified defrosting/defogging
Press the
 front defroster button to clear the glass assembly (the integrated status indicator light will immediately illuminate).
- To safely clear heavy moisture, ice, or fog accumulations from the front windshield glass quickly:
- When the ambient outside air temperature drops below 23ºF (-5ºC), adjust the temperature control dial to its maximum high setting and set the multi-speed blower fan to its lowest velocity tier (1/7) for approximately 2 minutes to warm the core, then immediately increase the fan speed to the maximum level.
- When the ambient outside air temperature is above 23ºF (-5ºC), immediately turn the temperature control dial to the maximum high setting and ramp the blower fan speed directly to its highest capacity level.
- Once the visual field of the front windshield is completely cleared of condensation, press the
 front defroster button a second time to return to normal operation (the status indicator light will turn off).
- The moment the
 front defroster button is pressed, the air conditioner compressor loop will automatically turn on to process and dehumidify the air stream directed at the glass.
Simultaneously, the outside fresh air intake mode will be automatically selected by the damper doors to optimize and accelerate the overall defogging performance inside the Nissan Leaf.
Fan speed control
Manually rotate the tactile
 fan speed control dial to increase or decrease the volume of air flowing into the passenger cabin.
To hand regulation back over to the vehicle computer, press the AUTO button to instantly change the fan speed mapping back to the fully automatic mode profile.
Air flow control
Press the tactile MODE selector button repeatedly to cycle through and change the active air flow distribution modes within your Nissan Leaf cabin parameters.
 Air flows directly from the adjustable center and side instrument panel ventilators.
 Air flows in a split path from the center and side ventilators as well as the lower footwells.
 Air is directed to flow almost exclusively out of the lower floor outlets.
 Air flows simultaneously from the base defroster ducts and the lower floor outlets.
 Air flows exclusively from the base windshield defroster vents to clear visibility.
Temperature control
Turn the ergonomic temperature control dial clockwise or counterclockwise to precisely calibrate your desired interior target climate value.
Recirculation
Press the
 intake air control button to manually override the air sourcing. When the status indicator light illuminates, the cabin air damper closes, forcing the air to continuously recirculate inside the interior cabin spaces.
When the ambient outdoor temperature exceeds 70ºF (21ºC), the intelligent climate management system may default to internal air recirculation mode automatically. This automatic adjustment minimizes thermal loss and reduces the overall power consumption of the climate system.
To exit this state manually, simply deselect the air recirculation button (the indicator light will turn off), opening the damper door to re-engage fresh air intake mode.
Fresh air
Press the
 intake air control button to change the source path of your ventilation. When the indicator light remains unlit, the intake damper opens wide, allowing fresh ambient air to be pulled from outside the vehicle parameters.
Automatic air intake control
While operating within the primary AUTO mode, the sourcing of intake air is managed dynamically by the vehicle computer modules. When the outside temperature exceeds 70ºF (21ºC), the air conditioning logic may default directly to internal air recirculation mode automatically to limit thermal load and reduce overall auxiliary power consumption.
To set the intake damper to full automatic regulation mode, press and hold down the
 intake air control button for several seconds.
The physical status indicator light will blink twice to confirm successful programming, and the internal/external air circulation path will be managed automatically by the Nissan Leaf sensor matrix. While operating in this automatic mode, the control light will illuminate only when internal air recirculation is actively engaged by the system.
Rear window and outside mirror (if so equipped) defroster switch
For more details regarding the operation of these thermal elements, please refer to the specialized "Rear window and outside mirror (if so equipped) defroster switch" instruction section.
To turn the system off
To completely shut down all climate control processing, simply press the Climate control system OFF button. The exact operating profile (Heater mode or A/C loop) that was active at the moment of deactivation will be saved in memory and restored the next time the system is turned back on.
 Displaying climate control system status screen (models with navigation system)
The specialized climate control system status screen on the Nissan Leaf can be conveniently displayed on your central infotainment panel as a dynamic widget. For detailed instructions on how to custom ...
 Automatic climate control
(models with Navigation System)
Automatic climate control
(models with Navigation System)
Temperature control button (used to adjust the target cabin temperature up or down)
HEAT button
Climate Ctrl. Timer indicator ...
Other materials:
C1109 power and ground system
DTC Logic
DTC DETECTION LOGIC
DTC CONFIRMATION PROCEDURE
1.PRECONDITIONING
If “DTC CONFIRMATION PROCEDURE� has been previously conducted, always turn
ignition switch OFF and
wait at least 10 seconds before conducting the next test.
>> GO TO 2.
2.CHECK DTC DETECTION
With CON ...
Timer Display
To provide you with immediate visibility into your vehicle's energy status, the timer display automatically activates for approximately 30 seconds as soon as you place the power switch of your Nissan Leaf in the OFF position.
Charging time
This section ...
Insufficient cooling
Description
Symptom
• Insufficient cooling
• No cool air comes out. (Air flow volume is normal.)
Diagnosis Procedur
NOTE:
Perform self-diagnosis with CONSULT-III before performing symptom diagnosis. If
any malfunction result or
DTC is detected, perform the corresponding diagnosis.
1. ...
