Nissan Juke Service and Repair Manual : Air cleaner filter
Removal and Installation
REMOVAL
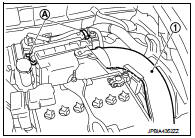
1. Remove air duct assembly (duct side) (1).
2. Unhook the tabs (A) of both ends of the air cleaner cover.
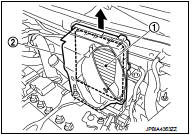
3. Remove the air cleaner filter (1) and air cleaner body (2) from the air cleaner case.
4. Remove the air cleaner filter from the air cleaner body.
INSTALLATION
Note the following, and install in the reverse order of removal.
• Fixing clips shall be fixed after inserting air cleaner body protrusion to air cleaner case notch hole.
• Make sure that whether air cleaner body has been firmly installed by shaking it.
 Drive belt
Exploded View
1. Alternator
2. Drive belt auto-tensioner
3. Crankshaft pulley
4. A/C compressor
5. Water pump
6. Drive belt
A. Possible use range
B.
Range when new drive belt is inst ...
 Spark plug
Exploded View
1. Rocker cover protector
2. O-ring
3. PCV valve
4. PCV hose
5. Clamp
6. Rocker cover gasket
7. Rocker cover
8. Clamp
9. PCV hose
10. Oil filler cap
11. Spark plug
...
Other materials:
Ecu diagnosis information
TCM
Reference Value
CONSULT-III DATA MONITOR STANDARD VALUE
• In CONSULT-III, electric shift timing or lock-up timing, i.e. operation
timing of each solenoid valve, is displayed.
Therefore, if there is an obvious difference between the shift timing estimated
from a shift shock (or
engin ...
Injection tube and fuel injector
Exploded View
1. Spill hose
2. Injection tube
3. Fuel injector
4. Heat protection washer
5. Fuel injector bracket
6. Fuel injector bracket spacer
7. Fuel rail stud bolt
8. Fuel rail
9. High pressure protection cover (lower)
10. Injection tube
11. High pressure supply pump
12. H ...
C1101, C1102, C1103, C1104 WHEEL SENSOR
DTC Logic
DTC DETECTION LOGIC
DTC CONFIRMATION PROCEDURE
1.PRECONDITIONING
If “DTC CONFIRMATION PROCEDURE” has been previously conducted, always turn
ignition switch OFF and
wait at least 10 seconds before conducting the next test.
>> GO TO 2.
2.CHECK DTC DETECTION
With CON ...
