Nissan Juke Service and Repair Manual : Water hose
Exploded View

1. Hose clamp
2. Water hose
A. Water outlet
B. Oil warm
Removal and Installation
REMOVAL
WARNING:
Never remove the radiator cap when the engine is hot. Serious burns could occur
from high pressure
coolant escaping from the radiator.
CAUTION:
Perform these steps after the coolant temperature has cooled sufficiently.
1. Remove the hose clamp and remove the water hose.
INSTALLATION
Note the following, and Install in the reverse order of removal.
CAUTION:
Never reuse copper washer.
• Refer to the following when installing water hoses.

- Insert water hose according to dimension “L” described below.
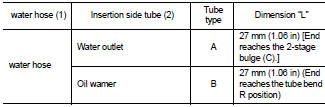
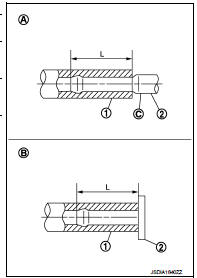
- Set hose clamps (1) at the both ends of water hoses (2) with dimension “A” from the hose edge.
Dimension “A” : 5 – 7 mm (0.20 – 0.28 in)
- Hose clamp should not interfere with the bulge of fluid cooler tube.

Inspection
INSPECTION AFTER INSTALLATION
Start the engine, and check the joints for coolant leakage. Refer to CO-11, "Inspection".
 Oil pump fitting bolt
Description
Replace the oil pump fitting bolt and the O-ring if oil leakage or exudes
from the oil pump fitting bol
Exploded View
1. Oil pump fitting bolt
2. O-ring
3. Transaxle assembly
: ...
 Fluid cooler system
Exploded View
1. Copper washer
2. CVT fluid cooler tube
3. Hose clamp
4. Fluid cooler hose A
5. Fluid cooler tube
6. Fluid cooler hose B
7. Fluid cooler hose C
8. Transaxle assembly
9 ...
Other materials:
Engine stalling
Description
CHART 7: ENGINE STALLING
Diagnosis Procedure
1.CHECK FUEL
Check that the fuel reservoir is correctly filled and with the right fuel.
>> GO TO 2.
2.CHECK ECM POWER SUPPLY AND GROUND CIRCUIT
Check ECM power supply and ground circuit. Refer to EC-885, "Diagnosis
Proc ...
Forward-facing child restraint installation using LATCH
A critical safety limitation applies to the LATCH system: do not utilize the lower anchors if the combined weight of the child and the child restraint exceeds 65 lbs. (29.5 kg). If the total weight surpasses this limit, you must secure the child restraint using the vehicle's standard seat belt syste ...
B2621 inside antenna
DTC Logic
DTC DETECTION LOGIC
DTC CONFIRMATION PROCEDURE
1.PERFORM DTC CONFIRMATION PROCEDURE
1. Select “INTELLIGENT KEY” of “BCM” using CONSULT-III.
2. Select “INSIDE ANT DIAGNOSIS” in “WORK SUPPORT” mode.
3. Perform inside key antenna (“INSIDE ANT DIAGNOSIS”) on “WORK ...
