Nissan Juke Service and Repair Manual : Oil pump fitting bolt
Description
Replace the oil pump fitting bolt and the O-ring if oil leakage or exudes from the oil pump fitting bol
Exploded View
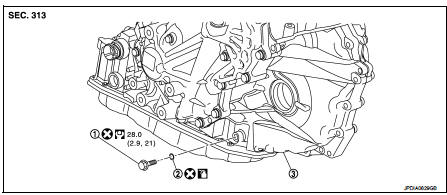
1. Oil pump fitting bolt
2. O-ring
3. Transaxle assembly
 : Always replace after every
disassembly.
 : N·m (kg-m, ft-lb)
 : Genuine NISSAN CVT Fluid NS-2
Removal and Installation
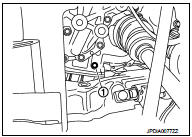
REMOVAL
1. Remove Oil pump fitting bolt (1) from transaxle assembly.
2. Remove O-ring from oil pump fitting bolt.
INSTALLATION
Note the following, and install in the reverse order of removal.
• After completing installation, check for CVT fluid leakage and CVT fluid level. Refer to TM-184, "Inspection".
CAUTION:
• Never reuse O-ring.
• Apply CVT fluid to O-ring.
 Differential side oil seal
Exploded View
1. Transaxle assembly
2. Differential side oil seal (left side)
3. Differential side oil seal (right side)
: Always replace after every
disassembly.
: Genuine NISSAN CVT Fluid ...
 Water hose
Exploded View
1. Hose clamp
2. Water hose
A. Water outlet
B. Oil warm
Removal and Installation
REMOVAL
WARNING:
Never remove the radiator cap when the engine is hot. Serious burns could oc ...
Other materials:
Engine maintenance (K9K)
Drive belt
DRIVE BELT : Checking Drive Belts
WARNING:
Be sure to perform when the engine is stopped.
1. Inspect belts for cracks, fraying, wear and oil. If necessary,
replace.
2. Evaluate manually if the belt is enough tensioned (tension cannot
be measured by way of frequency meter).
CAU ...
B2636, B2637, B2638, B2639, B2654, B2655 mode door motor
DTC Logic
DTC DETECTION LOGIC
DTC CONFIRMATION PROCEDURE
1.PERFORM DTC CONFIRMATION PROCEDURE
With CONSULT-III
1. Turn ignition switch ON.
2. Select “Self Diagnostic Result” mode of “HVAC” using CONSULT-III.
3. Check DTC.
Is DTC detected?
YES >> Refer to HAC-157, "Dia ...
Back door
Exploded View
REMOVAL
1. Back door weather-strip
2. Back door stay
3. Back door stay lower bracket
4. Bumper rubber
5. Back door striker
6. Back door panel
7. Back door hinge
8. Hole cover
A : Center mark
B : Seam
: Do not reuse
: Body grease
Back door assembly
BACK DOOR ASSEMB ...
