Nissan Juke Service and Repair Manual : Washer pump
Exploded View
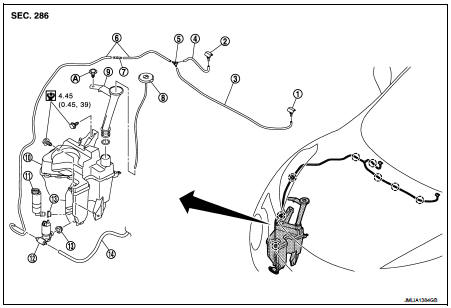
1. Front washer nozzle LH
2. Front washer nozzle RH
3. Front washer tube LH
4. Front washer tube RH
5. Check valve
6. Front washer tube
7. Joint
8. Washer tank inlet cap
9. Washer tank inlet
10. Washer tank
11. Headlamp washer pump
12. Washer pump
13. Packing
14. Rear washer tube
A : Clip
 : Clip
 : N·m (kg·m, in-lb
Removal and Installation
REMOVAL
1. Remove fender protector RH (front). Refer to EXT-22, "Removal and Installation".
2. Disconnect washer pump connector.
3. Disconnect front washer tube and rear washer tube.
4. Remove washer pump from the washer tank.
5. Remove packing from washer tank.
INSTALLATION
Note the following items, and then install in the reverse order of removal.
CAUTION:
• Check that there is no leakage after installation or replace packing with new
part if it has been damage.
• Never twist the packing when installing the washer pump.
 Washer tank
Exploded View
1. Front washer nozzle LH
2. Front washer nozzle RH
3. Front washer tube LH
4. Front washer tube RH
5. Check valve
6. Front washer tube
7. Joint
8. Washer tank inlet cap
...
 Headlamp washer pump
Exploded View
1. Front washer nozzle LH
2. Front washer nozzle RH
3. Front washer tube LH
4. Front washer tube RH
5. Check valve
6. Front washer tube
7. Joint
8. Washer tank inlet cap
...
Other materials:
Intelligent Lane Intervention (I-LI)
WARNING
Failure to strictly follow the safety warnings and operational instructions for the proper use of the I-LI system could result in an unintended vehicle path, loss of control, and subsequent serious injury or death.
The I-LI system is a driver-assist ...
LAN System can system (type 4)
DTC/CIRCUIT DIAGNOSIS
Main line between IPDM-E and DLC circuit
Diagnosis Procedure
1.CHECK CONNECTOR
1. Turn the ignition switch OFF.
2. Disconnect the battery cable from the negative terminal.
3. Check the following terminals and connectors for damage, bend and loose
connection (connector s ...
Suspension arm
Exploded View
1. Rear suspension member
2. Adjusting bolt
3. Upper link
4. Eccentric disk
5. Lower link
6. Suspension arm bracket
7. Suspension arm
: Vehicle front
: Always replace after every
disassembly.
: N·m (kg-m, ft-lb)
Removal and Installation
REMOVAL
1. Remove tires. Re ...
