Nissan Juke Service and Repair Manual : Headlamp washer pump
Exploded View
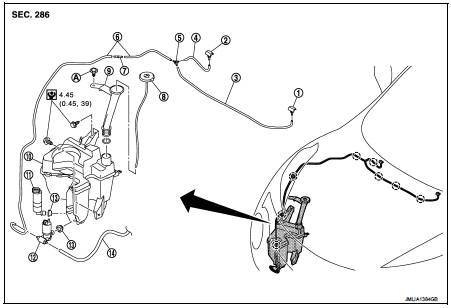
1. Front washer nozzle LH
2. Front washer nozzle RH
3. Front washer tube LH
4. Front washer tube RH
5. Check valve
6. Front washer tube
7. Joint
8. Washer tank inlet cap
9. Washer tank inlet
10. Washer tank
11. Headlamp washer pump
12. Washer pump
13. Packing
14. Rear washer tube
A : Clip
 : Clip
 : N·m (kg·m, in-lb)
Removal and Installation
REMOVAL
1. Remove fender protector RH (front). Refer to EXT-22, "Removal and Installation".
2. Disconnect headlamp washer pump connector.
3. Disconnect headlamp washer tube joint.
4. Remove headlamp washer pump from the washer tank.
5. Remove the packing from the washer tank.
INSTALLATION
Note the following items, and then install in the reverse order of removal.
CAUTION:
• Check that there is no leakage after installation or replace packing with new
part if it has been damage.
• Never twist the packing when installing the headlamp washer pump.
 Washer pump
Exploded View
1. Front washer nozzle LH
2. Front washer nozzle RH
3. Front washer tube LH
4. Front washer tube RH
5. Check valve
6. Front washer tube
7. Joint
8. Washer tank inlet cap
...
 Washer level switch
Removal and Installation
The washer level switch must be replaced together with the washer tank as an
assembly. Refer to WW-67,
"Removal and Installation". ...
Other materials:
Component parts
Engine control system : Component Parts Location
1. IPDM E/R
Refer to PCS-5, "Component Parts
Location".
2. Battery current sensor
(with battery temperature sensor)
3. Mass air flow sensor
(with intake air temperature sensor)
4. Electric throttle control actuator
(with built in ...
Steering wheel switch for audio control
1. SOURCE select switch
2. Tuning switch
3. VOLUME control switch
The audio system can be operated using the controls on the steering wheel.
SOURCE select switch
Push the SOURCE select switch to change the mode to available audio source.
VOLUME control switch
Push up or down the VOLUME cont ...
Normal operating condition
Description
FUEL CUT CONTROL (AT NO LOAD AND HIGH ENGINE SPEED)
If the engine speed is above 1,800 rpm under no load (for example, the
selector lever position is neutral and
engine speed is over 1,800 rpm) fuel will be cut off after some time. The exact
time when the fuel is cut off varies
b ...
