Nissan Juke Service and Repair Manual : TCM
Exploded View
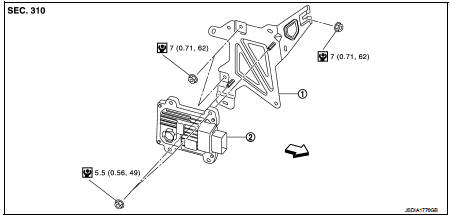
1. Bracket
2. TCM
 :Vehicle front
 : N·m (kg-m, in-lb)
Removal and Installation
NOTE
:
When replacing TCM and transaxle assembly as a set, replace transaxle assembly
first and then replace
TCM. Refer to TM-374, "Description".
REMOVAL
1. Remove the battery. Refer to PG-124, "Removal and Installation".
2. Remove air duct (inlet) and air cleaner case. Refer to EM-26, "Removal and Installation".
3. Disconnect the TCM connector.
4. Remove the TCM.
5. Remove the bracket.
INSTALLATION
Installation is the reverse order of removal.
Adjustment
ADJUSTMENT AFTER INSTALLATION
Perform "ADDITIONAL SERVICE WHEN REPLACING TCM". Refer to TM-374, "Description".
 Transmission range switch
Exploded View
1. Transmission range switch
2. Transaxle assem
Removal and Installation
REMOVAL
1. Remove battery. Refer to PG-124, "Removal and Installation".
2. Remove transmission ...
 Air breather hose
Removal and Installation
REMOVAL
1. Remove air cleaner case. Refer to EM-26, "Removal and Installation".
2. Remove clip from bracket.
3. Remove air breather hose from transaxle assembly. ...
Other materials:
Continuously Variable Transmission (CVT)
The Continuously Variable Transmission (CVT) in your vehicle is electronically
controlled to produce maximum power and smooth operation.
The recommended operating procedures for this transmission are shown on the following
pages.
Follow these procedures for maximum vehicle performance and driv ...
Intelligent Key operating range
The Intelligent Key functions can only be used when the Intelligent Key is within
the specified operating range from the request switch 1 .
When the Intelligent Key battery is discharged or strong radio waves are present
near the operating location, the Intelligent Key system’s operating ra ...
Does not operate
Description
ESP function, TCS function, ABS function, EBD function and brake limited slip
differential (BLSD) function
does not operate.
Diagnosis Procedure
CAUTION:
• ESP function, TCS function, ABS function, EBD function and brake limited slip
differential (BLSD)
function never operate ...
