Nissan Juke Service and Repair Manual : Reverse idler shaft and gear
Exploded View
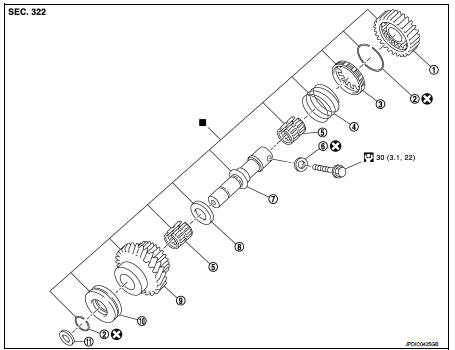
1. Reverse output gear
2. Snap ring
3. Reverse baulk ring
4. Return spring
5. Needle bearing
6. Seal washer
7. Reverse idler shaft
8. Spacer
9. Reverse input gear
10. Lock washer
11. Spring washer
 : Replace the parts as a set.
 : Always replace after every
disassembly.
 : N·m (kg-m, ft-lb)
Disassembly
1. Remove reverse output gear (1).
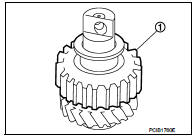
2. Remove snap ring (1).
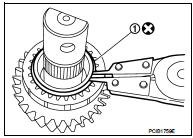
3. Remove reverse baulk ring (1) and return spring (2).
4. Remove snap ring (1), lock washer (2), and reverse input gear (3).
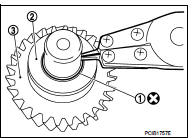
5. Remove needle bearings (1) and washer.
Assembly
Note the following procedures, and assemble in the reverse order of disassembly.
CAUTION:
• Never reuse snap ring.
• Check that snap ring is securely installed in a groove.
• Replace reverse output gear, snap ring, reverse baulk ring, return spring, needle bearing, reverse idler shaft, spacer, reverse input gear, and lock washer as a set.
Inspection
INSPECTION AFTER DISASSEMBLY
Shaft and Gear
Check the following items. Replace reverse output gear, snap ring, reverse baulk
ring, return spring, needle
bearing, reverse idler shaft, spacer, reverse input gear, and lock washer as a
set, if necessary.
• Damage, peeling, bend, uneven wear, and distortion of shaft • Excessive wear, damage, and peeling of gear
Bearing
Check damage and rotation of bearing. Replace reverse output gear, snap ring,
reverse baulk ring, return
spring, needle bearing, reverse idler shaft, spacer, reverse input gear, and
lock washer as a set, if necessary.
 Mainshaft and gear
Exploded View
1. Mainshaft front bearing outer
race
2. Mainshaft front bearing inner race
3. Mainshaft
4. 1st main gear
5. 1st inner baulk ring
6. 1st synchronizer cone
7. 1st outer baulk r ...
 Final drive
Exploded View
1. Shim
2. Differential side bearing outer race
(transaxle case side)
3. Differential side bearing inner race
(transaxle case side)
4. Final gear
5. Differential case
6. Dif ...
Other materials:
Anti-hijack function does not operate
Diagnosis Procedure
1.CHECK “DOOR LOCK–UNLOCK SET” SETTING IN “WORK SUPPORT”
1. Select “DOOR LOCK” of “BCM” using CONSULT-III.
2. Select “DOOR LOCK-UNLOCK SET” in “WORK SUPPORT” mode.
3. Check “DOOR LOCK-UNLOCK SET” in “WORK SUPPORT”
Refer to DLK-41, "DOOR ...
Brake precautions
Your Nissan Leaf is engineered with a sophisticated, dual-layer approach to braking, ensuring both safety and energy efficiency. The vehicle utilizes two integrated braking systems to provide optimal control in various driving conditions:
1. Hydraulic brake system
2. Regenerative brake sys ...
Cooling fan
Diagnosis Procedure
1.CHECK GROUND CONNECTION
1. Turn ignition switch OFF.
2. Check ground connection E38. Refer to Ground Inspection in GI-44, "Circuit
Inspection".
Is the inspection result normal?
YES >> GO TO 2.
NO >> Repair or replace ground connection.
2.CHE ...
