
Nissan Juke Service and Repair Manual : Refilling
1. IInstall reservoir tank if removed, and install radiator drain plug.
CAUTION:
Be sure to clean drain plug and install with new O-ring.
Radiator drain plug : Refer to CO-17, "Exploded View".
• If water drain plugs on cylinder block are removed, close and tighten them. Refer to EM-63, "Setting".
2. Check that each hose clamp has been firmly tightened.
3. Remove air duct (between air cleaner cover assembly and turbocharger inlet tube). Refer to EM-26, "Exploded View".
4. For LHD models, disconnect vacuum hose break booster side, and removal vacuum tube from clamp.
Refer to BR-49, "MR16DDT : Exploded View" (LHD models).
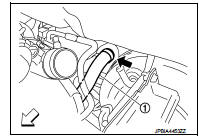
5. Disconnect heater hose (1) at position (
) in the figure.
 : Vehicle front
• Enhance heater hose as high as possible.
6. Fill radiator (1) to specified level.
CAUTION:
Never adhere the engine coolant to electronic equipments
(alternator etc.).
• Pour coolant slowly of less than 2 (2-1/8 US qt, 1-3/4 Imp qt) a minute to allow air in system to escape.
• When engine coolant overflows disconnected heater hose, connect heater hose, and continue filling the engine coolant.
• Use Genuine NISSAN Engine Coolant or equivalent in its quality mixed with water (distilled or demineralized). Refer to MA-13, "Fluids and Lubricants".
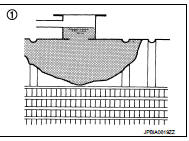
Engine coolant capacity (With reservoir tank at “MAX� level) Refer to CO-29, "Periodical Maintenance Specification".
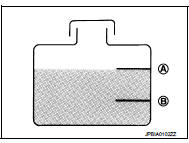
7. Refill reservoir tank to “MAX� level line with engine coolant.
A : MAX
B : MIN
Reservoir tank engine coolant capacity
(At “MAX� level)
Refer to CO-29, "Periodical Maintenance Specification".
8. Install air duct (between air cleaner cover assembly and turbocharger inlet tube). Refer to EM-26, "Exploded View".
9. Install radiator cap.
10. Warm up engine until opening thermostat. Standard for warming-up time is approximately 10 minutes at 3,000 rpm.
• Check thermostat opening condition by touching radiator hose (lower) to see a flow of warm water.
CAUTION:
Watch water temperature gauge so as not to overheat engine
.
11. Stop the engine and cool down to less than approximately 50°C (122°F).
• Cool down using fan to reduce the time.
• If necessary, refill radiator up to filler neck with engine coolant.
CAUTION:
Never adhere the engine coolant to electronic equipments (alternator etc.)
.
12. Refill reservoir tank to “MAX� level line with engine coolant.
13. Repeat steps 6 through 11 two or more times with radiator cap installed until engine coolant level no longer drops.
14. Check cooling system for leakage with engine running.
15. Warm up the engine, and check for sound of engine coolant flow while running engine from idle up to 3,000 rpm with heater temperature controller set at several position between “COOL� and “WARM�.
• Sound may be noticeable at heater unit.
16. Repeat step 15 three times.
17. If sound is heard, bleed air from cooling system by repeating step 6 through 11 until reservoir tank level no longer drops.
 Draining
WARNING:
• Never remove radiator cap when engine is hot. Serious burns may occur from
high-pressure engine
coolant escaping from radiator.
• Wrap a thick cloth around the radiator cap. Slowly ...
 Flushing
1. Install radiator drain plug.
CAUTION:
Be sure to clean drain plug and install with new O-ring.
Radiator drain plug : Refer to CO-17, "Exploded View".
• If water drain plugs on cyl ...
Other materials:
ABS actuator and electric unit (control unit)
Exploded View
LHD
1. ABS actuator and electric unit (control
unit)
2. ABS actuator and electric unit (control
unit) harness connector
3. Bracket
A. To master cylinder secondary side
B. To master cylinder primary side
C. To front LH caliper
D. To rear RH caliper
E. To rear LH caliper ...
P0470 exhaust gas pressure sensor 1
DTC Logic
DTC DETECTION LOGIC
NOTE:
If DTC P0470 is displayed with DTC P0651 or P2263, first perform trouble
diagnosis for DTC P0651 or P2263.
Refer to EC-975, "DTC Logic" (P0651), EC-1003, "DTC Logic" (P2263).
Diagnosis Procedure
1.CHECK GROUND CONNECTIONS
1. Turn i ...
Exploded View
1. Final drive mounting bracket
2. Washer
3. Rear final drive assembly
: Vehicle front
: N·m (kg-m, ft-lb)
: Never reuse parts
: Apply multi purpose grease
: Apply gear oil.
...
