Nissan Juke Service and Repair Manual : Oil filter
Removal and Installation
REMOVAL
1. Remove engine under cover.
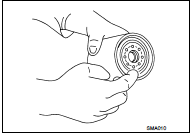
2. Using oil filter wrench [SST: KV10115801] (A), remove oil filter.
 : Vehicle front
CAUTION:
• Oil filter is provided with relief valve. Use genuine NISSAN
oil filter or equivalent.
• Be careful not to get burned when engine and engine oil may be hot.
• When removing, prepare a shop cloth to absorb any engine oil leakage or spillage.
• Completely wipe off any engine oil that adheres to engine and vehicle.

INSTALLATION
1. Remove foreign materials adhering to the oil filter installation surface.
2. Apply new engine oil to the oil seal contact surface of new oil filter.
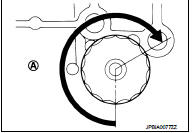
3. Screw oil filter manually until it touches the installation surface, then tighten it by 2/3 turn (A). Or tighten to specification.
Oil filter:
 : 17.7 N·m (1.8 kg-m, 13 ft-lb)
Inspection
INSPECTION AFTER INSTALLATION
1. Check the engine oil level. Refer to LU-25, "Inspection".
2. Start the engine, and check that there is no leakage of engine oil.
3. Stop the engine and wait for 10 minutes.
4. Check the engine oil level, and adjust the level. Refer to LU-25, "Inspection".
 Engine oil
Inspection
ENGINE OIL LEVEL
NOTE:
Before starting engine, put vehicle horizontally and check the engine oil level.
If engine is already started, stop
it and allow 10 minutes before checking.
...

Other materials:
P0850 PNP switch
Description
For CVT models, transmission range switch is turn ON when the selector lever
is P or N.
For M/T models, park/neutral position (PNP) range switch is ON when the selector
lever is Neutral position.
ECM detects the position because the continuity of the line (the ON) exists.
DTC ...
Conventional (fixed speed) cruise control mode
The conventional (fixed speed) cruise control mode in your Nissan Leaf offers a traditional driving experience, allowing you to maintain a constant speed between 25 and 90 mph (40 to 144 km/h) without the need to keep your foot engaged on the accelerator pedal.
WARNING
Unlike the ...
Service Notice or Precaution
OBD SELF-DIAGNOSIS (WITH OBD)
• CVT self-diagnosis is performed by the TCM in combination with the ECM. The
results can be read through
the blinking pattern of the malfunction indicator (MI). Refer to the table on
TM-159, "CONSULT-III Function
(TRANSMISSION)" for the indicator use ...
