Nissan Juke Service and Repair Manual : Light & rain sensor
Component Function Check
1.CHECK LIGHT & RAIN SENSOR
1. Clean light & rain sensor detection area of windshield fully.
2. Turn ignition switch ON.
3. Turn lighting switch AUTO.
4. With the light & rain sensor illuminating, check the auto light function.

Is the inspection result normal? YES >> Light & rain sensor is normal.
NO >> Refer to EXL-67, "Diagnosis Procedure".
Diagnosis Procedure
1.CHECK LIGHT & RAIN SENSOR FUSE
1. Turn ignition switch OFF.
2. Check that the following fuse is not fusing.

Is the inspection result normal? YES >> GO TO 2.
NO >> Replace the fuse after repairing the applicable circuit.
2.CHECK LIGHT & RAIN SENSOR POWER SUPPLY
1. Disconnect light & rain sensor connector.
2. Check voltage between light & rain sensor harness connector and ground.

Is the inspection result normal? YES >> GO TO 3.
NO >> Repair or replace harness.
3.CHECK LIGHT & RAIN SENSOR GROUND CIRCUIT
Check continuity between light & rain sensor harness connector and ground.

Is the inspection result normal? YES >> GO TO 4.
NO >> Repair or replace harness.
4.CHECK LIGHT & RAIN SENSOR SIGNAL
1. Connect light & rain sensor connector.
2. Turn ignition switch ON.
3. Check signal between BCM harness connector and ground with oscilloscope.
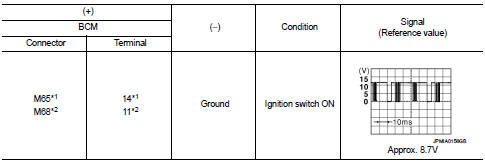
*1: Without Intelligent Key *2: With Intelligent Key
Is the inspection result normal? YES >> Replace light & rain sensor.
NO >> GO TO 5.
5.CHECK LIGHT & RAIN SENSOR SIGNAL CIRCUIT FOR OPEN
1. Turn ignition switch OFF.
2. Disconnect BCM connector and light & rain sensor connector.
3. Check continuity between BCM harness connector and light & rain sensor harness connector.

*1: Without Intelligent Key *2: With Intelligent Key
Is the inspection result normal? YES >> GO TO 6.
NO >> Repair or replace harness.
6.CHECK LIGHT & RAIN SENSOR SIGNAL CIRCUIT FOR SHORT
Check continuity between BCM harness connector and ground.

*1: Without Intelligent Key *2: With Intelligent Key
Is the inspection result normal? YES >> Refer to BCS-93, "Removal and Installation" (with Intelligent Key), BCS-161, "Removal and Installation" (without Intelligent Key).
NO >> Repair or replace harness.
 License plate lamp circuit
Without daytime running light system
WITHOUT DAYTIME RUNNING LIGHT SYSTEM : Component Function Check
1.CHECK TAIL LAMP (RH) OPERATION
Check that the tail lamp (RH) is turned ON.
Is the inspectio ...
 Turn signal lamp circuit
Component Function Check
1.CHECK TURN SIGNAL LAMP
CONSULT-III ACTIVE TEST
1. Select “FLASHER” of BCM (FLASHER) active test item.
2. With operating the test items, check that the turn signal la ...
Other materials:
Rear door
Exploded View
1. Rear door panel
2. TORX bolt
3. Door striker
4. Door check link
5. Door hinge (lower)
6. Door hinge (upper)
: Do not reuse
: N·m (kg-m, in-lb)
: N·m (kg-m, ft-lb)
: Body grease
Door assembly
DOOR ASSEMBLY : Removal and Installation
CAUTION:
• Perform work wit ...
Precaution Necessary for Steering Wheel Rotation after Battery Disconnect
NOTE:
• Before removing and installing any control units, first turn the ignition
switch to the LOCK position, then disconnect
both battery cables.
• After finishing work, confirm that all control unit connectors are connected
properly, then re-connect both
battery cables.
• Always us ...
Radiator cap : Inspection
Check valve seat (A) of radiator cap.
B : Metal plunger
- Check that valve seat is swollen to the extent that the edge of the
plunger cannot be seen when watching it vertically from the top.
- Check that valve seat has no soil and damage.
Pull negative-pressure valve to open it, and that it c ...
