
Nissan Juke Service and Repair Manual : Radiator cap : Inspection
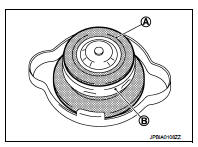
Check valve seat (A) of radiator cap.
B : Metal plunger
- Check that valve seat is swollen to the extent that the edge of the plunger cannot be seen when watching it vertically from the top.
- Check that valve seat has no soil and damage.
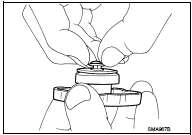
Pull negative-pressure valve to open it, and that it close completely when released.
- Check that there is no dirt or damage on the valve seat of radiator cap negative-pressure valve.
- Check that there are no unusualness in the opening and closing conditions of negative-pressure valve.
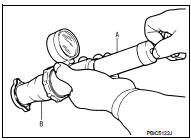
• Check radiator cap relief pressure.
Standard and Limit : Refer to CO-54, "Radiator".
- When connecting radiator cap to the radiator cap tester (commercial service tool) (A) and the radiator cap tester adapter (commercial service tool) (B), apply engine coolant to the cap seal surface.
• Replace radiator cap if there is an unusualness related to the above three.
CAUTION:
When installing radiator cap, thoroughly wipe out the radiator filler neck to
remove any waxy residue
or foreign material.
 Radiator
...
 Radiator : Inspection
Check radiator for mud or clogging. If necessary, clean radiator as follows.
CAUTION:
• Be careful not to bend or damage radiator fins.
• When radiator is cleaned without removal, remove all ...
Other materials:
B26F5 steering lock status switch
DTC Logic
DTC DETECTION LOGIC
NOTE:
• If DTC B26F5 is displayed with DTC U1000, first perform the trouble diagnosis
for DTC U1000. Refer to
BCS-83, "DTC Logic".
• If DTC B26F5 is displayed with DTC U1010, first perform the trouble diagnosis
for DTC U1010. Refer to
BCS-84, &qu ...
Component parts
Component Parts Location
1. BCM
Refer to BCS-6, "BODY CONTROL
SYSTEM : Component Parts Location"
(with Intelligent Key) or BCS-96,
"BODY CONTROL SYSTEM : Component
Parts Location" (without Intelligent
Key)
2. Power window main switch
3. Front power window motor (drive ...
P1745 line pressure control
Description
The line pressure solenoid valve regulates the oil pump discharge pressure to
suit the driving condition in
response to a signal sent from the TCM.
DTC Logic
DTC DETECTION LOGIC
DTC CONFIRMATION PROCEDURE
NOTE:
If “DTC CONFIRMATION PROCEDURE� has been previously performed, ...
