
Nissan Leaf 2018-2025 (ZE1) Owner's Manual : How to switch the display
With the primary power switch sitting in the active ON position, you can easily activate the system by pressing the physical hardware CAMERA button on the console bezel or by moving the electronic shift selector lever into the R (Reverse) position to automatically operate the Intelligent Around View Monitor system.
The Intelligent Around View Monitor is programmed to display different customized split-screen layouts depending on the active position of the shift selector. Simply press the physical CAMERA button repeatedly while the system is running to manually switch between the available camera views and perspective channels.
If the electronic shift selector lever is actively placed in the R (Reverse) position, the available split-screen layouts consist of:
- Rear view / bird's-eye view overhead composite split-screen interface
- Rear view / front-side peripheral clearance view split-screen interface
- Full screen wide-angle rear view spanning across the entire display screen
If the electronic shift position is held in the P (Park) or forward D (Drive) positions, the available multi-camera layouts consist of:
- Front view / bird's-eye view overhead composite split-screen interface
- Front view / front-side passenger wheel clearance view split-screen interface
The system display will automatically close out the camera feeds and switch away from the active Intelligent Around View Monitor screen whenever:
- The electronic shift lever is shifted into the forward D (Drive) position and the forward vehicle speed increases above approximately 6 mph (10 km/h).
- A different primary system menu button (such as Audio, Map, or Menu) is selected by the operator.
Adjusting the screen
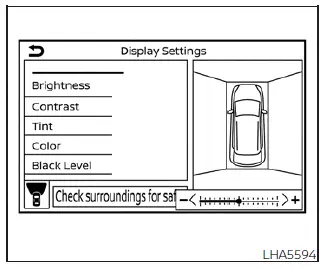
1. Press the physical hardware MENU button on the center display panel housing.
2. Touch the digital "Settings" key icon located on the interactive touchscreen interface.
3. Touch the specialized "Camera" key to enter the driver assistance configuration options.
4. Touch the specific "Display Settings" key to open up the screen illumination parameters.
5. Touch your chosen target parameter from the "Brightness," "Contrast," "Tint," "Color," or "Black Level" keys on the menu screen.
6. Adjust the chosen calibration level incrementally by touching the corresponding "+" or "-" keys on the digital touch-screen display.
NOTE:
To ensure optimal driver focus and safety, do not attempt to adjust any of the digital display settings of the Intelligent Around View Monitor while the vehicle is actively moving. Always make sure the vehicle is fully stationary and the parking brake is firmly applied before making screen adjustments inside your Nissan Leaf.
 Difference between predicted and
actual distances
Difference between predicted and
actual distances
The superimposed guidelines displayed on the monitor panel and their indicated contact points on the ground are calibrated exclusively for approximate driver reference. Physical obstacles located on s ...
 Intelligent Around View Monitor
system limitations
Intelligent Around View Monitor
system limitations
WARNING
Listed below are the vital engineering system limitations for the Intelligent Around View Monitor.
Failure to operate your vehicle in strict accordance wi ...
Other materials:
Outside key antenna
Driver side
DRIVER SIDE : Removal and Installation
REMOVAL
Remove the driver side outside handle. Refer to DLK-176, "OUTSIDE HANDLE :
Removal and Installation".
INSTALLATION
Install in the reverse order of removal.
Passenger side
PASSENGER SIDE : Removal and Installation
REMOVA ...
A/C on signal
Component Function Check
1.CHECK A/C ON SIGNAL
With CONSULT-III
1. Turn ignition switch ON.
2. Operate blower motor.
3. Select “AIR CONDITIONER� of “BCM� using CONSULT-III.
4. Select “AIR COND SW� in “DATA MONITOR� mode.
5. Check A/C ON signal when the A/C switch is operated.
...
Rear oil seal
REAR OIL SEAL : Removal and Installation
REMOVAL
1. Remove transaxle assembly. Refer to TM-301, "Exploded View" (CVT models)
or TM-84, "MR16DDT :
Exploded View" (M/T models).
2. Remove clutch cover and clutch disk (M/T models). Refer to CL-29, "EXCEPT FOR
K9K : Explo ...
