
Nissan Leaf 2018-2025 (ZE1) Owner's Manual : How to quick charge
Quick charging allows you to replenish your Nissan Leaf battery in a significantly shorter period by utilizing public high-capacity charging stations. Depending on your specific vehicle configuration, these stations can deliver power up to 50 kW for 40 kWh battery models, or up to 100 kW for 60 kWh battery models, making them an ideal solution for rapid energy top-ups while on the road.
WARNING
- Always verify that the public quick charger is fully compatible with the specific charging standards of your Nissan Leaf. Utilizing an incompatible or non-certified quick charging station may pose a severe risk of fire, permanent system malfunction, or catastrophic electrical damage, potentially resulting in serious personal injury or death.
- Before initiating any quick charging sequence, take the time to carefully read and follow all operational instructions displayed on the charging station interface. Ensure the quick charge connector is firmly seated, properly aligned, and fully locked into the vehicle's port. Failure to follow correct connection and operation procedures can cause substantial damage to both your Nissan Leaf electrical architecture and the charging station equipment.
NOTE:
- Quick charging remains a viable option for multiple daily sessions provided the battery temperature remains within an optimal range, well away from the red zone. If the battery management system detects that temperatures have reached the red zone, the vehicle will automatically restrict quick charging to preserve battery longevity, and the power limitation mode will be engaged.
- Please be aware that the state-of-charge and total capacity readings displayed on the public charging unit may occasionally differ from the specific battery diagnostics shown on your Nissan Leaf instrument panel, as the station and vehicle may use slightly different calculation methodologies.
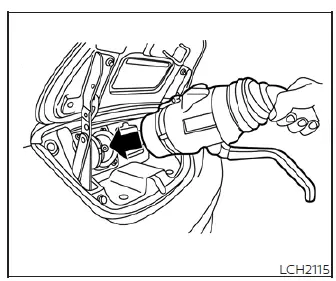
To start charging:
1. Ensure your vehicle is fully secured by pushing the P (Park) position switch and firmly applying the parking brake.
2. Before beginning the quick charge process, ensure the power switch of your Nissan Leaf is in the OFF position. Note that if the power switch remains in the ON position, the battery management system will prevent the charging cycle from initiating.
3. Safely open both the exterior charge port lid and the internal charge port cap to access the inlet.
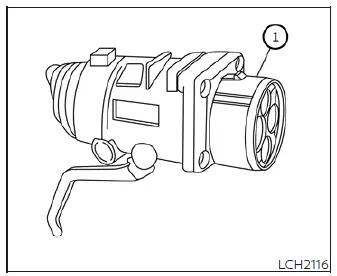
4. Carefully align the guide mark on the connector with the groove in the charge port, then insert the quick charge connector firmly into the inlet.
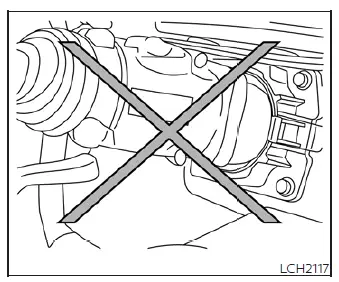
CAUTION
You must ensure the charge connector is inserted straight and fully into the quick charge port until it reaches the base. Inserting the connector at an angle or failing to seat it completely can lead to charging failure and may cause physical damage to the contact pins of your Nissan Leaf or the charging equipment.
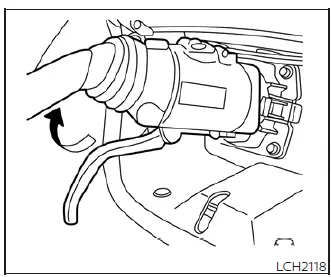
5. Once inserted, grasp the mechanical lock lever securely to lock the connector into place.
6. Proceed with the instructions provided by the quick charging station interface. Once the station recognizes the Nissan Leaf and is ready to deliver power, you will hear two audible beeps, and the charging status indicator lights on your vehicle dashboard will change to reflect the active charging mode. For details on interpreting these signals, refer to the "Charging status indicator lights" section.
Charging will conclude automatically in the following scenarios:
- When the battery reaches its designed maximum capacity.
- When the pre-set time limit specified by the public quick charger has been exceeded.
NOTE:
- The charging process may occasionally stop automatically before reaching 100% capacity due to station protocols or battery protection logic.
- If the session is interrupted prematurely, you can usually resume charging by following the prompts on the quick charger's control panel.
- During a session, the connector is mechanically locked to your Nissan Leaf. You must first stop the session via the charging station interface. Always confirm that charging has successfully ceased by checking the instrument panel indicators before attempting to disconnect.
- To protect the battery, the rate of charge will naturally slow down as the state-of-charge percentage increases during a quick charging session.
To finish charging:
1. Before disconnecting, confirm that the charging session has fully stopped by checking the status indicators on the Nissan Leaf instrument panel.
2. Disengage the mechanical lock, remove the connector from the vehicle, and ensure it is returned to the station’s holster for proper storage.
3. Secure the quick charge port cap back into place.
4. Firmly close the exterior charge port lid.
CAUTION
Be aware that the quick charge connector is significantly heavier than standard charging hardware. Exercise caution when removing it; if allowed to drop, the weight could damage the vehicle exterior, crack the charge connector housing, or cause personal injury.
When disconnecting, pull the connector out steadily and in a straight line to ensure a smooth removal process and to prevent stress on the charging interface of your Nissan Leaf.
 How to normal charge (AC 220-240 volt) by L1 & L2 EVSE
WARNING
Adhering strictly to the following safety protocols is mandatory. Failure to observe these warnings may result in severe property damage, critical system failure, or life-threatening inju ...
 How to charge/discharge using the quick charge port
The advanced V2X (Vehicle-to-Everything) technology allows your Nissan Leaf to act as a powerful mobile energy resource, enabling the vehicle to supply electricity to a variety of external systems, in ...
Other materials:
Blower fan resistor
Exploded View
1. A/C unit assembly
2. Fan control amp.*1
3. Blower fan resistor*2
4. Blower motor
5. Blower motor cover
• *1: Automatic air conditioner
• *2: Manual air conditioner
Removal and Installation
REMOVAL
1. Remove instrument panel assembly. Refer to IP-13, "Removal ...
System
System Diagram
System Description
REFRIGERANT CYCLE
Refrigerant Flow
The refrigerant from the compressor, flows the condenser with liquid tank, the
evaporator, and returns to the
compressor. The refrigerant evaporation in the evaporator is controlled by an
expansion valve.
Freeze Prote ...
Service regeneration
Description
Service Regeneration is performed with CONSULT-III to reduce particulate
matter in diesel particulate filter.
Service Regeneration should be performed in the following cases.
• ECM enters fail-safe mode because the amount of particulate matter in diesel
particulate filter reac ...
