
Nissan Juke Service and Repair Manual : Glow plug
Exploded View
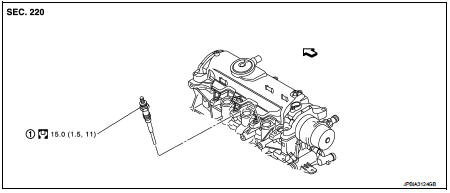
1. Glow plug
 Engine front
 : N·m (kg-m, ft-lb)
Removal and Installation
REMOVAL
CAUTION:
Remove glow plug only if necessary. If carbon adheres, it may be stuck and
broken.
1. Disconnect the battery cable from the negative terminal.
2. Remove cowl top extension. Refer to EXT-20, "Exploded View".
3. Remove engine under cover.
4. Remove turbocharger air inlet pipe. Refer to EM-280, "Exploded View".
5. Remove air inlet tube assembly and air inlet tube. Refer to EM-281, "Exploded View".
6. Remove High pressure protection cover (upper). Refer to EM-294, "Exploded View".
7. Disconnect harness connector from glow plug.
8. Remove glow plug.
CAUTION:
• When removing or installing, never use such tools as an air impact wrench.
• Handle it carefully without giving any impact, even after removal. [As a guide, if it drops from height of 10 cm (3.94 in) or higher, always replace it.]
INSTALLATION
1. Remove adhered carbon from glow plug installation hole with a reamer.
2. Install glow plug.
3. Install remaining parts in reverse order of removal.
 Oil pan
Exploded View
1. Baffle plate
2. Gasket
3. Oil pan
4. O-ring
5. Drain plug
6. Oil level gauge guide
7. Transaxle
8. Crankshaft position sensor (POS)
: N·m (kg-m, ft-lb)
: N·m (kg-m, ...
 Vacuum pump
Exploded View
1. Vacuum pump
2. Gasket
3. Damper valve bracket
4. Vacuum hose
A. To electric throttle control actuator
Engine front
: N·m (kg-m, ft-lb)
: Always replace after every
dis ...
Other materials:
Service data and specifications (SDS)
General Specifications
MR16DDT
HR16DE, K9K
Brake Pedal
Brake Booster
2WD
4WD
Front Disc Brake
MR16DDT
HR16DE, K9K
Rear Disc Brake
...
B1067, B1072 passenger air bag module
DTC Logic
DTC DETECTION LOGIC
DTC CONFIRMATION PROCEDURE
1.CHECK SELF-DIAG RESULT
With CONSULT-III
1. Turn ignition switch ON.
2. Perform “Self Diagnostic Result� mode of “AIR BAG� using CONSULT-III.
Without CONSULT-III
1. Turn ignition switch ON.
2. Check the air bag warning la ...
B2098 ignition relay on stuck
Description
The ignition relay integrated in IPDM E/R is operated with ignition switch ON
signal from the ignition switch.
DTC Logic
DTC DETECTION LOGIC
1.PERFORM DTC CONFIRMATION PROCEDURE
1. Turn ignition switch ON.
2. Check DTC in “Self Diagnostic Result� mode of “IPDM E/R� usin ...
