Nissan Juke Service and Repair Manual : Front oil seal
FRONT OIL SEAL : Removal and Installation
REMOVAL
1. Remove the following parts.
• Front fender protector (RH): Refer to EXT-22, "Exploded View".
• Drive belt: Refer to EM-20, "Exploded View".
• Crankshaft pulley: Refer to EM-67, "Exploded View".
2. Remove front oil seal with a suitable tool.
CAUTION:
Be careful not to damage front cover and crankshaft.
INSTALLATION
1. Apply new engine oil to new front oil seal joint surface and seal lip.
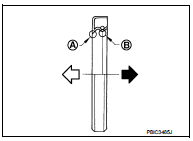
2. Install front oil seal so that each seal lip is oriented as shown in the figure.
A : Dust seal lip
B : Oil seal lip
 : Engine outside
 : Engine inside
• Press-fit front oil seal using a suitable drift with outer diameter 57 mm (2.24 in) and inner diameter 45 mm (1.77 in).
Within 0.3 mm (0.012 in) toward engine front (crankshaft pulley side) Within 0.5 mm (0.020 in) toward engine rear (crankshaft sprocket side)
CAUTION:
• Be careful not to damage front cover and crankshaft.
• Press-fit oil seal straight to avoid causing burrs or tilting.
3. Install in the reverse order of removal, for the rest of parts.
 Valve oil seal
VALVE OIL SEAL : Removal and Installation
REMOVAL
1. Remove camshafts. Refer to EM-78, "Exploded View".
2. Remove valve lifters. Refer to EM-78, "Exploded View".
3. Rotate cran ...
 Rear oil seal
REAR OIL SEAL : Removal and Installation
REMOVAL
1. Remove transaxle assembly. Refer to TM-301, "Exploded View" (CVT models)
or TM-84, "MR16DDT :
Exploded View" (M/T models).
...
Other materials:
General Precautions
WARNING:
When replacing fuel line parts, be sure to observe the following.
• Put a ???CAUTION: FLAMMABLE??? sign in the workshop.
• Be sure to work in a well ventilated area and furnish workshop with a CO2 fire
extinguisher.
• Never smoke while servicing fuel system. Keep open flames a ...
Front seat belt
Exploded View
1. Adjuster cover
2. Anchor bolt
3. Shoulder anchor
4. Spacer
5. Retaining washer
6. Seat belt adjuster
7. Seat belt pre-tensioner retractor
(Passenger side)
8. Outer anchor
9. Seat belt pre-tensioner retractor
(Driver side)
10. Seat belt buckle
11. Wave washer
&n ...
Fuses
Motor compartment
WARNING
Under no circumstances should you touch, disassemble, remove, or replace any high-voltage components, cables, or their associated connectors. High-voltage cables in your Nissan Leaf are identified by their distinctive orange outer i ...
