Nissan Juke Service and Repair Manual : Charging system preliminary inspection
Inspection Procedure
1.CHECK BATTERY TERMINALS CONNECTION
Check if battery terminals are clean and tight.
Is the inspection result normal? YES >> GO TO 2.
NO >> Repair battery terminals connection.
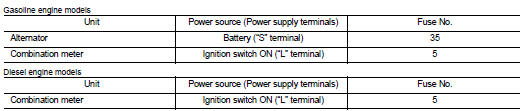
2.CHECK FUSE
Check for blown fuse and fusible link.
Is the inspection result normal? YES >> GO TO 3.
NO >> Be sure to eliminate the cause of malfunction before installing new fuse.
3.CHECK “E” TERMINAL CONNECTION (ALTERNATOR GROUND)
Check if “E” terminal (alternator ground) is clean and tight.
Is the inspection result normal? YES >> GO TO 4.
NO >> Repair “E” terminal (alternator ground) connection.
4.CHECK DRIVE BELT TENSION
Check drive belt tension. Refer to the following.
• HR16DE engine models: EM-154, "Checking" • MR16DDT engine models: EM-20, "Checking" • K9K engine models: EM-276, "Checking Drive Belts"
Is the inspection result normal? YES >> INSPECTION END
NO >> Repair as needed.
 Diagnosis and repair workflow
Gasoline engine models
GASOLINE ENGINE MODELS : Work Flow
OVERALL SEQUENCE
DETAILED FLOW
1.PRELIMINARY INSPECTION
Perform the preliminary inspection. Refer to CHG-17, "Inspection Procedure ...
 Power generation voltage variable control system operation
inspection
Power generation voltage variable control system operation
inspection
Inspection Procedure
CAUTION:
When performing this inspection, always use a charged battery that has completed
the battery inspection.
(When the charging rate of the battery is low, the respons ...
Other materials:
Front wiper motor lo circuit
Component Function Check
1.CHECK FRONT WIPER LO OPERATION
CONSULT-III ACTIVE TEST
1. Select “FRONT WIPER” of IPDM E/R active test item.
2. With operating the test item, check front wiper operation.
Lo : Front wiper (LO) operation
Off : Stop the front wiper.
Is front wiper (LO) operation n ...
Steering switch signal A circuit
Description
Transmits the steering switch signal to NAVI control unit.
Diagnosis Procedure
1.CHECK STEERING SWITCH SIGNAL A CIRCUIT
1. Disconnect NAVI control unit connector and spiral cable connector.
2. Check continuity between NAVI control unit harness connector and spiral cable
harness co ...
Instrument panel assembly
Exploded View
LHD models
1. Front passenger air bag module
2. Instrument panel assembly
3. Instrument side finisher LH
4. Combination meter
5. Cluster lid A
6. Push-button ignition switch
7. Steering column upper cover
8. Steering lock escutcheon
9. Steering column lower cover
10. ...
