Nissan Juke Service and Repair Manual : Blower fan resistor
Exploded View
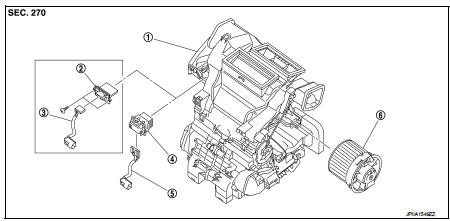
1. A/C unit assembly
2. Blower fan resistor*1
3. Sub harness*1
4. Power transistor*2
5. Sub harness*2
6. Blower motor
• *1: Manual air conditioner • *2: Automatic air conditioner
Removal and Installation
REMOVAL
1. Remove instrument panel assembly. Refer to IP-13, "Removal and
Installation". (LHD models)
2. Remove glove box assembly. Refer to IP-13, "Removal and Installation". (RHD
models)
3. Disconnect blower fan resistor harness connector.
4. Remove fixing screws, and then remove blower fan resistor from A/C unit assembly.
INSTALLATION
Install in the reverse order of removal.
 Refrigerant pressure sensor
Exploded View
Refer to HA-94, "Exploded View".
Removal and Installation
REMOVAL
Refer to HA-96, "REFRIGERANT PRESSURE SENSOR : Removal and Installation".
INSTALLATION
Insta ...
 Door cable
Exploded View
LEFT SIDE
1. A/C unit assembly
2. Intake door lever
3. Intake door link
4. Intake door cable
5. Air mix door cable
6. Upper air mix door rod
7. Upper air mix door lever
8 ...
Other materials:
B2014 chain of STRG-IMMU
DTC Logic
DTC DETECTION LOGIC
DTC CONFIRMATION PROCEDURE
1.PERFORM DTC CONFIRMATION PROCEDURE
1. Lock steering.
NOTE:
3. Press the push-button ignition switch.
4. Check DTC in “Self Diagnostic Result” mode of “BCM” using CONSULT-III.
Is DTC detected?
YES >> Go to SEC-7 ...
Air conditioner filter
Exploded View
LHD models
1. A/C unit assembly
2. Air conditioner filter
3. Filter cover
Removal and Installation (LHD models)
REMOVAL
1. Remove glove box assembly. Refer to IP-13, "Removal and Installation".
2. Remove filter cover (1), and then remove air conditioner filter (2) ...
Diagnosis system (IPDM E/R)
With intelligent key
WITH INTELLIGENT KEY : Diagnosis Description
AUTO ACTIVE TEST
Description
In auto active test mode, the IPDM E/R sends a drive signal to the following
systems to check their operation.
• Oil pressure warning lamp (only for K9K engine models)
• Rear window defogger
...
