Nissan Juke Service and Repair Manual : B261F ASCD clutch switch
DTC Logic
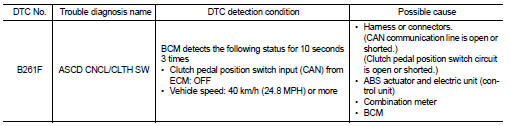
DTC DETECTION LOGIC
NOTE
:
• If DTC B261F is displayed with DTC U1000, first perform the trouble diagnosis
for DTC U1000. Refer to
BCS-83, "DTC Logic".
• If DTC B261F is displayed with DTC U1010, first perform the trouble diagnosis for DTC U1010. Refer to BCS-84, "DTC Logic".
DTC CONFIRMATION PROCEDURE
1.PERFORM DTC CONFIRMATION PROCEDURE
1. Start the engine.
2. Drive vehicle at a speed of 40 km/h (24.8 MPH) or more for 10 seconds.
3. Decrease the vehicle speed to below 40 km/h (24.8 MPH).
4. Repeat steps 2 and 3 twice (total of 3 times).
5. Check DTC in “Self Diagnostic Result” mode of “BCM” using CONSULT-III.
Is DTC detected? YES >> Go to SEC-108, "Diagnosis Procedure".
NO >> INSPECTION END
Diagnosis Procedure
1.CHECK DTC OF “ABS ACTUATOR AND ELECTRIC UNIT (CONTROL UNIT)”
Check DTC in “Self Diagnostic Result” mode of “ABS” using CONSULT-III.
Is DTC detected? YES >> Perform the trouble diagnosis related to the detected DTC. Refer to BRC-31, "DTC Index" (Without ESP) or BRC-142, "DTC Index" (With ESP).
NO >> GO TO 2.
2.CHECK DTC OF COMBINATION METER
Check DTC in “Self Diagnostic Result” mode of “METER/M&A” using CONSULT-III. Refer to MWI-36, "DTC Index".
Is the inspection result normal? YES >> GO TO 3.
NO >> Repair or replace the malfunctioning parts.
3.CHECK CLUTCH PEDAL POSITION SWITCH CIERCUIT
Refer to EC-427, "Component Function Check" (MR16DDT), EC-771, "Component Function Check" (HR16DE), or EC-980, "DTC Logic" (K9K).
Is the inspection result normal? YES >> GO TO 4.
NO >> Repair or replace the malfunctioning parts.
4.CHECK INTERMITTENT INCIDENT
Refer to GI-42, "Intermittent Incident".
>> INSPECTION END
 B261A Push-button ignition switch
DTC Logic
DTC DETECTION LOGIC
NOTE:
• If DTC B261A is displayed with DTC U1000, first perform the trouble diagnosis
for DTC U1000. Refer to
BCS-83, "DTC Logic".
• If DTC B261A is ...
 B2620 Park/neutral position switch
DTC Logic
DTC DETECTION LOGIC
DTC CONFIRMATION PROCEDURE
1.PERFORM DTC CONFIRMATION PROCEDURE
1. Turn ignition switch ON and wait 2 seconds or more under the following
conditions.
2. Set shif ...
Other materials:
Windshield wiper and washer switch
WARNING
In freezing temperatures the washer solution may freeze on the windshield
and obscure your vision which may lead to an accident. Warm windshield with the
defroster before you wash the windshield.
CAUTION
• Do not operate the washer continuously for more than 30 seconds.
• Do not ...
Power supply and ground circuit
Diagnosis Procedure
1.CHECK FUSE AND FUSIBLE LINK
Check that the following fuse and fusible link are not blown.
Is the fuse fusing?
YES >> Replace the blown fuse or fusible link after repairing the affected
circuit if a fuse or fusible link is
blown.
NO >> GO TO 2.
2.CHECK ...
Checking engine coolant level
Check the coolant level in the reservoir when the engine is cold. If the coolant
level is below the MIN level 2 , open the reservoir cap and add coolant up to the
MAX level 1 . If the reservoir is empty, check the coolant level in the radiator
when the engine is cold. If there is insufficien ...
