Nissan Juke Service and Repair Manual : Air breather hose
Removal and Installation
REMOVAL
1. Remove clip from bracket.
2. Remove air breather hose from transaxle assembly.
INSTALLATION
Note the following, and install in the reverse order of removal.
CAUTION:
• Check that air breather hose is not collapsed or blocked due to folding or
bending when installed.
• Securely install the clip to the bracket.
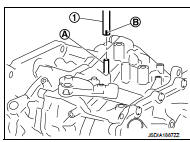
• Be sure to insert it fully until its end reaches the stop when inserting air breather hose (1) to transaxle tube (A).
• Install air breather hose to transaxle tube so that the paint mark (B) is facing frontward.
 TCM
TCM
Exploded View
1. Bracket
2. TCM
:Vehicle front
: N·m (kg-m, in-lb)
Removal and Installation
CAUTION:
When replacing TCM, note the “CVTF DETERIORATION DATE” value displayed on
CONSULT- ...
 G sensor
Exploded View
1. Bracket
2. G sensor
: Vehicle front
: N·m (kg-m, ft-lb)
: N·m (kg-m, in-lb)
Removal and Installation
CAUTION:
• Never drop or strike G sensor, because it has little tol ...
Other materials:
5TH main gear assembly
Removal and Installation
REMOVAL
1. Shift the shifter lever to the 3rd gear position.
2. Disconnect the shifter cable and the selector cable from shifter lever A and
selector lever. Refer to TM-25,
"Removal and Installation".
CAUTION:
Never move shifter lever A and the selector l ...
Engine oil
Inspection
ENGINE OIL LEVEL
NOTE:
Before starting engine, put vehicle horizontally and check the engine oil level.
If engine is already started, stop
it and allow 10 minutes before checking.
1. Pull out oil level gauge and wipe it clean.
2. Insert oil level gauge and check that the engine ...
P0031, P0032 A/F sensor 1 heater
DTC Logic
DTC DETECTION LOGIC
DTC CONFIRMATION PROCEDURE
1.PRECONDITIONING
If DTC Confirmation Procedure has been previously conducted, always turn
ignition switch OFF and wait wait
at least 10 seconds before conducting the next test.
TESTING CONDITION:
Before performing the following p ...
