
Nissan Juke Service and Repair Manual : A/C auto AMP.
Removal and Installation
REMOVAL
1. Remove audio unit. Refer to AV-38, "Removal and Installation".
2. Remove inside key antenna (instrument center). Refer to DLK-188, "INSTRUMENT CENTER : Removal and Installation".
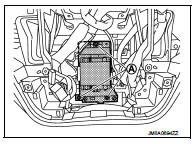
3. Remove fixing screws (A), and then remove A/C auto amp.
INSTALLATION
Install in the reverse order of removal.
 Controller
Removal and Installation
REMOVAL
Remove multi display unit. Refer to IP-13, "Removal and Installation".
INSTALLATION
Install in the reverse order of removal. ...
 Ambient sensor
Removal and Installation
REMOVAL
1. Remove bumper fascia assembly. Refer to EXT-13, "Removal and
Installation".
2. Disengage fixing pawl, and then remove ambient sensor (1)
from air gu ...
Other materials:
P1723 speed sensor
Description
The secondary speed sensor detects the revolution of parking gear and
generates a pulse signal. The pulse
signal is sent to the TCM, which converts it into vehicle speed.
The prymary speed sensor detects the primary pulley revolution speed and sends a
signal to the TCM.
DTC Log ...
Structure and operation
Sectional View
1. 3rd input gear
2. 3rd-4th synchronizer hub assembly
3. 4th input gear
4. 5th input gear
5. 5th-6th synchronizer hub assembly
6. 6th input gear
7. Transaxle case
8. 6th main gear
9. 5th main gear
10. 4th main gear
11. 3rd main gear
12. 2nd main gear
13. 1st-2n ...
B2622 inside antenna
DTC Logic
DTC DETECTION LOGIC
DTC CONFIRMATION PROCEDURE
1.PERFORM DTC CONFIRMATION PROCEDURE
1. Select “INTELLIGENT KEY� of “BCM� using CONSULT-III.
2. Select “INSIDE ANT DIAGNOSIS� in “WORK SUPPORT� mode.
3. Perform inside key antenna (“INSIDE ANT DIAGNOSIS�) on “WORK ...
