Nissan Juke Service and Repair Manual : Thermostat
Exploded View
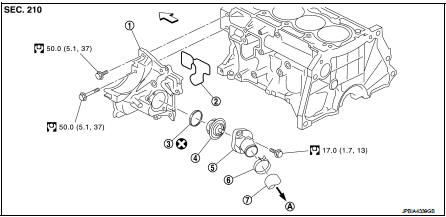
1. Thermostat housing
2. Gasket
3. Rubber ring
4. Thermostat
5. Water inlet
6. Clamp
7. Radiator hose (upper)
A. To radiator
 Engine front
 : N·m (kg-m, ft-lb)
 : Always replace after every
disassembly.
Removal and Installation
REMOVAL
1. Drain engine coolant from radiator. Refer to CO-11, "Draining".
CAUTION:
Perform this step when engine is cold.
2. Remove intake manifold. Refer to EM-28, "Exploded View".
3. Disconnect radiator hose (lower) (RH) from water inlet. Refer to CO-17, "Exploded View".
4. Remove water inlet and thermostat.
• Engine coolant leakage from cylinder block, so have a receptacle ready below.
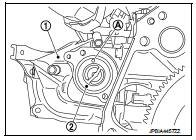
Thermostat housing
1. Drain engine coolant. Refer to CO-11, "Draining".
2. Remove alterator. Refer to CHG-30, "MR16DDT : Exploded View".
3. Remove water pump. Refer to CO-22, "Exploded View".
4. Disconnect water hose, and them remove thermostat housing.
INSTALLATION
Note the following, and install in the reverse order of removal.
Thermostat
• Install thermostat with making rubber ring (1) groove fit to thermostat flange (A) with the whole circumference.
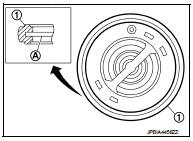
• Install thermostat (2) with jiggle valve (A) facing upwards.
1 : Thermostat housing
Thermostat housing
• Install in the reverse order of removal.
Inspection
INSPECTION AFTER REMOVAL
Thermostat
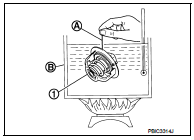
• Place a thread (A) so that it is caught in the valves of thermostat
(1). Immerse fully in a container (B) filled with water. Heat while
stirring.
• The valve opening temperature is the temperature at which the valve opens and falls from the thread.
• Continue heating. Check the full open valve lift amount.
• After checking the maximum valve lift amount, lower the water temperature and check the valve closing temperature.
Standard: Refer to CO-29, "Thermostat".
• If out of the standard, replace thermostat.
INSPECTION AFTER INSTALLATION
• Check for leakage of engine coolant using the radiator cap tester adapter (commercial service tool) and the radiator cap tester (commercial service tool). Refer to CO-11, "Inspection".
• Start and warm up the engine. Check visually that there is no leakage of engine coolant.
 Water pump
Exploded View
1. Gasket
2. Water pump
: N·m (kg-m, ft-lb)
: Always replace after every
disassembly.
Removal and Installation
REMOVAL
1. Drain engine coolant from radiator. Refer to CO-11, ...
 Water outlet
Exploded View
1. Heater pipe bracket
2. Radiator cap
3. Water outlet adaptor
4. Clamp
5. Water outlet hose
6. Clamp
7. Heater hose
8. Clamp
9. Water outlet
10. Clamp
11. Heater hos ...
Other materials:
B2192 ID discord, IMMU-ECM
DTC Logic
DTC DETECTION LOGIC
DTC CONFIRMATION PROCEDURE
1.PERFORM DTC CONFIRMATION PROCEDURE
1. Turn ignition switch ON.
2. Check DTC in “Self Diagnostic Result” mode of “BCM” using CONSULT-III.
Is DTC detected?
YES >> Go to SEC-60, "Diagnosis Procedure".
NO &g ...
Component parts
Component Parts Location
1. BCM
• With Intelligent Key: Refer to BCS-
6, "BODY CONTROL SYSTEM :
Component Parts Location".
• Without Intelligent Key: Refer to
BCS-96, "BODY CONTROL SYSTEM
: Component Parts Location".
2. Magnet clutch 3. Refrigerant pressure sensor
...
Control panel buttons — color screen with navigation system (if so equipped)
1. (brightness control) button
2. Display screen
3. MAP button
4. NAV button
5. TRAF button
6. SETUP button
7. BACK button
8. TUNE/SCROLL knob
9. Power button/Volume control knob
For navigation system control buttons, refer to the separate Navigation System
Owner’s Manual.
Wh ...
