Nissan Juke Service and Repair Manual : Secondary speed sensor
Exploded View

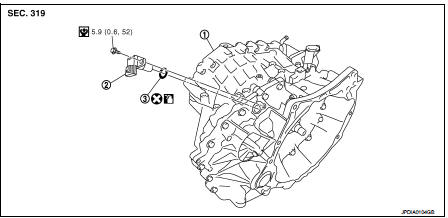
1. Transaxle assembly 2. Secondary speed sensor 3. O-ring
 : Always replace after every
disassembly.
 : N·m (kg-m, in-lb)
 : Genuine NISSAN CVT Fluid NS-2
Removal and Installation
REMOVAL
1. Remove air cleaner case. Refer to EM-26, "Removal and Installation".
2. Remove secondary speed sensor connector.
3. Remove secondary speed sensor.
4. Remove O-ring from secondary speed sensor.
INSTALLATION
Note the following, and install in the reverse order of removal.
CAUTION:
• Never reuse O-ring.
• Apply CVT fluid to O-ring.
Inspection and Adjustment
INSPECTION AFTER INSTALLATION
Check for CVT fluid leakage. Refer to TM-480, "Inspection".
ADJUSTMENT AFTER INSTALLATION
Adjust the CVT fluid level. Refer to TM-379, "Adjustment".
 Primary speed sensor
Exploded View
1. Transaxle assembly
2. O-ring
3. Primary speed sensor
: Always replace after every
disassembly.
: N·m (kg-m, in-lb)
: Genuine NISSAN CVT Fluid NS-2
Removal and Installatio ...
 Differential side oil seal
Exploded View
1. Transaxle assembly
2. Differential side oil seal (left side)
3. Differential side oil seal (right side)
: Always replace after every
disassembly.
: Genuine NISSAN CVT Fluid ...
Other materials:
Sealant or/and Lubricant
HFC-134a (R-134a) Service Tool and Equipment
• Never mix HFC-134a (R-134a) refrigerant and/or its specified lubricant with
CFC-12 (R-12) refrigerant and/
or its lubricant.
• Separate and non-interchangeable service equipment must be used for handling
each type of refrigerant/
lubricant.
• R ...
Replacement operations
Description
• This section is prepared for technicians who have attained a high level of
skill and experience in repairing
collision-damaged vehicles and also use modern service tools and equipment.
Persons unfamiliar with body
repair techniques should not attempt to repair collision-damaged ...
Washing
Wash dirt off the vehicle with a wet sponge and plenty of water. Clean the vehicle
thoroughly using a mild soap, a special vehicle soap or general purpose dishwashing
liquid mixed with clean, lukewarm (never hot) water.
CAUTION
• Do not use car washes that use acid in the detergent. Some car w ...
