
Nissan Leaf 2018-2025 (ZE1) Owner's Manual : Rear-facing child restraint installation using the seat belts
WARNING
You must utilize the three-point seat belt equipped with an Automatic Locking Retractor (ALR) when securing a child restraint.
Failing to properly engage the ALR mode means the child restraint will not be secured effectively. This can allow the restraint to tip over or shift during a sudden stop or collision, posing a significant injury risk to the child. Furthermore, improper seat belt configuration can adversely affect the operation of the front passenger air bag system.
Before installing a child restraint, carefully review all safety Warnings and Cautions provided in the "Child safety" and "Child restraints" sections of your Owner's Manual. Please note that you should not use the lower LATCH anchors if the combined weight of the child and the child restraint exceeds 65 lbs. (29.5 kg).
If the combined weight of the child and the child restraint is greater than 65 lbs. (29.5 kg), you are required to use the vehicle's standard seat belt system—rather than the lower LATCH anchors—to install the restraint. Always follow the installation instructions provided by the child restraint manufacturer to ensure proper setup in your Nissan Leaf.
Follow these steps to safely install a rear-facing child restraint using the vehicle seat belt in the rear seating positions:
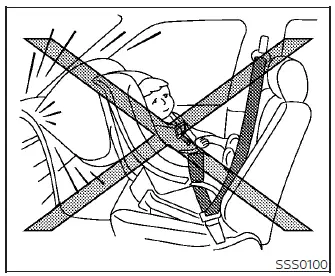
Rear-facing - step 1
1. Child restraints designed for infants must always be used in a rear-facing orientation and must never be installed in the front passenger seat. Position the child restraint firmly on the designated rear seat, ensuring you adhere strictly to the manufacturer's specific positioning instructions.
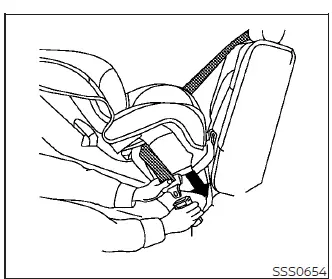
Rear-facing - step 2
2. Route the seat belt tongue through the appropriate path on the child restraint as defined by the manufacturer, then insert it into the buckle until you hear a clear click and feel the latch engage securely. Verify that the belt is routed exactly as specified to ensure the stability of the restraint.
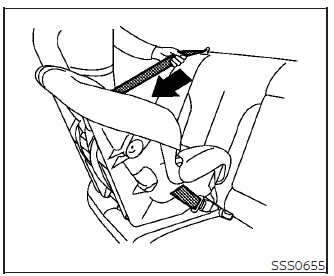
Rear-facing - step 3
3. Pull the shoulder portion of the seat belt until it is fully extended. In this state, the seat belt retractor automatically enters the ALR mode (the designated child restraint mode). The system will revert to the standard Emergency Locking Retractor (ELR) mode only after the seat belt has been allowed to retract fully.
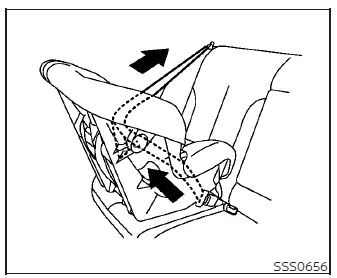
Rear-facing - step 4
4. Allow the seat belt to retract into the mechanism. While it retracts, pull upward on the shoulder belt portion to draw out any remaining slack, ensuring the belt is taut against the restraint frame.
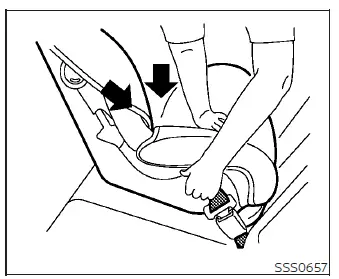
Rear-facing - step 5
5. To achieve a rock-solid installation, you must remove all additional slack. Press downward and rearward firmly in the center of the child restraint with your hand to compress the Nissan Leaf seat cushion and seatback, while simultaneously pulling up on the seat belt webbing to lock it into place.
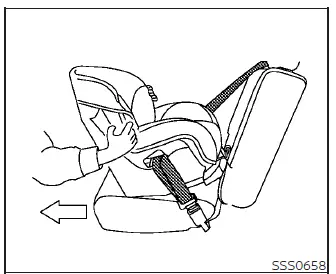
Rear-facing - step 6
6. After the restraint is attached, test the installation before placing the child inside. Push the restraint from side to side while holding it near the seat belt path. It should not move more than 1 inch (25 mm) in any direction. Additionally, tug it forward to confirm that the belt holds the restraint securely. If the restraint feels unstable, re-tighten the seat belt or try installing the restraint in a different seating position. If the issue persists, you may need to consider a different child restraint model, as not all seats are compatible with every vehicle interior.
7. Always perform a quick check to verify that the child restraint is properly secured before each use. If the seat belt is not locked firmly, repeat steps 1 through 6 to guarantee safety.
Once the child restraint is removed and the seat belt is allowed to retract fully, the ALR mode (child restraint mode) will be automatically canceled, returning the belt to standard operation.
 Rear-facing child restraint installation using LATCH
Before proceeding with the installation of any child safety seat, please ensure you have thoroughly reviewed all Warnings and Cautions detailed in the "Child safety" and "Child restraints" sections of ...
 Forward-facing child restraint installation using LATCH
A critical safety limitation applies to the LATCH system: do not utilize the lower anchors if the combined weight of the child and the child restraint exceeds 65 lbs. (29.5 kg). If the total weight su ...
Other materials:
Push-button ignition switch position indicator
Description
Push-button ignition switch changes the power supply position.
BCM maintains the power supply position status.
BCM changes the power supply position with the operation of the push-button
ignition switch.
Component Function Check
1.CHECK FUNCTION
Check push-button ignition swi ...
Precaution Necessary for Steering Wheel Rotation after Battery Disc
NOTE:
• Before removing and installing any control units, first turn the ignition
switch to the LOCK position, then disconnect
both battery cables.
• After finishing work, confirm that all control unit connectors are connected
properly, then re-connect both
battery cables.
• Always us ...
Shift P warning lamp
Component Function Check
1.CHECK FUNCTION
1. Select “INTELLIGENT KEY� of “BCM� using CONSULT-III.
2. Select “LCD� in “ACTIVE TEST� mode.
3. Check that the function operates normally according to the following
conditions.
Is the inspection result normal?
YES >> Shift P ...
