
Nissan Leaf 2018-2025 (ZE1) Owner's Manual : Rear-facing child restraint installation using LATCH
Before proceeding with the installation of any child safety seat, please ensure you have thoroughly reviewed all Warnings and Cautions detailed in the "Child safety" and "Child restraints" sections of your Owner's Manual to ensure full compliance with safety standards.
Important weight restrictions apply: do not utilize the lower LATCH anchors if the combined weight of the child and the child restraint exceeds 65 lbs. (29.5 kg). Should the total weight surpass this threshold, you must use the vehicle's standard seat belt system—rather than the lower LATCH anchors—to install the restraint. Always adhere strictly to the installation guidelines and weight limits provided by the child restraint manufacturer for your specific Nissan Leaf configuration.
Follow these precise steps to properly install a rear-facing child restraint in your vehicle using the LATCH system:
1. Position the child restraint securely on the desired rear seat.
Ensure the restraint is placed according to the specific orientation and positioning recommendations outlined in the child restraint manufacturer's instructions.
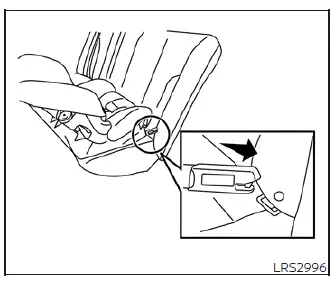
Rear-facing webbing-mounted - step 2
2. Securely connect the child restraint’s anchor attachments to the vehicle's LATCH lower anchors. Verify with a firm tug that each LATCH attachment is fully engaged and properly locked onto the lower anchor bars.
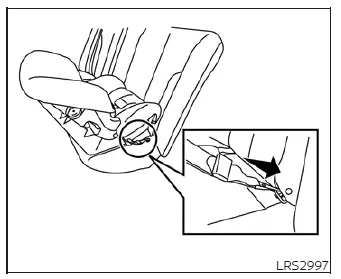
Rear-facing rigid-mounted - step 2
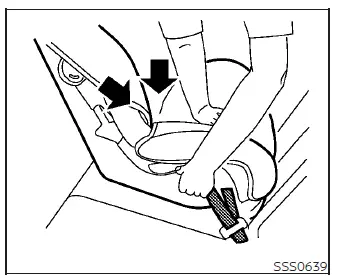
Rear-facing - step 3
3. If your child restraint utilizes webbing-mounted attachments, remove any excess slack to ensure a snug fit. To achieve maximum tension, press downward and rearward firmly in the center of the child restraint with your hand; this compresses the Nissan Leaf vehicle seat cushion and seatback, allowing you to tighten the anchor webbing effectively for a more stable install.
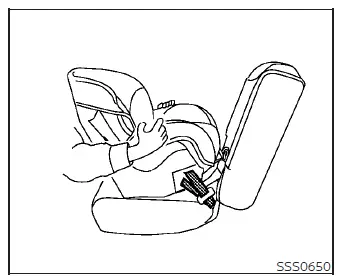
Rear-facing - step 4
4. Once attached, it is critical to test the restraint for stability before placing your child inside. Grasp the child restraint near the LATCH attachment points and push it firmly from side to side, as well as tugging it forward. A properly secured restraint should move no more than 1 inch (25 mm) in any direction. If there is excessive movement, re-tighten the LATCH attachments or reinstall the seat in a different position. If stability cannot be achieved, you may need to try a different child restraint model or opt for installation using the vehicle’s seat belt if your restraint and vehicle configuration allow it.
Please remember that due to variations in vehicle interior geometry, not every child restraint model is compatible with every vehicle.
5. Always perform a final safety check to ensure that the child restraint is firmly secured before every trip. If you detect any looseness or shifting, repeat steps 2 through 4 to ensure the safety of your child while traveling in your Nissan Leaf.
 LATCH (Lower Anchors and Tethers for CHildren) system
LATCH system lower anchor locations
Your Nissan Leaf is engineered with dedicated anchor points designed for use with LATCH-compatible child restraints, a system also wi ...
 Rear-facing child restraint installation using the seat belts
WARNING
You must utilize the three-point seat belt equipped with an Automatic Locking Retractor (ALR) when securing a child restraint.
Failing to properly engage the ALR mode means the child ...
Other materials:
Additional service when replacing transaxle assembly
Description
Perform the following work after the transaxle assembly is replaced.
CHECK LOADING OF CALIBRATION DATA
• The TCM acquires calibration data (individual characteristic value) of each
solenoid that is stored in the
ROM assembly (in the control valve). This enables the TCM to perfo ...
RearView Monitor
CAMERA button (used to manually trigger the display views or adjust active screen brightness layouts)
MENU button (opens up global display preferences and system option configuration screens)
WARNING
Failure to follow all safety warnings and t ...
The light reminder warning does not sound
Description
Light reminder warning chime does not sound even though headlamp is
illuminated.
Diagnosis Procedure
1.CHECK COMBINATION SWITCH (LIGHTING SWITCH) OPERATION
Check that the headlamps operate normally by operating the combination switch
(lighting switch).
Do they operate normally ...
