
Nissan Leaf 2018-2025 (ZE1) Owner's Manual : LATCH (Lower Anchors and Tethers for CHildren) system
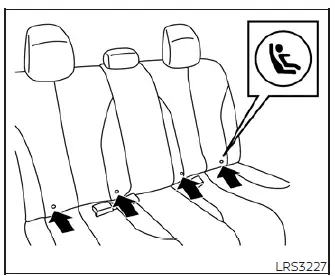
LATCH system lower anchor locations
Your Nissan Leaf is engineered with dedicated anchor points designed for use with LATCH-compatible child restraints, a system also widely recognized as ISOFIX or ISOFIX-compatible. This system streamlines the installation process, eliminating the need to use the vehicle’s standard seat belts to secure the restraint, provided the combined weight of the child and the child restraint does not exceed 65 lbs. (29.5 kg). Should the total weight exceed 65 lbs. (29.5 kg), you must secure the child restraint using the vehicle's seat belt rather than the lower anchors. Always prioritize the installation instructions provided by the child restraint manufacturer for your specific model.
LATCH anchor points are available for installing child restraints in either of the rear outboard seating positions or the center rear seating position. Please consult the corresponding section of your Owner's Manual for detailed, model-specific procedures regarding the installation of a child restraint in the center rear seating position using these LATCH anchors.
LATCH lower anchor
WARNING
- Failure to adhere to the safety warnings and installation instructions for child restraints can lead to severe injury or death for a child or other vehicle occupants in the event of a sudden stop or collision:
- Ensure that only LATCH-compatible child restraints are attached to the anchor points shown in the vehicle illustrations. Refer to the relevant sections of this Owner's Manual for comprehensive installation guidance.
- Physically inspect the lower anchors by inserting your fingers into the anchor area. Verify that there are no obstructions, such as stray seat belt webbing or bunched seat cushion material, covering the anchors. A child restraint cannot be secured properly if the LATCH lower anchors are obstructed.
- Child restraint anchorages are precision-engineered to support only the specific loads generated by correctly fitted child safety seats.
Under no circumstances should these anchor points be utilized to secure adult seat belts, supplemental harnesses, or to fasten any other cargo or equipment to the vehicle.
Misuse of these anchorages risks damaging them. If an anchorage point is compromised, the child restraint cannot be installed correctly, which significantly increases the risk of serious injury or fatality to a child during a collision.
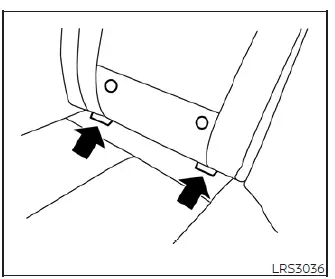
LATCH lower anchor location
LATCH lower anchor location
The LATCH lower anchors are positioned at the base of the rear seat cushion, right where it meets the seatback.
To assist you, a dedicated label is affixed to the seatback to help identify the precise location of each LATCH lower anchor.
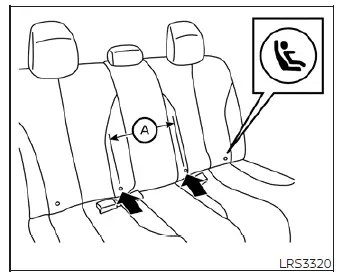
LATCH in the center rear seating position
While there are no anchors specifically dedicated to the center rear seat, the inboard LATCH anchors from the two outboard seating positions (indicated by markers) can be used to secure a Child Restraint System (CRS) in the center. These anchors are spaced at a distance of 15.8 in (400.3 mm). Before proceeding with this configuration, you must verify that the CRS manufacturer's instructions explicitly permit the use of LATCH anchors with this specific spacing.
This configuration is often referred to as using "shared" or "borrowed" anchors.
Note that any CRS featuring rigid lower attachments is incompatible with the center seating position and must be installed only in the outboard seating positions.
WARNING
- Never attach two separate CRS attachments to the same LATCH anchor. Doing so may overload the anchor point during a collision, dramatically increasing the risk of serious injury or death.
- When installing a CRS in the center rear seat using shared inboard anchors, ensure that any occupants or restraints in the outboard positions are properly secured using the vehicle seat belt, and confirm that there is no interference with the center installation. If it is impossible to properly restrain outboard occupants, consider using the vehicle seat belt for the center CRS, or relocate the restraint to a different seating position.
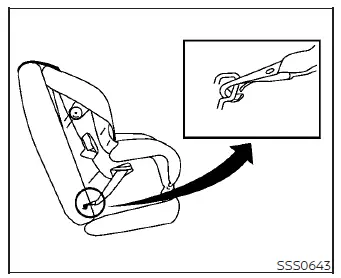
LATCH webbing-mounted attachment
Installing child restraint LATCH lower anchor attachments
LATCH-compatible child restraints feature two rigid or webbing-mounted attachments that connect securely to the anchors provided at specific seating positions in your Nissan Leaf. Using this system allows you to install the restraint without relying on the vehicle's seat belts. Always check the restraint for a manufacturer-provided label confirming its compatibility with the LATCH system, or consult the documentation provided by the manufacturer.
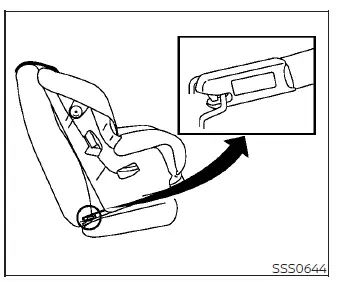
LATCH rigid-mounted attachment
The child restraint top tether strap must always be used when installing a restraint with either the LATCH lower anchor attachments or the vehicle seat belts. For further technical details, see the "Top tether anchor" section for complete installation instructions.
Throughout the installation process, ensure you thoroughly read and follow both the guidelines in this Owner's Manual and the specific instructions provided by the child restraint manufacturer.
Top tether anchor
WARNING
- If the cargo cover (tonneau cover) contacts the top tether strap while it is attached to the anchor, remove the cover from the vehicle or secure it on the cargo floor beneath the attachment point. Failure to remove an obstructing cargo cover may lead to damage to the top tether strap during a collision, putting your child at risk of serious injury or death.
- Never allow cargo to press against or contact the top tether strap when it is secured to the anchor. Properly stow and secure all cargo so that it remains clear of the strap. Improperly secured cargo that contacts the tether strap may cause it to fail during a collision.
A damaged top tether strap can result in serious injury or death to your child in an accident.
- Child restraint anchorages are designed to withstand only the specific loads imposed by correctly fitted child safety seats.
Under no circumstances should these points be used to attach adult seat belts, or any other items or equipment to the vehicle. Doing so could damage the child restraint anchorages.
A damaged anchorage will prevent the proper installation of a child restraint, potentially resulting in serious injury or fatality in a collision.
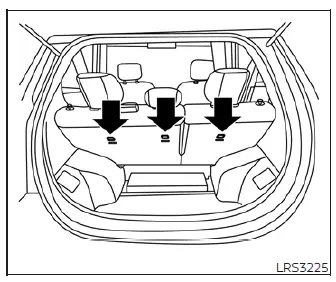
Top tether anchor point locations
The designated anchor points are located on the rear-facing side of the seatbacks.
The top tether strap is a critical safety component and must be used whenever installing a child restraint, whether you are using the LATCH lower anchors or the vehicle's seat belts. For detailed steps, refer to "Installing top tether strap."
Should you have any questions or require assistance while installing a top tether strap, we strongly recommend visiting a NISSAN certified LEAF dealer for professional guidance.
 Precautions on child restraints
WARNING
Failure to strictly adhere to the warnings and detailed instructions regarding the proper use and installation of child restraints ca ...
 Rear-facing child restraint installation using LATCH
Before proceeding with the installation of any child safety seat, please ensure you have thoroughly reviewed all Warnings and Cautions detailed in the "Child safety" and "Child restraints" sections of ...
Other materials:
Checking engine oil level
1. Park the vehicle on a level surface and apply the parking brake.
2. Run the engine until it reaches operating temperature.
3. Turn off the engine. Wait more than 10 minutes for the oil to drain back into
the oil pan.
4. Remove the dipstick and wipe it clean.
Reinsert it all the way.
5. R ...
PTC heater
Component Function Check
1.CHECK PTC HEATER OPERATION
1. Start the engine.
2. Operate fan control dial.
3. Operate temperature control dial to full hot position.
4. Check for warm air at discharge air outlet.
NOTE:
• Engine must be cold.
• Battery must be charged.
Is the inspection re ...
Repairing material
Foam Repair
During factory body assembly, foam insulators are installed in certain body
panels and locations around the
vehicle. Use the following procedure(s) to replace any factory-installed foam
insulators.
URETHANE FOAM APPLICATIONS
Use commercially available Urethane foam for sealant ...
