Nissan Juke Owners Manual : Rear-facing child restraint installation using LATCH
Refer to all Warnings and Cautions in the “Child safety” and “Child restraints” sections before installing a child restraint.
Follow these steps to install a rear-facing child restraint using the LATCH system:
1. Position the child restraint on the seat.
Always follow the child restraint manufacturer’s instructions.
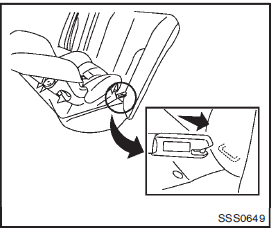
Rear-facing web-mounted — step 2
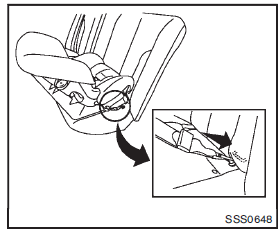
2. Secure the child restraint anchor attachments to the LATCH lower anchors. Check to make sure the LATCH attachment is properly attached to the lower anchors.
Rear-facing rigid-mounted — step 2
Rear-facing — step 3
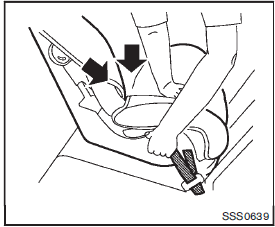
3. For child restraints that are equipped with webbing-mounted attachments, remove any additional slack from the anchor attachments.
Press downward and rearward firmly in the center of the child restraint with your hand to compress the vehicle seat cushion and seatback while tightening the webbing of the anchor attachments.
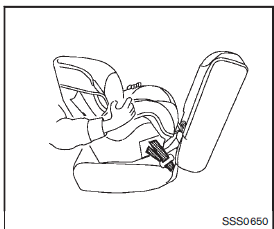
Rear-facing — step 4
4. After attaching the child restraint, test it before you place the child in it. Push it from side to side while holding the child restraint near the LATCH attachment path. The child restraint should not move more than 1 inch (25 mm), from side to side. Try to tug it forward and check to see if the LATCH attachment holds the restraint in place. If the restraint is not secure, tighten the LATCH attachment as necessary, or put the restraint in another seat and test it again. You may need to try a different child restraint or try installing by using the vehicle seat belt (if applicable). Not all child restraints fit in all types of vehicles.
5. Check to make sure the child restraint is properly secured prior to each use. If the child restraint is loose, repeat steps 1 through 4.
 Lower Anchors and Tethers for CHildren System (LATCH)
LATCH label location
Your vehicle is equipped with special anchor points that are used with LATCH
(Lower Anchors and Tethers for CHildren) system compatible child restraints. This
system may al ...
 Rear-facing child restraint installation using the seat belts
WARNING
The three-point seat belt with Automatic Locking Retractor (ALR) must be used
when installing a child restraint.
Failure to use the ALR mode will result in the child restraint not being ...
Other materials:
P0200 fuel injector
DTC Logic
DTC DETECTION LOGIC
Diagnosis Procedure
1.CHECK FUEL INJECTOR POWER SUPPLY CIRCUIT FOR OPEN AND SHORT
1. Turn ignition switch OFF.
2. Disconnect ECM harness connector.
3. Disconnect fuel injector harness connector.
4. Check the continuity between fuel injector harness connector an ...
Front door glass
Exploded View
1. Front door panel
2. Lower sash (front)
3. Sealing screen
4. Pull handle bracket
5. Front door glass run
6. Front door glass
7. Power window motor
8. Front door regulator assembly
9. Lower sash (rear)
: Vehicle front
Removal and Installation
REMOVAL
1. Fully open ...
In-cabin microfilter
The air conditioning system is equipped with an in-cabin microfilter which collects
dirt, pollen, dust, etc. To make sure the air conditioner heats, defogs, and ventilates
efficiently, replace the filter according to the specified maintenance log shown
in the NISSAN Service and Maintenance Gui ...
