Nissan Juke Service and Repair Manual : Oil filter
Exploded View
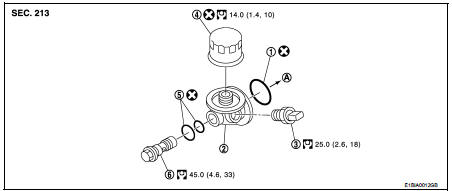
1. O-ring
2. Oil filter bracket
3. Oil pressure switch
4. Oil filter
5. O-ring
6. Connecting bolt
A. To oil cooler
 : N·m (kg-m, ft-lb)
 : Always replace after every
disassembly.
Removal and Installation
REMOVAL
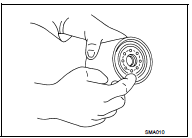
1. Using an oil filter wrench [SST:KV113C0010 (Mot.1329)] (A) remove oil filter.
CAUTION:
• Be careful not to get burned when the engine and engine oil
are hot.
• When removing, prepare a shop cloth to absorb any oil leakage or spillage.
• Never allow engine oil to adhere to the drive belts.
• Completely wipe off any oil that adhere to the engine and the vehicle.
INSTALLATION
1. Remove foreign materials adhering to the oil filter installation surface.
2. Install oil filter bracket to oil cooler.
CAUTION:
Install oil filter bracket, positioning lug in the hole of oil cooler.
3. Apply engine oil to the oil seal contact surface of the new oil filter.
4. Install the oil filter until it comes into contact with the oil seal on the engine bracket.
5. Tighten the oil filter three-quarters of a turn by hand.
6. After warming up the engine, check for engine oil leakage.
7. Check oil level and add engine oil. Refer to LU-33.
 Engine oil
Inspection
OIL LEVEL AND MUDDINESS
• Before starting the engine, check the oil level placing vehicle
horizontally.
If the engine is already started, stop it and allow 10 minutes
before check ...

Other materials:
Precaution for Supplemental Restraint System (SRS) "AIR BAG" and "SEAT BELT
PRE-TENSIONER"
The Supplemental Restraint System such as “AIR BAG” and “SEAT BELT PRE-TENSIONER”,
used along
with a front seat belt, helps to reduce the risk or severity of injury to the
driver and front passenger for certain
types of collision. This system includes seat belt switch inputs and dual s ...
P062B ECM
DTC Logic
DTC DETECTION LOGIC
Diagnosis Procedure
1.INSPECTION START
1. Turn ignition switch ON.
2. Erase DTC.
3. Turn ignition switch OFF and wait for 20 seconds.
4. Turn ignition switch ON and perform the self-diagnosis.
Is the DTC P062B displayed again?
YES >> GO TO 2.
NO &g ...
B26F1 ignition relay
DTC Logic
DTC DETECTION LOGIC
DTC CONFIRMATION PROCEDURE
1.PERFORM DTC CONFIRMATION PROCEDURE
1. Turn ignition switch ON under the following conditions, and wait for 2
seconds or more.
CVT models
- Selector lever is in the P or N position
- Do not depress brake pedal
M/T models
- Do n ...
