Nissan Juke Service and Repair Manual : Luggage room lamp
Exploded View
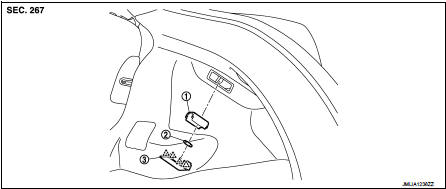
1. Bulb housing
2. Bulb
3. Lens
 : Pawl
Removal and Installation
CAUTION:
Disconnect the battery cable from negative terminal or remove the fuse.
REMOVAL
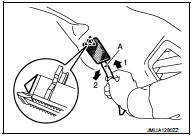
1. Insert a remover tool (A) into the gap between luggage room lamp and luggage side lower finisher RH.
2. Disengage luggage room lamp fixing pawl, and then disconnect luggage room lamp harness connector.
 : Pawl
3. Remove luggage room lamp from luggage side lower finisher RH.
INSTALLATION
Install in the reverse order of removal.
Replacement
CAUTION:
• Disconnect the battery cable from negative terminal or remove the fuse.
• Never touch the glass of bulb directly by hand. Keep grease and other oily substaces away from it. Never touch bulb by hand while it is lit or right after it is off.
• Never leave bulb out of lamp reflector for a long time because dust, moisture smoke, etc. may affect the performance of lamp. When replacing bulb, be sure to replace it with a new one.
LUGGAGE ROOM LAMP BULB
1. Remove the luggage room lamp.
2. Insert a remover tool (A) into the gap between the lens and bulb housing, and then disengage fixing pawls as shown by the arrow in the figure.
: Pawl
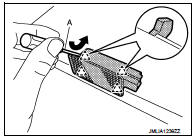
3. Remove the bulb.
 Map lamp
Exploded View
1. Map lamp bulb housing
2. Bulb
3. Lens
: Pawl
Removal and Installation
CAUTION:
Disconnect the battery negative terminal or the fuse.
REMOVAL
1. Remove the lens (1).
• ...
 Service data and specifications (SDS)
Bulb Specifications
*: With intelligent key ...
Other materials:
TCM branch line circuit
Diagnosis Procedure
1.CHECK CONNECTOR
1. Turn the ignition switch OFF.
2. Disconnect the battery cable from the negative terminal.
3. Check the following terminals and connectors for damage, bend and loose
connection (unit side and connector
side).
- TCM
- Harness connecotor F1
- Harness ...
System description
VENTILATION SYSTEM
System Description
OUTLINE
Ventilation system is controlled by A/C auto amp. (AUTOMATIC AIR
CONDITIONING) or A/C control (MANUAL
AIR CONDITIONING and MANUAL HEATER). For details of air conditioner system,
refer to HAC-17,
"System Description" (AUTOMATIC AIR COND ...
P0488 EGR system
DTC Logic
DTC DETECTION LOGIC
Diagnosis Procedure
1.CHECK EGR VOLUME CONTROL VALVE CONTROL CIRCUIT
1. Turn ignition switch OFF.
2. Disconnect EGR volume control valve harness connector and ECM harness
connector.
3. Check the continuity between EGR volume control valve terminal harness
co ...
