Nissan Juke Service and Repair Manual : Light & rain sensor
Exploded View
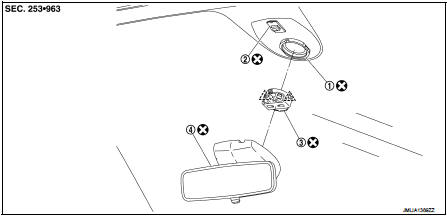
1. Light & rain sensor bracket
2. Mirror base
3. Light & rain sensor
4. Inside mirror assembly
 : Pawl
 : Do not reuse
Removal and Installation
CAUTION:
When the light & rain sensor is removed from windshield, the light & rain sensor
cannot be reused.
REMOVAL
1. Remove inside mirror assembly. Refer to MIR-41, "Removal and Installation".
2. Disconnect light & rain sensor connector.
3. Disengage both sides fixing pawls, and remove the light & rain sensor from the windshield.
INSTALLATION
Note the following items, and then install in the reverse order of removal.
CAUTION:
ŌĆó Surface of windshield should be cleaned.
ŌĆó Never touch gel/adhesive of new part.
 Front wiper drive assembly
Exploded View
REMOVAL
LHD models
1. Front wiper arm cap
2. Front wiper arm LH
3. Front wiper blade LH
4. Front wiper arm RH
5. Front wiper blade RH
6. Front wiper drive assembly
: Pawl
...
 Wiper and washer switch
Exploded View
The washer level switch must be replaced together with the washer tank as an
assembly. Refer to WW-67,
"Removal and Installation". ...
Other materials:
Vehicle load capacity
Do not exceed the load limit of your vehicle shown as ŌĆ£The combined weight of
occupants and cargoŌĆØ on the Tire and Loading Information label. Do not exceed the
number of occupants shown as ŌĆ£Seating CapacityŌĆØ on the Tire and Loading Information
label.
To get ŌĆ£the combined weight of o ...
Component parts
Component Parts Location
1. BCM
ŌĆó With Intelligent Key: Refer to BCS-
6, "BODY CONTROL SYSTEM :
Component Parts Location".
ŌĆó Without Intelligent Key: Refer to
BCS-96, "BODY CONTROL SYSTEM
: Component Parts Location".
2. Magnet clutch 3. Refrigerant pressure sensor
...
Push-button ignition switch position indicator
Description
Push-button ignition switch changes the power supply position.
BCM maintains the power supply position status.
BCM changes the power supply position with the operation of the push-button
ignition switch.
Component Function Check
1.CHECK FUNCTION
Check push-button ignition swi ...
