
Nissan Juke Service and Repair Manual : Ignition coil, spark plug and rocker cover
Exploded View
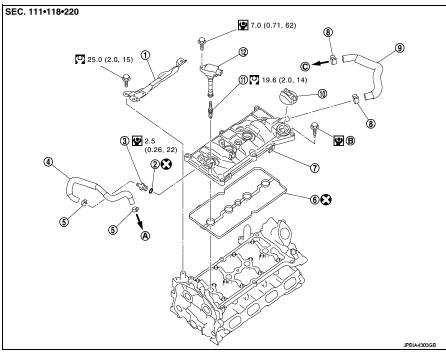
1. Rocker cover protector
2. O-ring
3. PCV control valve
4. PCV hose
5. Clamp
6. Rocker cover gasket
7. Rocker cover
8. Clamp
9. PCV hose
10. Oil filler cap
11. Spark plug
12. Ignition coil
A. To air duct assembly B.Tightening must be done following the installation procedure.
Refer to EM-53
C. To turbocharger inlet tube
 : N·m (kg-m, ft-lb)
 : N·m (kg-m, in-lb)
 : Always replace after every
disassembly.
Removal and Installation
REMOVAL
1. Drain engine coolant. Refer to CO-11, "Draining".
2. Remove engine cover. Refer to EM-25, "Exploded View".
3. Remove intake manifold. Refer to EM-28, "Exploded View".
4. Remove air inlet tube assembly. Refer to EM-31, "Exploded View".
5. Remove PCV hose.
6. Remove rocker cover protector.
7. Disconnect ignition coil harness connector, and them remove ignition coil.
CAUTION:
• Never drop or shock ignition coil.
• Never disassemble ignition coil.
8. Move ignition harness.
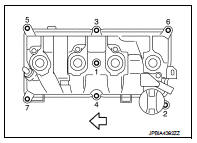
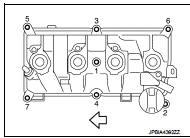
9. Remove rocker cover.
• Loosen bolts in reverse order shown in the figure.
 : Engine front
10. Remove PCV valve and PCV hose, if necessary.
11. Remove rocker cover gasket from rocker cover.
INSTALLATION
1. Install the rocker cover gasket to rocker cover.
CAUTION:
Check the gasket is not dropped.
2. Install rocker cover.
• Tighten bolts in two steps separately in numerical order as shown in the figure.
: Engine front
1st step : 1.96 N·m (0.20 kg-m,
17 in-lb)
2nd step : 8.33 N·m (0.85 kg-m, 74
in-lb)
3. Install in the reverse order of removal, for the rest of parts.
 Fuel injector and fuel tube
Exploded View
1. Holder
2. Seal ring (white)
3. Backup ring
4. O-ring (blue)
5. Fuel injector
6. Stud bolt
7. Fuel tube assembly
8. Fuel tube insulator
9. Fuel tube protector
10. Fu ...
 Unit removal and installation
Engine assembly
2WD
2WD : Exploded View
1. Washer
2. Upper torque rod (RH)
3. Engine mounting insulator (RH)
4. Rear torque rod bracket
5. Rear torque rod
6. Engine mounting insulator (L ...
Other materials:
Seat belt maintenance
• To clean the seat belt webbing, apply a mild soap solution or any solution
recommended for cleaning upholstery or carpets.
Then wipe with a cloth and allow the seat belts to dry in the shade. Do not allow
the seat belts to retract until they are completely dry.
• If dirt builds up in the ...
Precaution for Supplemental Restraint System (SRS) "AIR BAG" and "SEAT BELT
PRE-TENSIONER"
The Supplemental Restraint System such as “AIR BAG� and “SEAT BELT PRE-TENSIONER�,
used along
with a front seat belt, helps to reduce the risk or severity of injury to the
driver and front passenger for certain
types of collision. Information necessary to service the system safely is
...
Door does not lock/unlock with door lock and unlock
switch
All door
ALL DOOR : Description
All doors do not lock/unlock using door lock and unlock switch.
ALL DOOR : Diagnosis Procedure
1.CHECK DOOR LOCK AND UNLOCK SWITCH
Check door lock and unlock switch. Refer to the following.
• Driver side: Refer to DLK-391, "DRIVER SIDE : Component Funct ...
