
Nissan Leaf 2018-2025 (ZE1) Owner's Manual : How to normal charge (AC 220-240 volt) by charging device
WARNING
- If you utilize any medical electronic devices, such as an implantable cardiac pacemaker or an implantable cardiovascular defibrillator, please consult with the manufacturer of that device regarding the potential effects that the electromagnetic environment during charging may have on its operation. Always confirm safety protocols with your medical provider before initiating a charge for your Nissan Leaf.
- Always adhere strictly to the installation and operational precautions provided for any charging equipment installed in your home. Failure to follow these manufacturer guidelines, or attempting to use improperly installed equipment, poses a significant risk of severe personal injury or death.
CAUTION
Never use charging hardware, cables, or adapters that are not specifically verified as compatible with your Nissan Leaf.
Attempting to use incompatible equipment may result in charging failures, software communication errors, or permanent damage to the vehicle's electrical systems and the high-voltage Li-ion battery pack.
- Normal charging utilizes a dedicated charging device (AC 220-240 volt, 16A or 32A) professionally installed at your residence to replenish the Li-ion battery.
- You can conveniently execute immediate charging, schedule sessions via the charging timer, or initiate remote charging (on models equipped with a Navigation System) while in normal charge mode. For deeper insights into these features, please refer to the "Charging methods" section of your owner’s manual.
- Your Nissan Leaf is designed to perform a sophisticated "handshake" protocol with the charging equipment before power transfer begins. If this communication cannot be established—typically because other devices or unauthorized adapters are interfering with the signal—the vehicle will refuse to draw power to protect the internal systems.
- NISSAN strongly recommends connecting the charging device every time you park your Nissan Leaf at home, even if you do not require an immediate top-up. Keeping the vehicle plugged in ensures you get the maximum benefit from remote climate control and timer-based heating or cooling functions, as these systems can draw energy directly from the grid rather than depleting your battery's stored range.
To start normal charge:
1. Ensure the vehicle is safely secured by pushing the P (Park) position switch and firmly engaging the parking brake.
2. Before attempting to initiate the charging process, ensure the power switch is in the OFF position. If the power switch is left in the ON position, the Nissan Leaf will prevent the Li-ion battery from receiving a charge to maintain system safety.
3. Open the exterior charge port lid and remove the internal protective charge port cap to access the vehicle’s inlet.
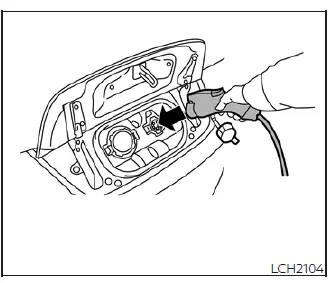
4. Firmly insert the charge connector into the port. A single audible beep will sound to confirm that the connection has been securely established.
5. Once the session begins, or if the vehicle is successfully queued for a scheduled timer charge, you will hear two consecutive beeps. Additionally, the charging status indicator light display on your dashboard will update to reflect the new state. For more details on what these patterns mean, please consult the "Charging status indicator lights" section.
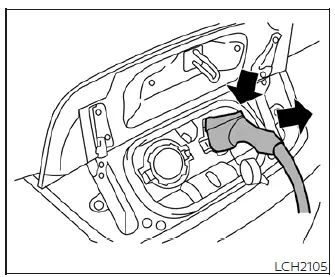
To stop normal charge:
1. Confirm that the charge connector lock is disengaged. If you encounter resistance, please refer to the "Charge connector lock system" section for release procedures.
2. Firmly press the release button on the charge connector handle to disengage the mechanical lock, then carefully extract the connector from the port and return it to its designated storage location.
3. Secure the internal charge port cap firmly into place.
4. Once the cap is sealed, close the exterior charge port lid until it clicks into the locked position.
NOTE:
Should you need to stop the session mid-charge, simply remove the charge connector from the inlet. The Nissan Leaf will automatically detect the disconnection and instantly cease all power transfer to ensure safety.
 Types of charge and how to charge the Li-ion battery
*1: V2X (Vehicle to everything); The EV supplies electric power to a home or a building, etc. (e.g., Vehicle to Home (V2H), Vehicle to Building (V2B), Vehic ...
 How to trickle charge (AC 110-120 volt) by L1 EVSE
WARNING
If you utilize a pacemaker or an implantable cardiovascular defibrillator (ICD), ensure you maintain a minimum distance of 6 inches (15 cm) from the EVSE (Electric Vehicle Suppl ...
Other materials:
Rear fog lamp
Exploded View
REMOVAL
1. Rear fog lamp
DISASSEMBLY
1. Rear fog lamp housing
2. Rear fog lamp bulb
3. Rear fog lamp bulb sock
Removal and Installation
CAUTION:
Disconnect battery negative terminal or remove the fuse.
REMOVAL
1. Insert any appropriate tool into the gap between the rea ...
Door motor
Diagnosis Procedure
NOTE:
If all of door motor DTCs are detected, check this circuit.
1.CHECK DOOR MOTOR POWER SUPPLY
1. Turn ignition switch ON.
2. Check voltage between intake door motor harness connector and ground.
Is the inspection result normal?
YES >> GO TO 2.
NO >> ...
Front seats
Front manual seat adjustment
Forward and backward:
Pull the lever1 up and hold it while you slide the seat forward or backward
to the desired position. Release the lever to lock the seat in position.
Reclining:
To recline the seatback, pull the lever2 up and lean back. To bring the seatback ...
