Nissan Juke Service and Repair Manual : Control linkage
Exploded View
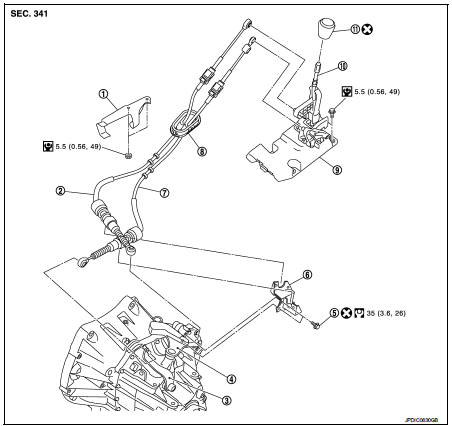
1. Bracket
2. Shifter cable
3. Selector lever
4. Shifter lever A
5. Tapping bolt
6. Cable mounting bracket
7. Selector cable
8. Grommet
9. M/T shift selector assembly
10. Shifter lever
11. Shifter lever knob
 : Always replace after every
disassembly.
 : N·m (kg-m, ft-lb)
 : N·m (kg-m, in-lb)
Removal and Installation
REMOVAL
1. Shift the shifter lever to the neutral position.
2. Remove air cleaner case. Refer to EM-26, "Removal and Installation" (MR16DDT) or EM-280, "Removal and Installation" (K9K).
3. Remove bracket (1), as per the following procedure.
 : Vehicle front
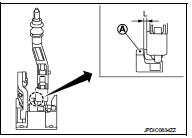
a. Disconnect clips (A) from bracket.
b. Remove bolts (B) from bracket.
c. Remove bracket.
4. Pull out and disconnect the each cable from the shifter lever A and the selector lever, using a suitable remover.

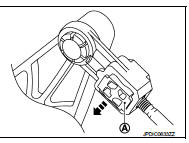
5. While pressing the lock of the selector cable in the direction of the arrow shown in the figure, remove the selector cable from the cable mounting bracket.
6. While pressing the lock of the shifter cable in the direction of the arrow shown in the figure, remove the shifter cable from the cable mounting bracket.
7. Remove cable mounting bracket from transaxle case.
8. Pull the shifter lever knob upward to remove.
9. Remove center console assembly. Refer to IP-23, "Removal and Installation".
10. Pull out and disconnect the shifter cable from the pin of the M/T shift selector assembly, using a suitable remover.
11. Pull up the stopper (A) of the selector cable in the direction of the arrow as shown in the figure.
12. Pull out and disconnect the selector cable from the pin of the M/ T shift selector assembly, using a suitable remover.
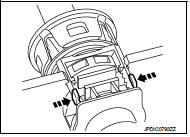
13. While pressing the lock of the selector cable in the direction of the arrow shown in the figure, remove the selector cable from the M/T shift selector assembly.
14. While pressing the lock of the shifter cable in the direction of the arrow shown in the figure, remove the shifter cable from the M/T shift selector assembly.
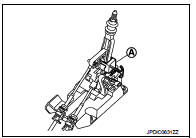
15. Remove the M/T shift selector assembly.
16. Remove three way catalyst and heat plate. (MR16DDT) Refer to EX-6, "Removal and Installation".
17. Remove diesel particulate filter assembly and heat plate. (K9K) Refer to EX-17, "Removal and Installation".
18. Remove the bracket from the vehicle.
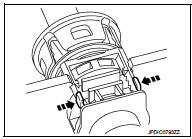
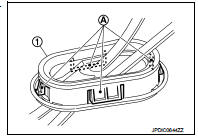
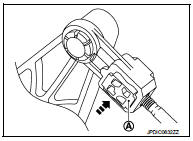
19. Disengage the pawls (A) of the grommet (1), and pull downwards to remove.
20. Remove the shifter cable and selector cable from the vehicle.
INSTALLATION
Note the following, and install in the reverse order of removal.
CAUTION:
• Install each cable without causing interference with other parts, a 120 mm
(4.72 in)-or-less bend, and
a 180-degrees-or-more twist.
• Install boot of each cable without causing interference with other parts and a 90-degrees-or-more twist.
• Fit boot of to center console assembly the groove on shifter lever knob.
• To install the shifter lever knob, press it into the shifter lever.
CAUTION:
• Never reuse shifter lever knob.
• Be careful with orientation of shifter lever knob.
• Tapping work for tapping bolts is not applied to new transaxle case. Do not perform tapping by other than screwing tapping bolts because tapping is formed by screwing tapping bolts into transaxle case.
CAUTION:
Never reuse tapping bolt.
• Insert the each cable until it reaches the cable mounting bracket and M/T shift selector assembly.
• Insert the each cable until it reaches the shifter lever A and the selector lever.
• Shift the shifter lever to the neutral position.
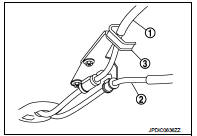
• Install the shifter cable (1) and the selector cable (2) to the bracket (3) as shown in the figure.
Install the selector cable (the M/T shift selector assembly side), as per the following procedure.
When M/T shift selector assembly is replaced: 1. Install the selector cable to the M/T shift selector assembly.
2. Shift the shifter lever to the neutral position.
3. Install the lever stopper (A) to the M/T shift selector assembly as shown in the figure.
CAUTION:
Selector cable cannot be adjusted accurately without using
the lever stopper.
4. Check that the shifter lever does not move in the direction of the select. If it moves, repeat step 3.
5. Insert the stopper (A) until it reaches the selector cable.
6. Remove the lever stopper from the M/T shift selector assembly.
7. Shift the shifter lever to each gear position to check that there are no bindings. If any, repeat step 3.
When M/T shift selector assembly is not replaced: 1. Install the selector cable to the M/T shift selector assembly.
2. Shift the shifter lever to the 4th gear position.
3. Adjust the length “L” between the stopper (A) and the lever to the standard value.
Length “L” : 3.51 – 4.11 mm (0.1382 – 0.1618 in)
4. Insert the stopper (A) until it reaches the selector cable.
5. Shift the shifter lever to each gear position to check that there are no bindings. If any, repeat step 3.

Inspection
INSPECTION AFTER INSTALLATION
Shifter Lever Knob
Check that the shifter lever knob is installed in the right position.
Shifter Cable and Selector Cable • Pull each cable in the removal direction to check that it dose not disconnect from the cable mounting bracket.
• Pull each cable in the removal direction to check that it dose not disconnect from the M/T shift selector assembly.
• Pull grommet in the removal direction to check that it dose not disconnect from the vehicle.
M/T Shift Selector Assembly and Shifter Lever • Check that there is no tangle, hook, abnormal sound, looseness, and interference when the shifter lever is moved to each position. If there is a malfunction, then repair or replace the malfunctioning part.
• Check that the shifter lever smoothly returns to the neutral position after moving the lever from 1st to 2nd gear and moving hands off the lever. If there is a malfunction, then repair or replace the malfunctioning part.
• Check that the shifter lever smoothly returns to the neutral position after moving the lever from 5th to 6th gear and moving hands off the lever. If there is a malfunction, then repair or replace the malfunctioning part.
 Position switch
Removal and Installation
REMOVAL
1. Remove air cleaner case. (K9K) Refer to EM-280, "Removal and
Installation".
2. Remove battery. (MR16DDT) Refer to PG-124, "Removal and Installat ...
 Air breather hose
MR16DDT : Exploded View
1. Clip
2. Air breather hose
3. 2 way connector
MR16DDT : Removal and Installation
REMOVAL
1. Remove air cleaner case. Refer to EM-26, "Removal and Installation& ...
Other materials:
Precaution Necessary for Steering Wheel Rotation after Battery Disconnect
NOTE:
• Before removing and installing any control units, first turn the ignition
switch to the LOCK position, then disconnect
both battery cables.
• After finishing work, confirm that all control unit connectors are connected
properly, then re-connect both
battery cables.
• Always us ...
B2622 inside antenna
DTC Logic
DTC DETECTION LOGIC
DTC CONFIRMATION PROCEDURE
1.PERFORM DTC CONFIRMATION PROCEDURE
1. Select “INTELLIGENT KEY” of “BCM” using CONSULT-III.
2. Select “INSIDE ANT DIAGNOSIS” in “WORK SUPPORT” mode.
3. Perform inside key antenna (“INSIDE ANT DIAGNOSIS”) on “WORK ...
RAB system operation
RAB warning light and dedicated system warning indicator
Steering-wheel-mounted control switches (located on the left side)
Center infotainment and information display
The RAB system is active whenever the shift lever is placed in the R (R ...
