
Nissan Juke Service and Repair Manual : Component parts
Component Parts Location
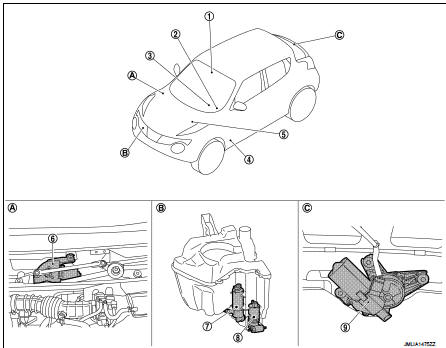
1. Light & rain sensor*1
2. Combination switch
3. Combination meter
4. BCM
Refer to BCS-6, "BODY CONTROL
SYSTEM : Component Parts Location".
5. IPDM E/R Refer to PCS-5, "Component Parts Location" (with Intelligent Key system) or PCS-37, "Component Parts Location" (without Intelligent Key system).
6. Front wiper motor
7. Headlamp washer pump*2
8. Washer pump
9. Rear wiper motor
A. Cowl top, right side of engine room B. Behind front fender protector (RH) C. Back door lower finisher inside
*1: With light & rain sensor models *2: With cold area models
Component Description
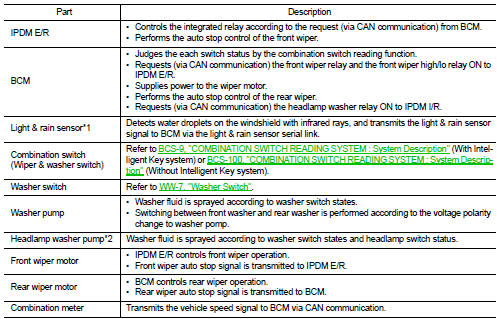
*1: With light & rain sensor models *2: With cold area models
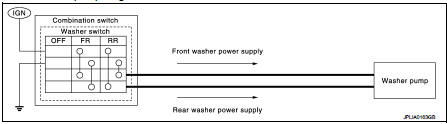
Washer Switch
• Washer switch is integrated with combination switch.
• Combination switch switches polarity between front washer operating and rear washer operating to supply power to the washer pump on ground.

 System
Front wiper and washer system (with light & rain sensor)
FRONT WIPER AND WASHER SYSTEM (WITH LIGHT & RAIN SENSOR) : System
Diagram
FRONT WIPER AND WASHER SYSTEM (WITH LIGHT & RAIN SEN ...
Other materials:
ABS warning lamp
Component Function Check
1.CHECK ABS WARNING LAMP FUNCTION
Check that ABS warning lamp in combination meter turns ON for approx. 1
second after ignition switch is
turned ON.
CAUTION:
Never start engine.
Is the inspection result normal?
YES >> INSPECTION END
NO >> Proceed to B ...
Antenna base
Exploded View
1. Antenna rod
2. Antenna base
: N·m (kg-m, in-lb)
Removal and Installation
REMOVAL
1. Remove headlining. Refer to INT-26, "Exploded View".
2. Disconnect antenna feeder connector.
3. Remove nut to remove antenna base.
INSTALLATION
Install in the reverse order ...
Fuel tank
2WD : Exploded View
1. Fuel filler cap
2. Grommet
3. Fuel filler tube
4. EVAP canister hose
5. Fuel tank mounting band (RH)
6. Fuel tank mounting band (LH)
7. Fuel tank
8. Clamp
9. Fuel filler hose
10. Vent hose
Vehicle front
: N?·m (kg-m, ft-lb)
2WD : Removal and Installation ...
