
Nissan Juke Service and Repair Manual : Combination switch input circuit
Diagnosis Procedure
1.CHECK INPUT 1 - 5 CIRCUIT FOR OPEN
1. Turn ignition switch OFF.
2. Disconnect BCM and combination switch connectors.
3. Check continuity between BCM harness connector and combination switch harness connector.
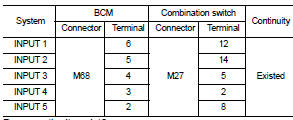
Does continuity exist? YES >> GO TO 2.
NO >> Repair harnesses or connectors.
2.CHECK INPUT 1 - 5 CIRCUIT FOR SHORT
Check for continuity between BCM harness connector and ground.
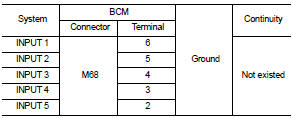
Does continuity exist? YES >> Repair harnesses or connectors.
NO >> GO TO 3.
3.CHECK BCM INPUT SIGNAL
1. Connect BCM and combination switch connectors.
2. Turn ON any switch in the system that is malfunction.
3. Check voltage between BCM harness connector and ground.
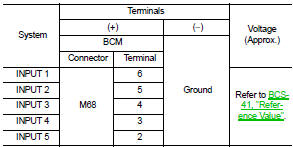
Is the measurement value normal? Yes >> Replace BCM. Refer to BCS-93, "Removal and Installation".
No >> Replace combination switch.
 Combination switch output circuit
Diagnosis Procedure
1.CHECK OUTPUT 1 - 5 CIRCUIT FOR OPEN
1. Turn ignition switch OFF.
2. Disconnect BCM and combination switch connectors.
3. Check continuity between BCM harness connector and co ...
 Symptom diagnosis
COMBINATION SWITCH SYSTEM SYMPTOMS
Symptom Table
1. Perform “Data Monitor� of CONSULT-III to check for any malfunctioning
item.
2. Check the malfunction combinations.
3. Identify the malfu ...
Other materials:
Blower fan on signal
Component Function Check
1.CHECK BLOWER FAN ON SIGNAL
With CONSULT-III
1. Turn ignition switch ON.
2. Select “AIR CONDITIONER� of “BCM� using CONSULT-III.
3. Select “FAN ON SIG� in “DATA MONITOR� mode.
4. Check blower fan ON signal when the fan control dial is operated.
Is t ...
B2608 starter relay
DTC Logic
DTC DETECTION LOGIC
NOTE:
• If DTC B2608 is displayed with DTC U1000, first perform the trouble diagnosis
for DTC U1000. Refer to
BCS-83, "DTC Logic".
• If DTC B2608 is displayed with DTC U1010, first perform the trouble diagnosis
for DTC U1010. Refer to
BCS-84, &qu ...
Keyfob
Replace the battery in the keyfob as follows:
1. Remove the screw.
2. Insert a small screwdriver into the slit of the corner and twist it to separate
the upper part from the lower part. Use a cloth to protect the casing.
3. Replace the battery with a new one.
Recommended battery:
CR1620 or eq ...
