
Nissan Leaf 2018-2025 (ZE1) Owner's Manual : Charge connector lock system
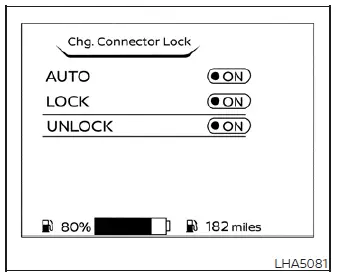
To provide enhanced security and peace of mind during public charging sessions, the Nissan Leaf is equipped with an integrated charge connector lock system. This feature allows you to securely lock your normal or trickle charge connector to the vehicle's charge port, preventing unauthorized removal.
You can easily customize the behavior of this security feature by navigating through the vehicle's settings menu:
1. Press the  button on your steering wheel to select "EV settings," then press the OK button to confirm.
2. Use the navigation buttons  to scroll through the menu until "Chg. Connector Lock" is highlighted, and press OK to access the lock configurations.
NOTE:
The charge connector lock functionality can only be configured or activated when the shift lever is securely in the P (Park) position and the charging cable is physically connected to the vehicle. Please note that the system will not engage the lock if it detects an improper or incomplete connection between the cable and the Nissan Leaf charge port.
AUTO mode
To enable AUTO mode, use the arrow switches to highlight "AUTO" and press the OK button. The corresponding indicator light will illuminate to confirm your selection.
When operating in AUTO mode, the Nissan Leaf automatically secures the charge connector as soon as the charging process begins. Once the battery reaches its full charge state, the system intelligently unlocks the connector, allowing you to easily remove it when you return to your vehicle.
LOCK mode
To select LOCK mode, highlight "LOCK" using the arrow switches and press OK. The LOCK indicator light will illuminate, signaling that the system is active.
In this mode, the charge connector remains firmly locked to your Nissan Leaf at all times, regardless of the charging status. To release the cable, you must manually change the setting to UNLOCK mode or utilize the temporary unlock procedure described below.
UNLOCK mode
To select UNLOCK mode, highlight "UNLOCK" and press OK. The UNLOCK indicator will illuminate.
When this mode is active, the charge connector lock is disabled, and the cable remains unlocked, allowing for immediate removal at any time.
Temporary unlock mode
If your Nissan Leaf is currently in AUTO or LOCK mode, you can still access the connector for a short period without changing your permanent settings by using your NISSAN Intelligent Key or the dedicated charge port lid switch.
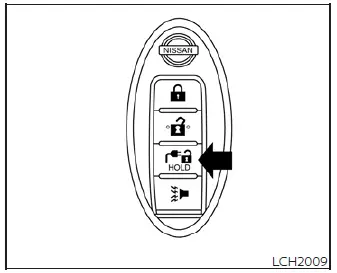
Unlock operation using Intelligent Key
1. Press and hold the charge port lid opener button on your NISSAN Intelligent Key for at least 1 second.
2. You will see the vehicle's charging status indicator light flash three times, accompanied by three audible beeps. The charge connector lock will disengage for 30 seconds.
3. After this 30-second window, the system will automatically re-lock the connector.
The lock can also be temporarily released for 30 seconds if you unlock the vehicle's doors or the rear hatch (note that in this instance, the status indicator lights will not flash). If you happen to operate the lock mechanism again within that same 30-second window, the connector will re-lock immediately.
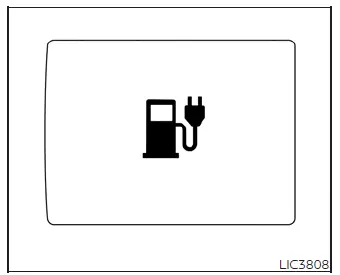
Unlock operation using charge port lid switch
1. Simply push the charge port lid switch located inside the cabin.
2. Similar to the key fob method, the charging status indicator light will flash three times, and you will hear three beeps, confirming the connector is unlocked for 30 seconds.
3. The lock will automatically engage again after the 30-second interval has elapsed.
NOTE:
- Compatibility may vary; depending on the specific charging station hardware and local standards, it may occasionally not be possible to utilize the Nissan Leaf connector lock feature.
- Should your power source be interrupted while charging in AUTO mode, the connector will remain securely locked for 5 minutes before automatically releasing.
- If you have scheduled timer charging while in AUTO mode, the connector will not lock until the actual charging process commences.
- The charge connector lock will not engage if the vehicle is currently managing climate control timers, remote climate control, or the Li-ion battery warmer, or if the 12-volt battery is undergoing a separate charging cycle.
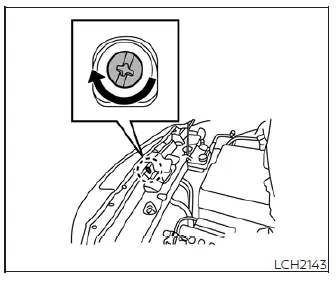
If the charge connector cannot be unlocked
1. Ensure the power switch of your Nissan Leaf is moved to the OFF position.
2. Open the hood to access the internal charge port area.
3. Insert a flat-head screwdriver or a similarly suitable tool into the manual release screw located at the front of the hood lock/charge port assembly.
4. Carefully rotate the tool clockwise; this action will manually release the charge connector lock.
5. You can now safely remove the charge connector from your vehicle.
 How to charge/discharge using the quick charge port
The advanced V2X (Vehicle-to-Everything) technology allows your Nissan Leaf to act as a powerful mobile energy resource, enabling the vehicle to supply electricity to a variety of external systems, in ...
 Charging methods
...
Other materials:
P2263 TC system
DTC Logic
DTC DETECTION LOGIC
Diagnosis Procedure
1.CHECK VACUUM HOSES AND VACUUM GALLERY
1. Turn ignition switch OFF.
2. Check vacuum hoses and vacuum gallery for clogging, cracks
or improper connection. Refer to EC-825, "TURBOCHARGER
BOOST CONTROL : Vacuum Hose Drawing".
Is t ...
Brake pedal
Exploded View
WITHOUT ESP
1. Clevis pin
2. Brake pedal assembly
3. Brake pedal pad
4. Stop lamp switch
5. Clip
6. Snap pin
: Apply multi-purpose grease.
: N·m (kg-m, ft-lb)
WITH ESP
1. Clevis pin
2. Brake pedal assembly
3. Brake pedal pad
4. Brake switch/brake pedal position ...
Back door request switch
Component Function Check
1.CHECK FUNCTION
1. Select “INTELLIGENT KEY� of “BCM� using CONSULT-III.
2. Select “REQ SW-BD/TR� in “DATA MONITOR� mode.
3. Check that the function operates normally according to the following
conditions.
Is the inspection result normal?
YES >&g ...
