
Nissan Juke Service and Repair Manual : Blower motor
Diagnosis Procedure
1.CHECK FUSE
1. Turn ignition switch OFF.
2. Check following fuses.
- 10A fuse [No. 15, located in fuse block (J/B)] - 15A fuses [Nos. 14 and 16, located in fuse block (J/B)]
NOTE
:
Refer to PG-22, "Fuse, Connector and Terminal Arrangement".
Is the inspection result normal? YES >> GO TO 2.
NO >> Replace the blown fuse after repairing the affected circuit if a fuse is blown.
2.CHECK BLOWER MOTOR POWER SUPPLY
1. Disconnect blower motor connector.
2. Turn ignition switch ON.
3. Check voltage between blower motor harness connector and ground.

Is the inspection result normal? YES >> GO TO 4.
NO >> GO TO 3.
3.CHECK BLOWER RELAY
1. Turn ignition switch OFF.
2. Check blower relay. Refer to HAC-82, "Component Inspection (Blower Relay)".
Is the inspection result normal? YES >> Repair harness or connector between blower motor and fuse.
NO >> Replace blower relay.
4.CHECK BLOWER MOTOR CONTROL CIRCUIT
1. Turn ignition switch OFF.
2. Connect blower motor connector.
3. Disconnect power transistor connector.
4. Turn ignition switch ON.
5. Check voltage between power transistor harness connector and ground.

Is the inspection result normal? YES >> GO TO 6.
NO >> GO TO 5.
5.CHECK BLOWER MOTOR CONTROL CIRCUIT FOR OPEN
1. Turn ignition switch OFF.
2. Disconnect blower motor connector.
3. Check continuity between power transistor harness connector and blower motor harness connector.

Is the inspection result normal? YES >> Replace blower motor. Refer to VTL-15, "Removal and Installation (LHD models)" or VTL-16, "Removal and Installation (RHD models)".
NO >> Repair harness or connector.
6.CHECK A/C AUTO AMP. IGNITION POWER SUPPLY
1. Turn ignition switch OFF.
2. Disconnect A/C auto amp.
3. Turn ignition switch ON.
4. Check voltage between A/C auto amp. harness connector and ground.

Is the inspection result normal? YES >> GO TO 7.
NO >> Repair harness or connector between A/C auto amp. and fuse.
7.CHECK POWER TRANSISTOR IGNITION POWER SUPPLY
Check voltage between power transistor harness connector and ground.

Is the inspection result normal? YES >> GO TO 8.
NO >> Repair harness or connector between power transistor and fuse.
8.CHECK POWER TRANSISTOR GROUND CIRCUIT FOR OPEN
1. Turn ignition switch OFF.
2. Check continuity between power transistor harness connector and ground.

Is the inspection result normal? YES >> GO TO 9.
NO >> Repair harness or connector.
9.CHECK POWER TRANSISTOR CONTROL SIGNAL
1. Connect blower motor connector and A/C auto amp. connector.
2. Turn ignition switch ON.
3. Set air outlet to VENT.
4. Change fan speed from 1st – 7th, and check duty ratios between blower motor harness connector and ground by using an oscilloscope.
NOTE
:
Calculate the drive signal duty ratio as shown in the figure.
T2 = Approx. 1.6 ms
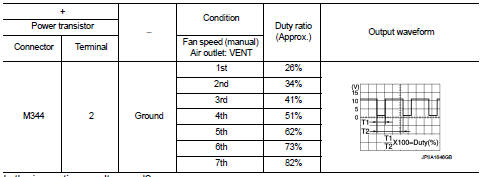
Is the inspection result normal? YES >> Replace power transistor. Refer to HAC-97, "Removal and Installation".
NO >> GO TO 10.
10.CHECK POWER TRANSISTOR CONTROL SIGNAL CIRCUIT FOR OPEN
1. Turn ignition switch OFF.
2. Disconnect power transistor connector and A/C auto amp. connector.
3. Check continuity between power transistor harness connector and A/C auto amp. harness connector.

Is the inspection result normal? YES >> GO TO 11.
NO >> Repair harness or connector.
11.CHECK POWER TRANSISTOR CONTROL SIGNAL CIRCUIT FOR SHORT
Check continuity between power transistor harness connector and ground.

Is the inspection result normal? YES >> Replace A/C auto amp. Refer to HAC-91, "Removal and Installation".
NO >> Repair harness or connector.
Component Inspection (Blower Motor)
1.CHECK BLOWER MOTOR
1. Remove blower motor. Refer to VTL-15, "Removal and Installation (LHD models)" or VTL-16, "Removal and Installation (RHD models)".
2. Check that there is not any mixing foreign object in the blower motor.
Is the inspection result normal? YES >> GO TO 2.
NO >> Replace blower motor. Refer to VTL-15, "Removal and Installation (LHD models)" or VTL-16, "Removal and Installation (RHD models)".
2.CHECK BLOWER MOTOR
Check that there is not breakage or damage in the blower motor.
Is the inspection result normal? YES >> GO TO 3.
NO >> Replace blower motor. Refer to VTL-15, "Removal and Installation (LHD models)" or VTL-16, "Removal and Installation (RHD models)".
3.CHECK BLOWER MOTOR
Check that blower motor turns smoothly.
Is the inspection result normal? YES >> INSPECTION END
NO >> Replace blower motor. Refer to VTL-15, "Removal and Installation (LHD models)" or VTL-16, "Removal and Installation (RHD models)"
Component Inspection (Blower Relay)
1.CHECK BLOWER RELAY
1. Remove blower relay. Refer to PG-22, "Fuse, Connector and Terminal Arrangement".
2. Check continuity between blower relay terminal 3 and 5 when the voltage is supplied between terminal 1 and 2.

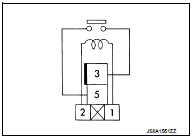
Is the inspection result normal? YES >> INSPECTION END
NO >> Replace blower relay.
 Blower fan on signal
Component Function Check
1.CHECK BLOWER FAN ON SIGNAL
With CONSULT-III
1. Turn ignition switch ON.
2. Select “AIR CONDITIONER� of “BCM� using CONSULT-III.
3. Select “FAN ON SIG� in †...
 Magnet clutch
Component Function Check
1.CHECK MAGNET CLUTCH OPERATION
Perform auto active test of IPDM E/R. Refer to PCS-12, "Diagnosis
Description" (with Intelligent Key) or PCS-
43, "Diagnosi ...
Other materials:
Check anti-pinch function
Description
If any of the following operations are performed, the initialization is
necessary for normal operation of antipinch
function.
• Disconnection and connection of battery cable from negative terminal.
• When power window main switch replaced.
• Electric power supply to power ...
For side and rollover collision : When SRS is not activated in a collision
CAUTION:
Due to varying models and option levels, not all parts listed in the chart below
apply to all vehicles.
WORK PROCEDURE
1. Before performing any of the following steps, ensure that all vehicle body
and structural repairs have been
completed.
2. Check the SRS components and the rel ...
Brake system
BRAKING PRECAUTIONS
The brake system has two separate hydraulic circuits. If one circuit malfunctions,
you will still have braking at two wheels.
You may feel a small click and hear a sound when the brake pedal is fully depressed
slowly.
This is not a malfunction and indicates that the brake ...
