Nissan Juke Service and Repair Manual : Battery charging chart
Slow Charge
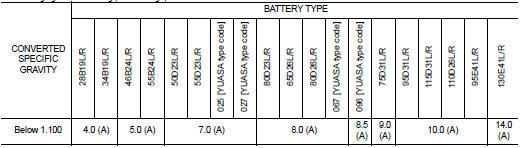
1.DETERMINE INITIAL CHARGING CURRENT
1. Determine initial charging current from specific gravity.
2. Check battery type and determine the specified current using the table.
NOTE
:
After starting charging, adjustment of charging current is not necessary.
Initial Charging Current Setting (Slow Charge)
>> GO TO 2.
2.CHARGE BATTERY
1. Charge battery.
2. Check charge voltage 30 minutes after starting the battery charge.
Is the voltage between 12 V and 15 V? YES >> GO TO 3.
NO >> Replace battery.
3.CHARGE BATTERY
Continue to charge for 12 hours.
>> GO TO 4.
4.CHECKING SPECIFIC GRAVITY
Check specific gravity. Refer to PG-111, "How to Handle Battery".
Is the specific gravity 1.240 or more? YES >> Complete slow charge. Perform ŌĆ£CAPACITY TESTŌĆØ. Refer to PG-113, "Work Flow".
NO >> GO TO 5.
5.CONDUCT ADDITIONAL CHARGE
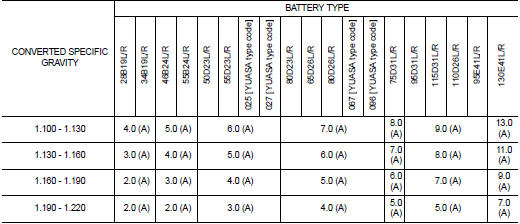
Add charging time depending on specific gravity.
Additional Charge (Slow Charge)

>> Complete slow charge. Perform ŌĆ£CAPACITY TESTŌĆØ. Refer to PG-113, "Work Flow".
CAUTION:
ŌĆó Set charging current to value specified in ŌĆ£Initial Charging Current Setting
(Slow Charge)ŌĆØ. If charger
is not capable of producing specified current value, set its charging current as
close to that value as
possible.
ŌĆó Keep battery away from open flame while it is being charged.
ŌĆó When connecting charger, connect leads first, then turn on charger. Never turn on charger first, as this may cause a spark.
ŌĆó If battery temperature rises above 55┬░C (131┬░F), stop charging. Always charge battery when its temperature is below 55┬░C (131┬░F).
Standard Charge
1.DETERMINE INITIAL CHARGING CURRENT
1. Determine initial charging current from specific gravity.
2. Check battery type and determine the specified current using the table.
NOTE
:
After starting charging, adjustment of charging current is not necessary.
Initial Charging Current Setting (Standard Charge)
>> GO TO 2.
2.CHARGE BATTERY
Charge battery for 8 hours.
>> GO TO 3.
3.CHECKING SPECIFIC GRAVITY
Check specific gravity. Refer to PG-111, "How to Handle Battery".
Is the specific gravity 1.240 or more? YES >> Complete standard charge. Perform ŌĆ£CAPACITY TESTŌĆØ. Refer to PG-113, "Work Flow".
NO >> GO TO 4.
4.CONDUCT ADDITIONAL CHARGE
Add charging time depending on specific gravity.
Additional Charge (Standard Charge)

>> Complete standard charge. Perform ŌĆ£CAPACITY TESTŌĆØ. Refer to PG-113, "Work Flow".
CAUTION
:
ŌĆó Never use standard charge method on a battery whose specific gravity is less
than 1.100.
ŌĆó Set charging current to value specified in ŌĆ£Initial Charging Current Setting (Standard Charge)ŌĆØ. If charger is not capable of producing specified current value, set its charging current as close to that value as possible.
ŌĆó Keep battery away from open flame while it is being charged.
ŌĆó When connecting charger, connect leads first, then turn on charger. Never turn on charger first, as this may cause a spark.
ŌĆó If battery temperature rises above 55┬░C (131┬░F), stop charging. Always charge battery when its temperature is below 55┬░C (131┬░F).
Quick Charge
1.DETERMINE INITIAL CHARGING CURRENT
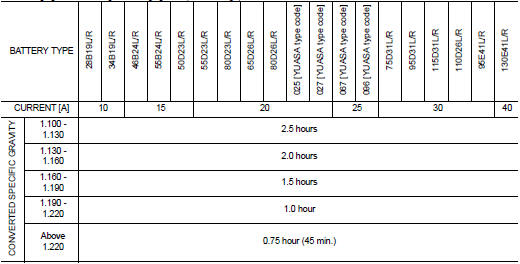
1. Determine initial charging current setting and charging time from specific gravity.
2. Check battery type and determine the specified current using the table.
NOTE
:
After starting charging, adjustment of charging current is not necessary.
Initial Charging Current Setting and Charging Time (Quick Charge)
CAUTION:
ŌĆó Never use quick charge method on a battery whose specific gravity is less than
1.100.
ŌĆó Set initial charging current to value specified in ŌĆ£Initial Charging Current Setting and Charging Time (Quick Charge)ŌĆØ. If charger is not capable of producing specified current value, set its charging current as close to that value as possible.
ŌĆó Keep battery away from open flame while it is being charged.
ŌĆó When connecting charger, connect leads first, then turn on charger. Never turn on charger first, as this may cause a spark.
ŌĆó Be careful of a rise in battery temperature because a large current flow is required during quickcharge operation.
If battery temperature rises above 55┬░C (131┬░F), stop charging. Always charge battery when its temperature is below 55┬░C (131┬░F).
ŌĆó Never exceed the charging time specified in ŌĆ£Initial Charging Current Setting and Charging Time (Quick Charge)ŌĆØ, because charging battery over the charging time can cause deterioration of the battery.
>> GO TO 2.
2.CHARGE BATTERY
Charge battery.
>> Complete quick charge. Perform ŌĆ£CAPACITY TESTŌĆØ. Refer to PG-113, "Work Flow".
 Fusible link inspection
How To Check
A melted fusible link can be detected either by visual inspection or by
feeling with finger tip. If its condition is questionable, use circuit
tester or test lamp.
1 :Fusible link
CA ...

Other materials:
P0340 CMP sensor (phase)
DTC Logic
DTC DETECTION LOGIC
NOTE:
If DTC P0340 is displayed with DTC P0643, first perform the trouble diagnosis
for DTC P0643. Refer to
EC-686, "DTC Logic".
DTC CONFIRMATION PROCEDURE
1.PRECONDITIONING
If DTC Confirmation Procedure has been previously conducted, always turn
...
Waxing
Regular waxing protects the paint surface and helps retain new vehicle appearance.
Polishing is recommended to remove built-up wax residue and to avoid a weathered
appearance before reapplying wax.
A NISSAN dealer can assist you in choosing the proper product.
ŌĆó Wax your vehicle only after a ...
Wiring diagram
AUTOMATIC AIR CONDITIONING SYSTEM
Wiring Diagram
For connector terminal arrangements, harness layouts, and alphabets in a
(option abbreviation; if not
described in wiring diagram), refer to GI-12, "Connector Information/Explanation
of Option Abbreviation".
...
