Nissan Juke Service and Repair Manual : Basic inspection
DIAGNOSIS AND REPAIR WORK FLOW
Work Flow
OVERALL SEQUENCE
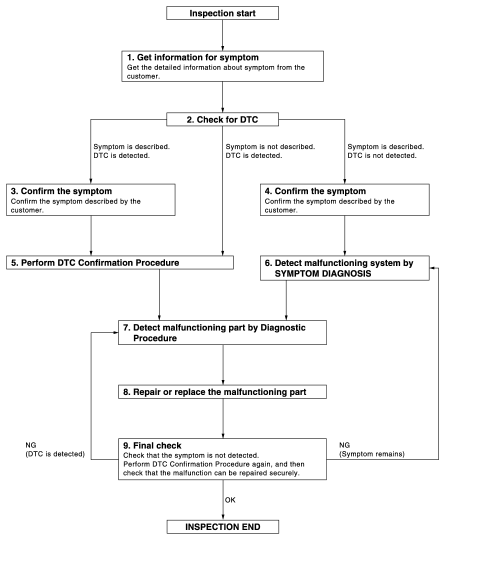
DETAILED FLOW
1.GET INFORMATION FOR SYMPTOM
1. Get detailed information from the customer about the symptom (the condition and the environment when the incident/malfunction occurred).
2. Check operation condition of the function that is malfunctioning.
>> GO TO 2.
2.CHECK FOR DTC
1. Check BCM for DTC.
2. Perform the following procedure if DTC is displayed.
- Record DTC and freeze frame data (print them out with CONSULT-III).
- Erase DTC.
- Study the relationship between the cause detected by DTC and the symptom described by the customer.
3. Check related service bulletins for information.
Are any symptoms described or any DTC detected? Symptom is described, DTC is displayed>>GO TO 3.
Symptom is described, DTC is not displayed>>GO TO 4.
Symptom is not described, DTC is displayed>>GO TO 5.
3.CONFIRM THE SYMPTOM
Confirm the symptom described by the customer.
Connect CONSULT-III to the vehicle in the “DATA MONITOR” mode and check real time diagnosis results.
Verify relation between the symptom and the condition when the symptom is detected.
>> GO TO 5.
4.CONFIRM THE SYMPTOM
Confirm the symptom described by the customer.
Connect CONSULT-III to the vehicle in the “DATA MONITOR” mode and check real time diagnosis results.
Verify relation between the symptom and the condition when the symptom is detected.
>> GO TO 6.
5.PERFORM DTC CONFIRMATION PROCEDURE
Perform DTC Confirmation Procedure for the displayed DTC, and then check that DTC is detected again.
At this time, always connect CONSULT-III to the vehicle, and check diagnostic results in real time.
If two or more DTCs are detected, refer to BCS-66, "DTC Inspection Priority Chart" (BCM) determine trouble diagnosis order.
NOTE: Perform Component Function Check if DTC Confirmation Procedure is not included in Service Manual. This simplified check procedure is an effective alternative though DTC cannot be detected during this check.
If the result of Component Function Check is NG, it is the same as the detection of DTC by DTC Confirmation Procedure.
Is DTC detected? YES >> GO TO 7.
NO >> Refer to GI-42, "Intermittent Incident".
6.DETECT MALFUNCTIONING SYSTEM BY SYMPTOM DIAGNOSIS
Detect malfunctioning system according to SYMPTOM DIAGNOSIS based on the confirmed symptom in step 4, and determine the trouble diagnosis order based on possible causes and symptoms.
>> GO TO 7.
7.DETECT MALFUNCTIONING PART BY DIAGNOSTIC PROCEDURE
Inspect according to Diagnostic Procedure of the system.
NOTE
:
The Diagnostic Procedure described is based on open circuit inspection. A short
circuit inspection is also
required for the circuit check in the Diagnostic Procedure.
Is malfunctioning part detected? YES >> GO TO 8.
NO >> Check voltage of related BCM terminals using CONSULT-III.
8.REPAIR OR REPLACE THE MALFUNCTIONING PART
1. Repair or replace the malfunctioning part.
2. Reconnect parts or connectors disconnected during Diagnostic Procedure again after repair and replacement.
3. Check for DTC. If DTC is displayed, erase it.
>> GO TO 9.
9.FINAL CHECK
When DTC is detected in step 2, perform DTC Confirmation Procedure or Component Function Check again, and then check that the malfunction is completely repaired.
When symptom is described by the customer, refer to confirmed symptom in step 3 or 4, and check that the symptom is not detected.
Does the symptom reappear? YES (DTC is detected)>>GO TO 7.
YES (Symptom remains)>>GO TO 6.
NO >> INSPECTION END
 Wiring diagram
DOOR & LOCK SYSTEM
Wiring Diagram
For connector terminal arrangements, harness layouts, and alphabets in a
(option abbreviation; if not
described in wiring diagram), refer to GI-12, "Conn ...

Other materials:
Starting system (without intelligent key)
CVT : Wiring Diagram
For connector terminal arrangements, harness layouts, and alphabets in a
(option abbreviation; if not
described in wiring diagram), refer to GI-12, "Connector Information/Explanation
of Option Abbreviation".
M/T : Wiring Diagram
For connector terminal arrangem ...
Traction AA, A, B and C
The traction grades, from highest to lowest, are AA, A, B and C. Those grades
represent the tire’s ability to stop on wet pavement as measured under controlled
conditions on specified government test surfaces of asphalt and concrete. A tire
marked C may have poor traction performance.
WARNI ...
Seat belt extenders
If, because of body size or driving position, it is not possible to properly
fit the lap-shoulder belt and fasten it, an extender that is compatible with the
installed seat belts is available that can be purchased. The extender adds approximately
8 in (200 mm) of length and may be used for eit ...
